The MGA With An Attitude
|
| MGAguru.com |
|
MGAguru.com |
SEQUENCE OF ASSEMBLY for MGA Interior -- INT-130
|
On 4/14/2010 -0600, Bill Allen in Norristown, PA, wrote:
"Finishing up an A and now ready to start the interior. What assembly order do you suggest"?
Form follows function. Obviously you can't install seats before carpet. For the interior. I will assume the body is already on the frame, because some of the carpeting lies over body flanges. Also the lower bulkhead panel and tunnel and floorboards must be in place. Chase all captive threads to remove paint so screws can be installed with fingers. You will find #10-32 cage nuts around the heater box opening and 5/16-24 threads in the frame around the goal post parts. Sit in the middle of the cockpit, look around, and install things farthest away from you first, then work inward toward the center point of the interior.
- Install under dash insulation pad that needs glue, if used. Master cylinder and pedal brackets should be in place (but not any pedals), as the under dash pad will fit around the pedal bracket. Most convenient if nothing else is yet mounted on the heater shelf or upper bulkhead. An issue here is to get holes in the pad aligned with holes in the sheet metal so screws, grommets and other parts passing through the bulkhead can be installed later. RT-633
- Install all rubber grommets in the bulkhead where anything will pass through, and plug all unused holes. BD-105
- Seal any gap between top of bulkhead and body top side sheet metal. BD-109
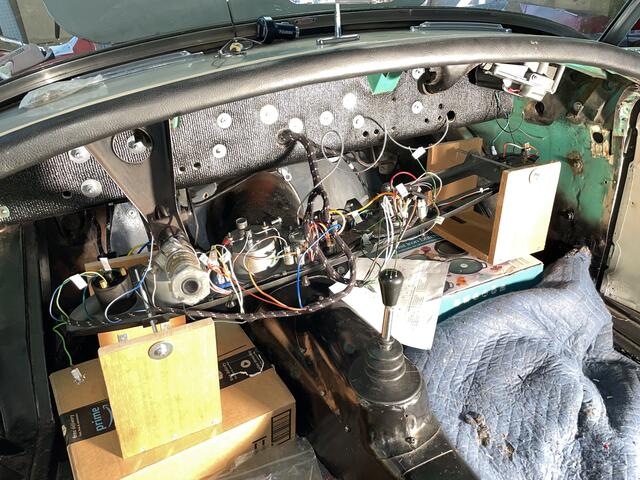
- Here you can install all electrical and mechanical parts that go on the front side of the bulkhead with fasteners passing through the bulkhead, and everything that goes on the heater shelf (except the heater). It is convenient to do this stuff before installing the windscreen. RT-118. Do not install the heater or run the main wiring harness through the bulkhead yet.
- If you have a Coupe or a 1600-MK-II you may want to install the vinyl covering on top of the front body tonneau before installing the windscreen. Test fit the windscreen to determine position for front edge of the vinyl. INT-119
- Install windscreen. WT-102
- Install screen washer jets (if used) AT-105B
- Install screen wiper drive parts. ET-113
- Install defroster chrome trim (directing air toward glass) and sheet metal air ducts.
- Install seat floor rails in whatever manner you like. This pretty much requires temporary test fitting of the seats to have the floor rails properly positioned. Then remove the seats and put the floor rails back in (temporarily), or whatever rail support part you might use, whatever part will protrude through the carpet. INT-109
- Install carpet padding, as much as you will do (not on frame rails or rear vertical floorboard). I like to glue all padding in place. INT-101 Pg-2
- Install carpet, all of it, including carpet on the battery cover and rear wheel wells (if used). INT-101. I like to glue in place all carpet except the tunnel center carpet section (over the gear shift cover) and the floor carpet (under feet and seats). The center tunnel section fits around the rubber shifter boot and gets tucked up under the front tunnel carpet piece, so make provision for a small space there when installing the front section. The center section can be stapled to the floor for security, easy to R&R staples when you need to remove this carpet piece for gearbox service. Carpet on side frame rails lies on top of horizontal body flange and abuts against the door seal mounting ridge. Carpet under feet can be installed with LTD studs for easy removal for cleaning or drying. Carpet under seats, trimmed to fit around seat rails, can be trimmed for close fit in all corners, in which case it lies nicely flat with no fasteners, and can be removed for cleaning or drying.
- Install carpet in boot if used. This can be done any time, even last or after the car is on the road, but is a bit more convenient before a tire cover in the boot would be installed. Also nice to get all of the glue projects finished.
- Install headliner (for Coupe) if not already done. This needs to be done before installation of front and rear windows. Can be done first, but might be left until this point to avoid accidentally messing it up with carpet glue (sticky fingers). CP-104
- Install seat belts if used (any time before seats). This is convenient before tire cover and top frame are in the way, in case you need access through the battery cover, and especially if shoulder harness will be used. Factory lap belts installation requires welded bracket on outer frame rail and screwed bracket on side of tunnel. Shoulder harness requires welded bracket under rear tonneau, or screwed bracket on top of rear tonneau (Workshop Manual Section S.21), or screwed bracket on inner fender (Workshop Manual Section SS.3). All of this should have been worked out before frame and body were painted. A simple lap belt can be attached with bolts through the rear plywood bulkhead in lower corners where the bolts and/or thick washers can contact metal frame parts behind the plywood. INT-121. See several articles starting with INT-120.
- Install spare tire cover, the part that protrudes into the passenger compartment above the battery cover. INT-117. 1600 Coupes do not have this part. If you will use a tire cover in the boot, this should be installed in conjunction with the front tire cover. Originally heavy paper mounting ring goes aft of the bulkhead, rivet heads then go in back before setting rivets. I like to install these with binding head machine screws, lock washers and hex nuts (some people use acorn nuts to be neat) so it can be serviced later, but most people may never remove this part again. You can install the spare tire (and hold down clamp) to "inflate" the tire cover in the cockpit (and in the boot).
- Install tool roll retention web straps where they pass through the rear bulkhead (all except 1600 Coupes). INT-102. Some cars use a small bracket similar to a miniature drawer pull handle, on front side of bulkhead just below the slot in the bulkhead. The web strap passes forward through the slot, down through the bracket, then up in front and back through the slot. If there are no screw holes in this location, then no bracket. In this case the web strap passes forward through the bulkhead slot, down through a cut slot in the tire cover, rearward, then up through another slot cut in the tire cover aft of the bulkhead (if cover is used in the boot).
- Install cockpit trim rolls all around (roadster). Leave the rear trim roll loose (5 screws). More on that later. See several articles starting with INT-104.
- Test install side curtain mounting brackets on doors with screws passing through the interior panels (not yet installed) into the steel door shell. Screw positions in the door shell must not have stripped out holes. If the holes are too large this needs to be repaired (should have been done earlier). Best repair is to plug weld the holes, grind flush, then re-drill the holes small enough for the large sheet metal screws. If you do this, carefully locate the holes in correct position for proper alignment of the bracket relative to side curtain positioning while test fitting side curtains. Remove side curtains and the brackets.
- Install radio antenna, if used. AT-112B
- Install kick panels, door pockets, door panels. The rear kick panels will cover a couple of screws for the rear corner trim rolls, which is why the trim rolls go in before the kick panels. Bolts for the rear wheel forward splash panels are hidden behind the rear kick panels, so be sure those splash panels have been installed prior. Bolts for windscreen posts are hidden behind front kick panels, so the windscreen must be installed prior. INT-103 INT-108
- Final install side curtain brackets and test fit side curtains with panels in place. This is a good time for final adjustment of side curtain brackets shape for best fit of side curtains. Then remove side curtains to be out of the way.
- Install door seals and their chrome end caps. This could be done any time later, even last, but is convenient when the seats and dash are not in the way. There may be some issues with fitting the door seals up to the kick panels. INT-108B
- Install convertible top frame (roadster). This bolts in over the rear kick panels. Installing those screws is convenient when seats are not in the way. Fold and stow the top frame back out of the way over the spare tire.
- Remove rear trim roll to install side curtain stowage bag. INT-107. Place side curtains in the bag while determining height for hanging the bag. For early cars the loaded bag should hang just touching the tunnel carpet. For cars with later style folding top frame and angle bracket on battery cover, the bag should sit on top of the battery cover (although I have yet to figure out how the assembly could actually fit in that position). Only after you have the bag with parts inside being functional, then staple the bag to back of trim roll, and finally cut off excess fabric at the top before permanently attaching the trim roll to body.
Install LTD studs on wall and matching LTD fasteners in side curtain stowage bag (assuming you actually use these parts).
- You can install a tonneau cover at this point, or at least install the LTD studs. TT102. The primary interest here is to get the LTD studs installed in the correct places. Various cover designs place LTD studs in different locations. Short cover needs wood screw studs on the rear trim roll. Long cover needs machine screw studs on the body tonneau just aft of the trim roll. Extra long (aftermarket) cover can attach to the rag top rear mount teardrop brackets. Front LTD studs go on the front body tonneau just ahead of the front trim roll. Different model years used various locations for these studs in front. There is some question if the rear studs ever changed. Standard front studs would be two-screw-flange type with sheet metal screws for easy top side only installation, but more likely machine screw studs outboard from the grab handles (when used in that location). Some cars may have prior installation of machine screw studs with nuts underneath, which is why it is convenient to install these parts before the dash (but not absolutely necessary). Early 1500s had studs on top of the doors (which most people prefer to delete except for concours show). Aftermarket installed tonneau cover could have any arrangement of LTD studs. Remove and store tonneau cover out of the way.
- Install main wiring harness with the large rubber grommet where it passes through the bulkhead. ET-100A. Let the harness dangle for now aft of the bulkhead, but it is recommended to at least install all P-clips on front side of bulkhead while it is still convenient for access to fasteners on both sides of the bulkhead.
- Install dipper switch. ET-114A
- Install heater box with bottom vent parts and duct hoses for defroster vents. HR-1.
- Install steering column lower bracket.
- Install all pedals and linkages, including pedal stop under the throttle pedal. CB-114
- Install steering column top bracket.
- If you have a Coupe or Twin Cam or 1600-MK-II (not Australian CKD origin) you need to install the vinyl covering on the dash before installing anything in the dash. DT-110. Vinyl covered dash panels also get bright trim installed along the bottom edge, and chrome speaker bezel. Install piping on top flange of dash where it mates to the body (all cars). Piping is secured there with Tinnerman clips. Test fit dash panel to body to see how the piping fits.
- Assemble the complete dash assembly on the workbench (without radio). Turn signal indicator lamp housing and map light bulb socket (original style) must ground on the dash panel, so remove paint from dash panel where required for electrical grounding contact. The dash is grounded to body and wiring harness in multiple contact locations, so rest assured that the dash panel will be grounded (unless you install a wood dash panel). When using a wood dash you need to add ground wires to the indicator and map lamps, but everything else in the dash is grounded with black wires in the harness.
- Install all instruments and switches in the dash panel. For the temperature gauge, coil the sensor line and tie it up for protection, or install this gauge last (even after dash is in the car). The only electrical connection here is for grounding the instrument illumination lamp on the mounting bracket. The dash harness can be installed on the work bench, leaving just one single bullet end to be connected later. Dress the dash harness into a nice stable out of the way position (mostly above the instruments and switches) using a few clips or tie wraps when appropriate. ET-101B ET-101C
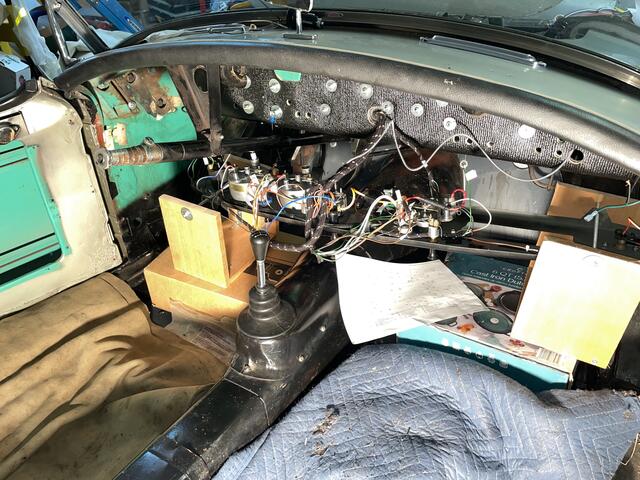
- Offer the dash up to the body momentarily for correct orientation. Sit on the tunnel with dash face down on your knees (or some boxes on the floor) while you connect all wires of the main harness to the dash component terminals. One last wire with bullets connects with a snap connector between dash harness and main harness. If no heater or heater control switch, then install snap connectors to protect those bullet wire ends.

- Offer the dash up to the body and install three screws (large flat washers and lock washers) to attach the dash to the body. One of these screws may be above one of the large instruments with difficult access, so you may find it convenient to remove the instrument mounting bracket and push the instrument out of the dash while installing this screw. When reinstalling the instrument be sure to attach any black grounding wires to the bracket. DT-141
- Install four dash braces from bottom of dash to bottom corner of heater shelf. The heater control panel (if used) gets installed at this time along with two of the braces. HR-104
- Run all control cables through the bulkhead with appropriate rubber grommets For temperature sensor, oil signal line and speedo/tach cables, place rubber grommet on the line first, then pass line through bulkhead and seat grommet in the bulkhead last. DT-102C
- Install hoses for screen washer (if used). AT-105B
- Install radio at your convenience, any time, even after car is on the road. It is convenient to do it here before steering column and seats are installed. Original issue radio speaker attaches to a heavy card stock mounting box which in turn attaches to the speaker grille studs and to the dash braces. Very few of these original speaker mounts are still in use. Otherwise you're on your own for installing speakers or aftermarket radio in any manner you like. AT-112 AT-112B
- Install steering column in passenger compartment and U-joint in engine bay. The column passes through a rubber flat pad seal that is mounted in the lower bulkhead panel.
- Install seats. INT-109 INT-109A
- Install steering wheel. Reference steering alignment SR-106, and get the seering wheel right side up and level.
- Install convertible top canopy any time after the top frame is installed. TT-103
|