The MGA With An Attitude
MGA Guru Is GOING MOBILE - (November 16 - November 30, 2022)
Wednesday, November 16, 2022:
More time went to the backlog of email messages. And someone asked and reminded me that I should be going to the NAMGAR GT-48 in Memphis, Tennessee next June.
 Replacement keyboard for my computer arrived at friend's house today (to be picked up later). Replacement keyboard for my computer arrived at friend's house today (to be picked up later).
Thursday, November 17, 2022:
Completed update of my parts inventory spread sheet from two months ago to current using interim parts orders for added parts and travel log entries for parts used. Also accounting for a few empty baggies in my pocket from parts used used, and I think the end result is pretty accurate, including the wish list for next parts order.
Replacement Batteries (2) for my camera arrived at friend's house today (to be picked up later).
Friday, November 19, 2022:
While updating the parts inventory file, I took time to reorganize it some (wanting to do this for some time). Putting the parts groups in Alphabetical order, similar to the Ziploc baggies in the Magic Trailer (rather than page order from the Moss Motors catalog).
Also made a new group for Clips & Clamps (similar to the group for Seal Washers), and a new group for Fasteners. The idea is if a part is used in more then one group, then make cross reference to the new group to have all inventory of that part in one place. Well, I'm the only one using this spread sheet, so it is supposed to make my life easier in the future.
Getting close to being back to normal after recovery from the computer crash. Time to get back to future planing, and I think we have an appointment for tomorrow. Most of the rest of the day was spend doing data backup from hard drive to a thumb drive (kind of time consuming).
Saturday, November 19, 2022:
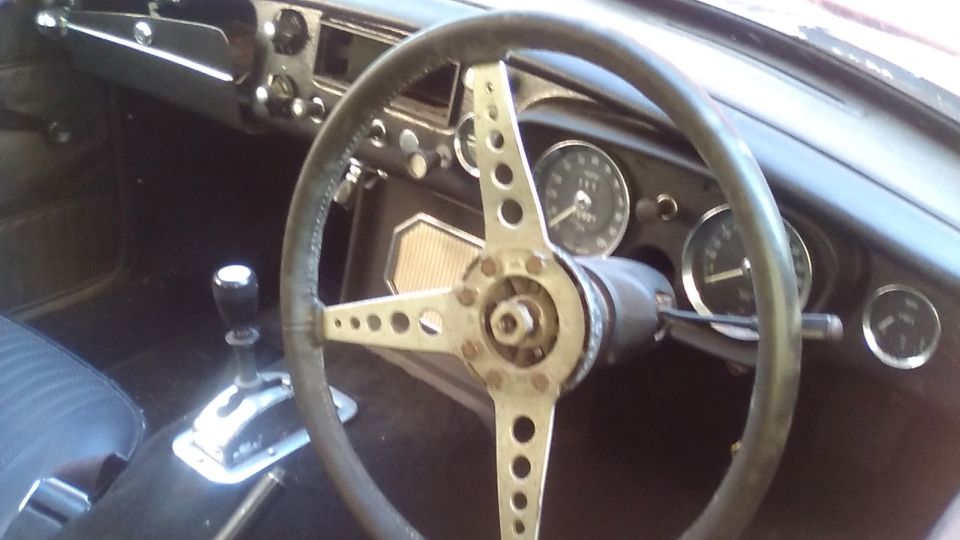
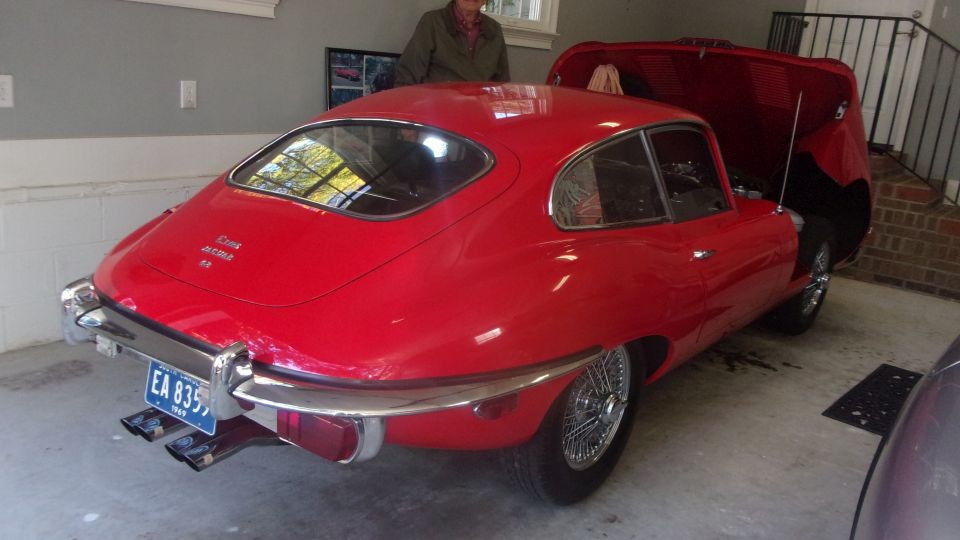
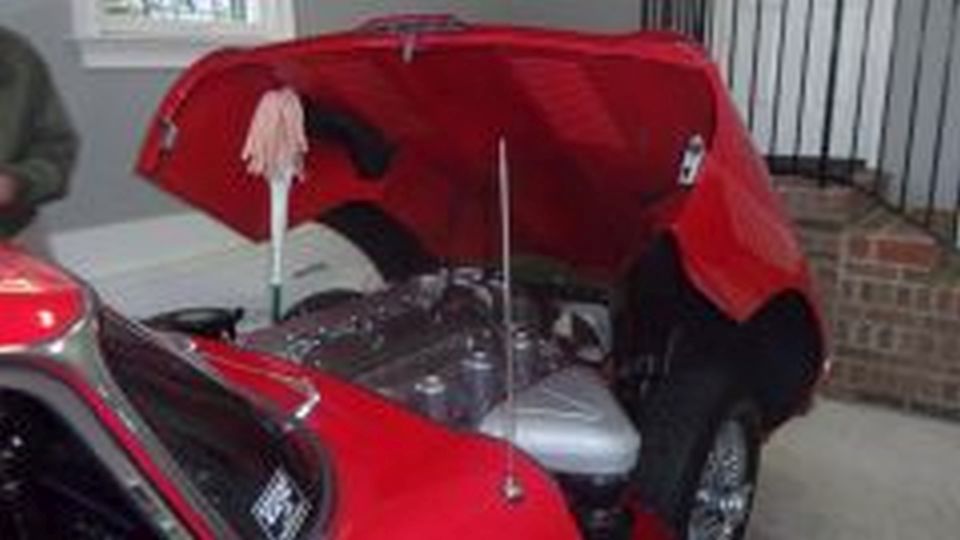
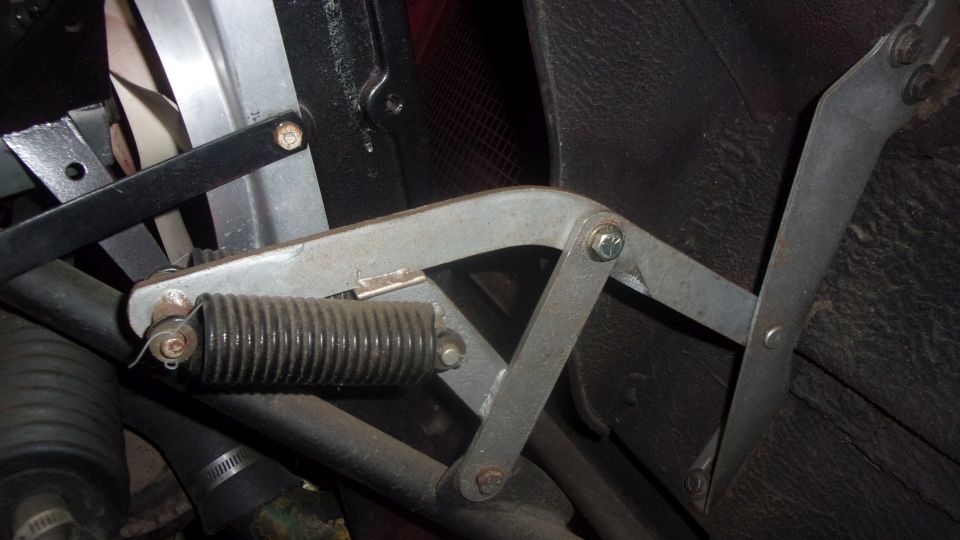
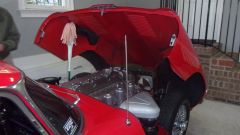
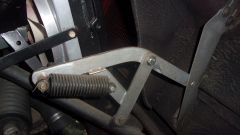
Something to do today, dropping in to visit Elliott Cox in Columbia, SC, to check out his 1978 Jaguar E-type. Same friendly face and same car, but he has moved since our last visit. First problem was a loose and wobbly bonnet when it was raised. Traced this down to a loose pivot bolt in the spring loaded articulated forward hinge. That would be the bolt just right of center in the picture. On the right side the bolt was too short, so the Nyloc nut was only screwed on half way and working loose. On the left side the bolt was long enough, but had a standard hex nut working loose. Found a longer bolt and some flat washers in the Magic Trailer, and sent Elliot off to local hardware store to pick up some Nyloc nuts. Installed one longer bolt and flat washers and Nyloc nuts, snug with minimal free play but not tight, and the bonnet hinges were working again.

There was the Brake Warning light on the dash sometimes blinking sporadically. That was doing exactly what it
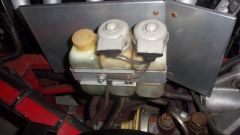
 was supposed to do when brake fluid was low, as the brake reservoirs have a fluid level warning switch. We looked up the spec's to be sure before topping up with DOT-3 fluid, and the light went out.
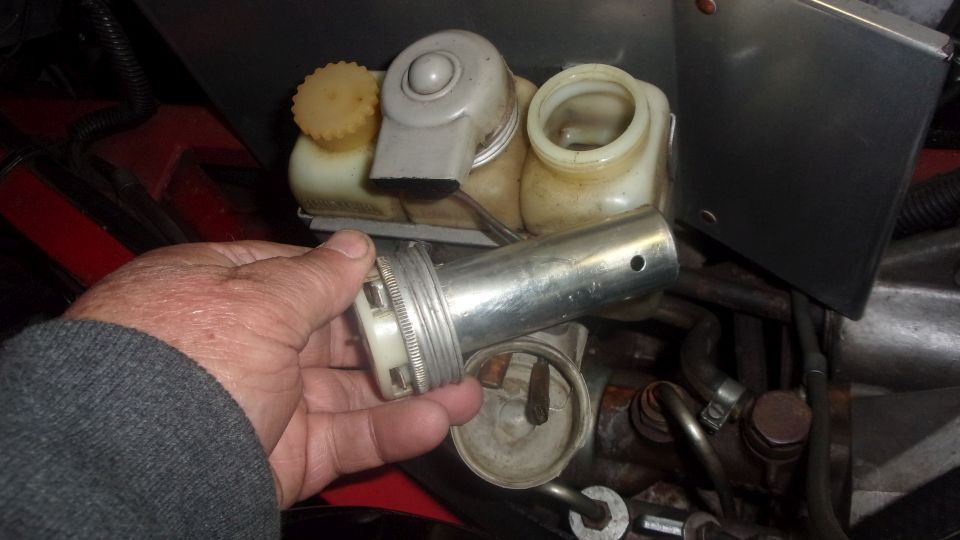
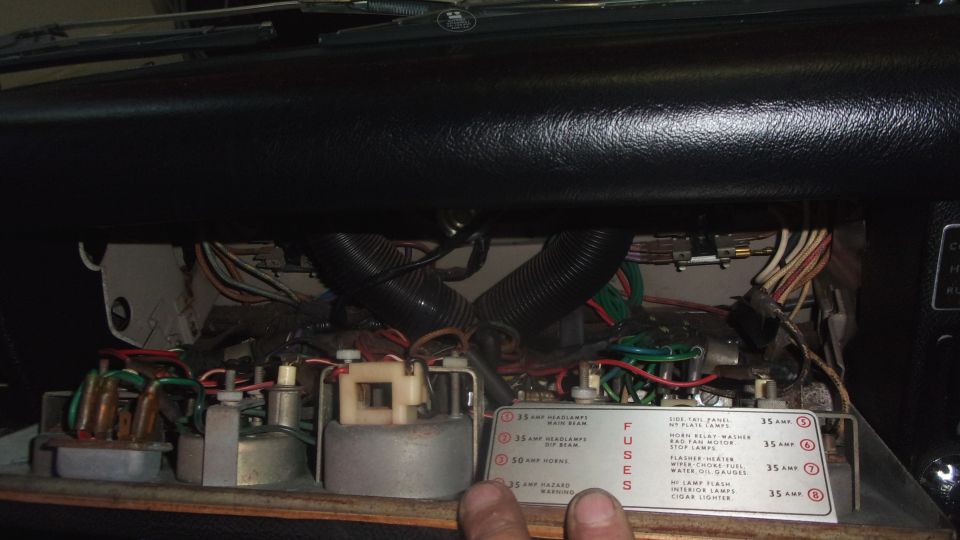
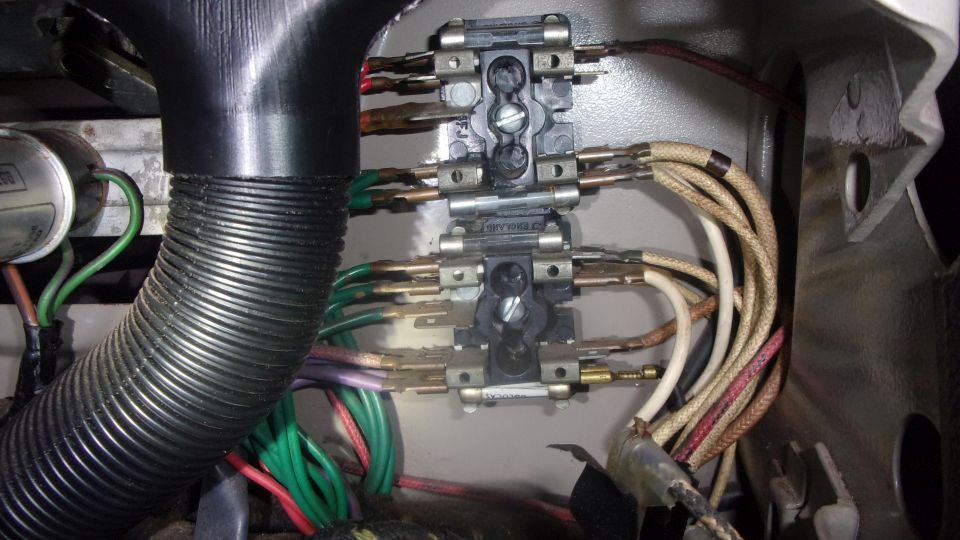
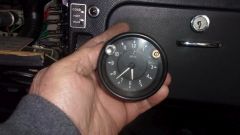
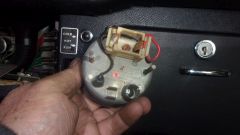
Then he said the headlights were not working, but in fact the tail and side lights also did not work, no exterior lights at all. Remove two thumb screws to fold down the center dash panel, and this looks like one of the more friendly electrical panels, except the moving panel hit the top of the center console and didn't open quite wide enough. Also pretty cramped quarters inside an E-Type when trying to kneel upright with head near the windscreen and hands inside the cubby hole. There was just enough space to get a hand in there to change a fuse, maybe. But no way to get to the plug-on wire connectors until I removed the small demister tubes. Also the clock (large instrument at top center of the panel) was obstructing access to back of the lighting switches (bottom center of the panel), so remove the clock as well (just two thumb screws and one plug-in light). Then have at it with a test light and jumper wire.
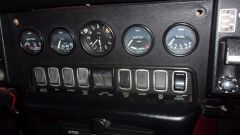
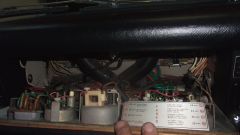

The problem turned out to be a bad contact in a Lucar push-on connector, one of the Brown wires on far left side of the left bank of fuses. Wiggle, wiggle, push and shove, and eventually the lights came on.
 Parking lights were intermittent,and the rocker switch required some fiddling to make the contact. Fiddle, fiddle some more, and click the switch on/off about 50 times, and eventually the contacts cleaned up enough to work reliably (for now). These old cars liker to be driven regularly rather than sitting parked for long periods. Parking lights were intermittent,and the rocker switch required some fiddling to make the contact. Fiddle, fiddle some more, and click the switch on/off about 50 times, and eventually the contacts cleaned up enough to work reliably (for now). These old cars liker to be driven regularly rather than sitting parked for long periods.
Then the headlights could be on with parking lights off (wrong way around). One wire on wrong terminal in back of the headlight switch, fix that and it was sequencing properly.
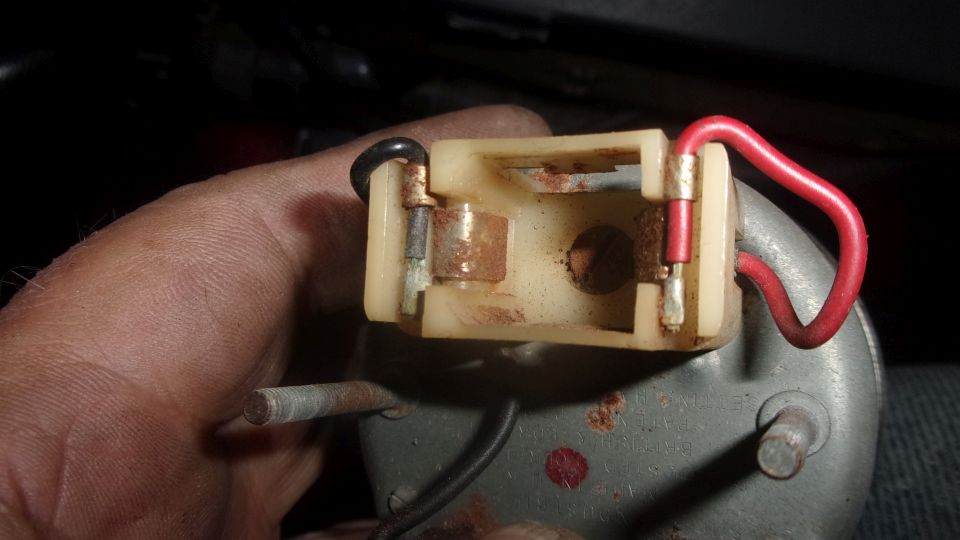
Then a quick look at the non-working clock, since it was already in my hand. One plug-in illumination lamp, and one Black ground wire connection to make the light work. Otherwise self-contained clock. The rectangular socket at top rear is for a dry cell battery, but the battery contacts are badly corroded. Maybe a good contact cleaning could get it working (good luck finding a battery that size). At least that battery is the easiest thing to access when the dash panel is open.

Elliot was due for another appointment around 4-pm, so we were off again to meet Dave Daniel near his office in Cacye, SC, on south side of Columbia (meeting at a truck stop with good WiFi). He had my new computer keyboard and battery (batteries) for the little camera. Not long to get those installed and the computer working, followed by a late lunch and processing these photos and notes. Then found that the camera was not charging with the new battery (when it reported that it was charging). Out of time tonight, check into it again tomorrow.
Sunday, November 20, 2022:
Cooler today, and a bit of rain, good time for a day off to stay indoors. Had navigator checking into the camera charging problem, and neither one of us can figure it out. Two new batteries, each had a little charge when first installed, at least enough to make the camera boot up. Plug the USB cable into the camera to charge it, and the result after a while looks like total discharge. Baffling to say the least. Thinking about buying a stand-alone charger to plug into the wall to charge the batteries, then try again in the camera. Got distracted and didn't get it done.
Did make some email and phone contacts for possible friendly visits with a few more people in the Columbia area, but in the end all leads fell through, no go. Called a friend in Monks Corner, SC with a definite appointment, but not settled on a date yet. He will be busy with the upcoming Thanksgiving holidays, so begging off until next Monday. That's the way it goes with us and holidays, may have to hibernate for a while.
More work on the inventory list for Clips and Clamps, cross referencing Moss Motors and BMC part numbers, getting close to finish.
Monday, November 21, 2022:
Got a call from Tad Ridgell in West Columbia, SC with inquiry about possible help with an MGB. We were anticipating that call for a couple days. Being close by, he dropped in to visit us for a chat that turned into a long chat. Story is that his 1974 MGB-GT, ran when parked, but has been sitting about 10-years, and he would like to revive it. That sounds like a couple days work, and possibly some delay waiting for a parts shipment, so might wipe a week off the calendar. Likely we won't be here in the area that long, but made a tentative appointment to go look at the car tomorrow for inspection and assessment. Problem then is his house is undergoing some repairs and is currently not occupied, garage not available for working on the car, and the car is sitting out in the driveway. This is sounding a lot like a maybe next time proposition.
Tuesday, November 22, 2022:
Plan to check out Tad Ridgell's MGB mid day, after some of his morning appointment. Sitting in a good WiFi spot very close to his current temporary residence (hotel), waiting for the late morning phone call. The whole day passed with no call, don't know what happened to him. Meanwhile got a call from someone else wondering why we weren't somewhere else. Misunderstanding I guess, but maybe tomorrow.
In recent days I've been involved with a BBS discussion about crankcase ventilation, getting into intimate details of chemistry and physics and thermodynamics of how it works throughout. Some people dropped out of the discussion, like too much science to think about, while more people are at least interested and encouraging continuation of the discussion (interesting tech session).
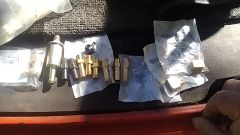
Finished the Clips and Clamps inventory consolidation list. Next step will be to grab a zip-lock freezer bag and collect the cross referenced parts from multiple sections of the inventory and put them all in one bag. Probably not more than half an hour once we get around to it, which should help keep track of inventory and save on searching time later. And we can subsequently order some more parts to fill out the inventory of clips and clamps with a better chance of having what we need when it may be needed.
Wednesday, November 23, 2022:
| |
| (Insert 1000 words here). |
|
A picture is worth 1000 words, but I don't have a picture, because the camera is still not charging the new battery. Been here before, and it doesn't seem right to buy a new camera every time a battery dies from old age. So we do without pictures until I can get this resolved.
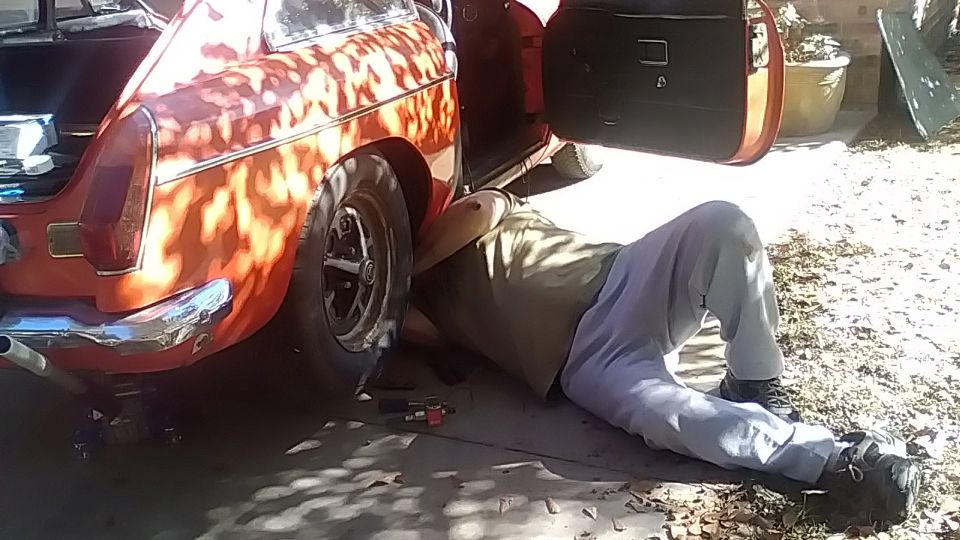
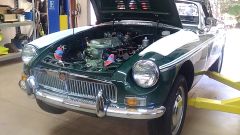
Back to Tim's place for some more work on the white MGA. First task was to stash the side curtains in the stowage bag behind the seats, should be easy, but ran into two problems. First the armrest attached to the carpet on the tunnel was positioned full back against the rear vertical floor board where the side curtain stowage bag needed to sit. That had to go, meaning the armrest had to be separated from the carpet. Luckily it was not sewn in place like original issue, but was attached with four short wood screws and finishing washers underneath, and the carpet was not glued down. The little wood screws actually pulled out of the thin plywood base board that is part of the replacement armrest kit. Figure out how to reattach that later (or not).
Drop the side curtains into the stowage bag, upside down and hooks to the back, but the assembly could not be moved back under the body tonneau, because the stowed rag top could not sit on top of the spare tire cover when the tire was sitting too high in front. At first it looked like an extra wide spare tire, but in fact it was same size as the other four, 165-80-15. Turned out the thick felt spacer pads under the tire in the boot had been removed when installing boot carpet. Quick to find the parts and place the pads under the tire sidewall to raise the back of the tire, which lowered the front of the tire to allow the rag top to be stowed farther back on top of the spare tire. Then the side curtains could be tilted back underneath the body tonneau, and button up the LTD fastener for the bag cover flap, and set the loose armrest in place in front of the bag.
Next task was to install the center latch for the new convertible top. Tim thought we needed #4 screws, which seemed rather small to me, but we had stopped at a hardware store to pickup the screws this morning. Looking at the latch parts it was obvious they needed #6 screws, and we didn't have any #6 flat head machine screws or #6 pan head wood screws, so there was another quick trip town to pickup more screws. Measure carefully to center of the windscreen, place the latch hook plate under the frame rail for desired location, and punch mark the hole locations on top. Drill clearance holes for #6 screws, tough drilling through the chrome plating, break a drill bit, regrind the drill point a couple of times, but finally got through. Then countersink the two holes for flat head screws, also tough cutting through the chrome plating, but finished that too before the countersink tool wore out. Go slow and check often to stop with the screw heads just slightly above flush, so not to expose too much of the underlying brass around the screw heads. Then just a couple minutes to attach the lower latch plate.
This is a 1500 car that never had a center latch. It has the later style wood bow that is thicker at the back edge above the metal frame to accept the wood screws. But it still has the original 1500 style steel top frame with no notches in the metal bow to clear the wood screws. And the fabric top has already been installed with the front bow assembly wrapped in fabric, so it will not be easy to modify the steel front bow in situ. After punch marking the location for the two screws, it turned out to be just on to the top edge of the steel bow, pretty much right where we expected it would be. Solution was to drill small pilot holes through the edge of the steel bow, then have at it with a hand grinder and small carbide steel burring tool to enlarge the holes and make them break out the top edge to make the required notches in the steel bow. Bit of a PITA, but it worked. Not long then to final position the toggle latch and screw it in place with the long #6 wood screws. Nice tight center latch to appreciate.
One more request to check out the speedometer. Report was the needle would stick some, maybe not going back to "0" when the car topped. Even worse, the needle might suddenly swing up to 75-mph when road speed was only 50. Okay, all of that sounded like stiff sticky bushings in the instrument, likely due to dry grease from sitting in for 30 years during the long and slow restoration process. But before tampering with the instrument I though it was a good idea to check the cable output to be sure the drive gearing in the gearbox was correct. So get the car outside with lots of space, and stick a screwdriver in the ground near the front tire. Measure 50 feet 8-5/8 inches forward (1/100 mile) and stick another screwdriver in the ground. Disconnect the drive cable from back of the speedometer, drop the cable below the dash and stick a tape on it to serve as a flag. Push or drive the car forward from marker to marker while counting rotations of the cable flag. Result was 14.6 turns for that 1/100 mile, equating to 1460 turns in one mile, less than 1% error for the 1450 TPM speedometer, all good.
Then we took a few minutes to remove the speedometer from the dash and open the front to remove the indicator needle and the face plate. Remove the knob from the trip ODO reset shaft, remove two screws from the back, and pull the works out of the case. Then we got to spend an hour (or was it two or three) to talk tech for a while, verify that there was indeed significant drag in the moving parts, scrape away some dried grease, soak all the moving bearing points lightly in alcohol to soften the grease, and apply a touch of light oil to the bearings. The idea was to free up the moving parts without having to disassemble the whole instrument for cleaning.
Once it was cleaner and seemed to be working properly, we needed some light machine oil. With no 3-in-1 or sewing machine oil handy, we decided this was the golden opportunity to try DOT-5 bake fluid for the lubricant, as it is light oil and is not supposed to evaporated for a long time. This may seem nuts at first, but there's one way to find out if it works, so we did. By the time it was reassembled and back in the car it was well past dark and time to call it a night and find a WiFi spot.
Thursday, November 24, 2022:
Happy turkey day for us in the States. Day off for us when everyone else is busy with family affairs. Time to catch up the notes from yesterday's tech work (see above).
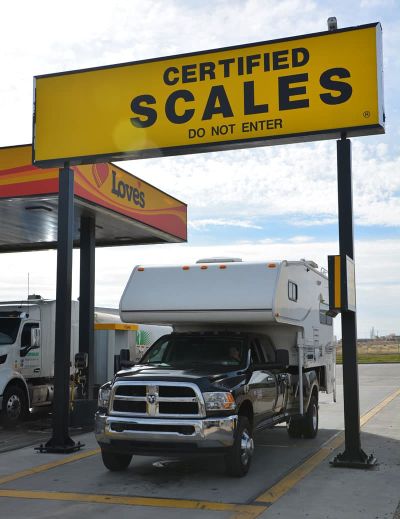
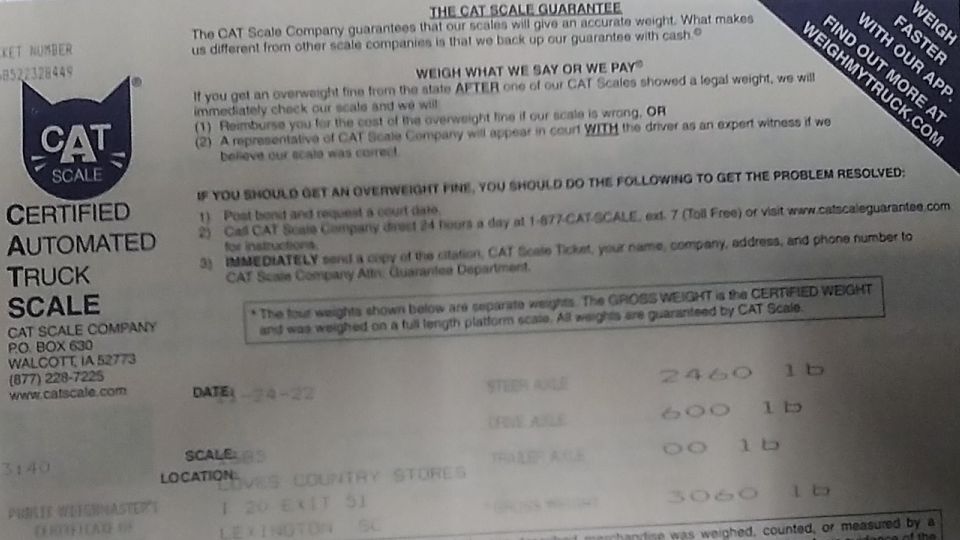
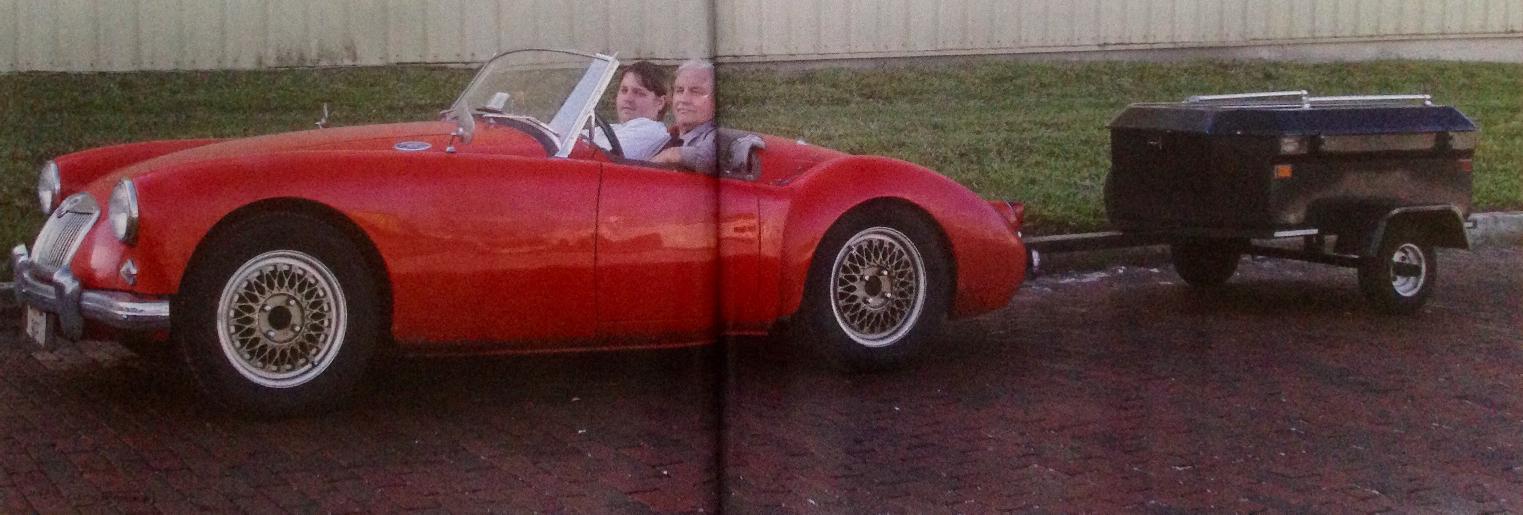
What to do with time to spare? I ran the car and trailer across a CAT Scale (Certified Automated Truck Scale) just for kicks, then weighed the driver and navigator separately. This should be good for a few chuckles on the MGA forum.
 . . Car + driver 2-axles, 2460#
. . Trailer axle, 600#
. . Driver, 247#
. . Navigator, 296#
. . Estimated hitch load, 40#
Car alone: 2460-247-40 = 2173
Trailer alone: 600+40 = 640
2 people: 247+296 = 543
. . Total all: 3356#
. . 3.5 Gallons of fuel in the tank.
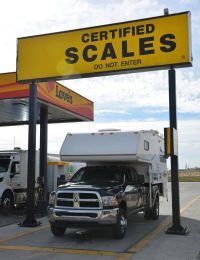
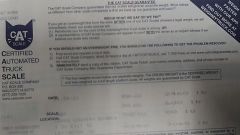
People scales may be accurate within a few pounds. It was fun reading up on the accuracy of the 200,000 pound capacity CAT Scale and how it works. Print-out numbers are rounded off to the nearest 20-pound increment, so if it finds 2150 it will display or report either 2140 or 2160. In short, the reported numbers reported are +/-10 pounds (sort of). Internally the scale may be reading resolution of one pound increments (or smaller), but there is some allowed inaccuracy in those readings. For legal purposes the certified accuracy and reported numbers are to the nearest 20-pound number. If we want to be more accurate, we need a different kind of scale.
You might ask why the car weighs so much when it began life just under 2000 pounds published kerbweight (with 2 gallons of fuel). There are a few accessories like the optional heater, oil cooler, navigator's desk and the Class-I trailer hitch (17-pounds). Add on extra carpet padding, full carpet plus boot carpet, insulation in the doors, a few more coats of paint, some luggage and oil and tools in the boot (maybe more than you might think). These days it is a little less race car and a little more touring car. Driver and navigator have also been gaining weight in recent years.
The Chipmunk "Lil Chip" trailer was originally 150 pounds empty. It likely gained 10 pounds with the change to steel fenders and more paint. If you have been following this travel log for a while, you might have some idea about the 480 pounds of contents that we have been dragging around for the past quarter million miles. Also why this rig is sometimes a little slow going up big hills in the truck lane.
Friday, November 25, 2022:
Since the computer crash two weeks ago, I have been fighting to get my link working for CMGC webmaster incoming email POP box. My MGAguru email POP box on the same server works (fortunately), but I haven't been able to make the other nearly identical setup work (authentication failed). So today I took a side step. I logged into the server, as webmaster, and created a mail forwarder to redirect all mail coming for webmaster to MGAguru, and that works, so now the club email comes in along with my personal email with one download. Cheers, now get back to work.
Spent some time in public discussion about crankcase ventilation, turning to discussion about Products Of Combustion, and how much water is resulting, and when/where it may condense. The short description is this:
C8H18 + 12.5 O2 >> 8 CO2 + 9 H2O
Isooctane + Oxygen >> Carbon dioxide + Water
C8H18 + 12.5 (O2 + 3.76 N2) >> 8 CO2 + 9H2O + 47 N2
Isooctane + (Oxygen+Nitrogen) >> Carbon dioxide + Water + Nitrogen
The first formula shows the feed stock of fuel and oxygen, where the POC are carbon dioxide and water. The second formula shows the feed stock of fuel and air, where the POC are still carbon dioxide and water, while the nitrogen is just along for the free ride. Nitrogen comes out exactly as it went in with no reaction at all. That is, nitrogen just happens to be hanging around in the neighborhood as the combustion is going on.
While we think of air as 21% oxygen and 78% nitrogen, you also need to include the mass of the liquid fuel. When the reaction is finished, the total mass is still the same, and nitrogen is still about 71% of the total, same as it was to begin with. And for the record, composition of exhaust gas looks like this:
| | Gases | Vol. (%) | |
| | N2 | 71.0 | |
| | CO2 | 18.0 | |
| | H2O | 9.2 | |
| | O2 and noble gases | 0.7 | |
| | Pollutants | | |
| | (a) CO | 0.85 | |
| | (b) NOx | 0.08 | |
| | (c) Unburned HCs | 0.05 | |
| | (d) Particulate matters | 0.005 | |
| | Others | 0.115 | |
| | Total | 100% | |
Note that POCs have about twice as much carbon dioxide as water, and not much else.
Saturday - Sunday, November 26-27, 2022:
Mostly just killing the rest of the holiday week end, no rush, gradually moving more eastward from Columbia area toward the Atlantic coast. Don't even remember what I was doing, so must not be very important.
Monday, November 28, 2022:
We gave up fighting with the 7th dead pocket camera in 8-1/2 years, and went shopping for another one. Monday after Black Friday after Thanksgiving, and the shelves were mostly bare, none of the economy models available anywhere. There were a few available a lot more expensive, and I might have gone for one of those, but they were all somewhat larger and likely would not have fit in my pocket as well, so we passed. Will revert to taking pictures with the dumb phone for a while.
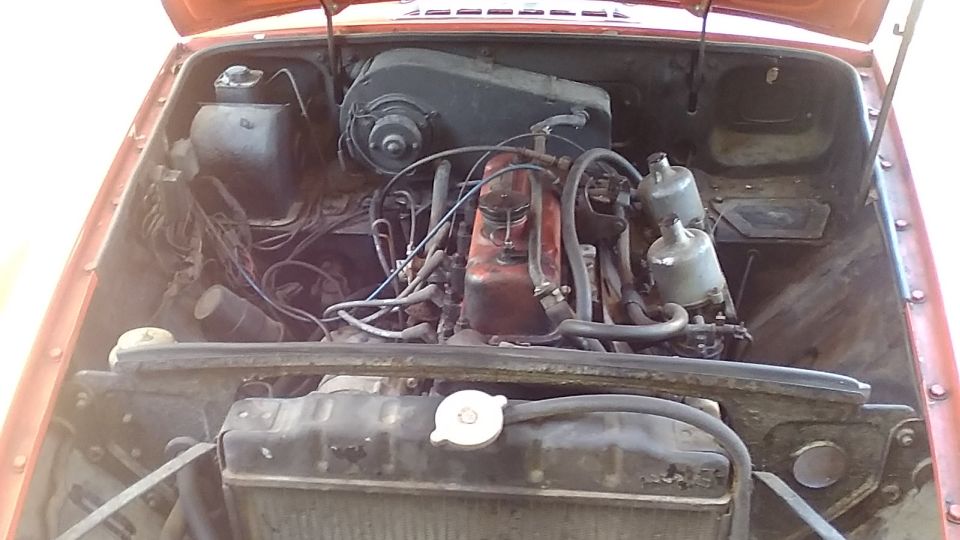
We had one appointment today, dropped in to visit Ron Neal in Moncks Corner, South Carolina. He has more than a few MGs sitting around, and likes to play with MGCs these days. But he also has an MGB GT, from Europe, with right hand drive and automatic transmission. It was imported long ago, maybe 30 years back, and may have never been registered in the States. Apparently it ran when parked, at least ten years ago (maybe longer). Some wishful thinking wanted it to run again.


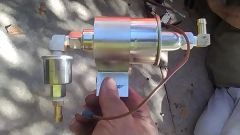
Standard plan, be sure the engine is not frozen, drain the old petrol and flush some fresh fuel through it. No drain plug in the later MGB fuel tanks, so try using the vehicle fuel pump get the old fuel out. Connect up a good battery, power on with disconnected ignition coil, but no ticky. Circuits look good with a test light, but pump not running. It was one of the square Facet pumps, always suspect even if it did look new, so take it out and install a new Airtex style pump (compliments of the Magic Trailer). And we took a short break for lunch.

Before switching on, check to see if the hose from tank to pump was clear, and it wasn't. Unbelievable the gunk in that hose, not only smelled like turpentine but looked like dirty engine oil that would not run out. No sense trying to run any of that through a new fuel pump. Rather than trying to clear the hose it seemed prudent to just cut it off and install a new hose. With the old hose removed, it was obvious the hose was well clogged, and the tank was likely loaded with more of the same stuff. So executive decision to stop there to remove the tank and get a new one before wasting any more time on this one. I suggested gravity feed fresh fuel to the carburetors and give it a sniff of ether to see if it would fire up, but another executive decision to just put it away for later consideration, and that was the end of that project for the day.

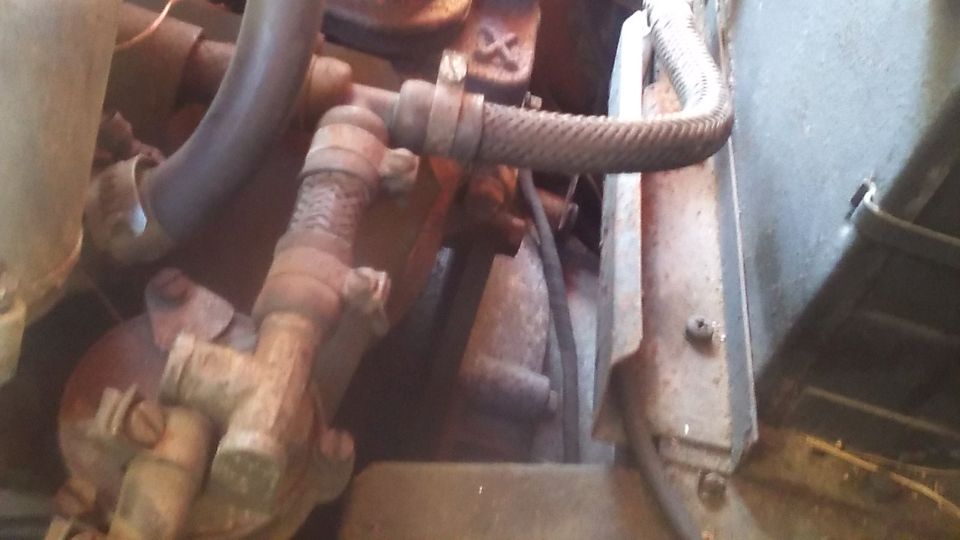
There was an MGC nearing end of restoration work, a clean machine. Somehow the engine and overdrive gearbox were installed with no vent fitting in top of the gearbox.


We picked the shortest vent fitting available, found the location of the threaded port, applied a pry bar to move the gearbox slightly away from left side of the tunnel, but still could not get a hand in there with space to actually screw in the fitting. After a little silent cursing, put that one away for the day as well.


With multiple disappointments, Ron may have had enough frustration for the day, so just stash the toys, lock it up, and head off to find a friendly WiFi spot for the evening.
Tuesday, November 29, 2022:
Had a little backlog of BBS and email with some tech questions. Trying a little more discussion about fuel combustion and water production, phase change from steam to water vapor and condensation in the exhaust, but this gets rather complicated if two parties are not on the same wave length. Fortunately it is not a rush or high priority, and at least two of us are still discussing and not arguing, off line and private for now.
Downloaded yesterday's pictures from my cell phone, and stumbling through using a new image editor, slow going. Did get the photos and notes uploaded to the trip log (this page). Time drags and flies when you're not having fun.
Wednesday, November 30, 2022:
Spent some more time discussing products of combustion, don't know why I bother. Spent considerable time discussing tires and tire pressure for good handling, actually a favorite subject of mine, since I had a lot of practice with it in the 90's. Received the Chicago club newsletter (in Publisher format) in the evening, not much time but got a small start on it. Late night move brought us another screaming fan belt, and another broken alternator bracket. Shut it down and look at it in the morning.
|
 . . Car + driver 2-axles, 2460#