The MGA With An Attitude
REBUILDING THE MG GEARBOX - GT-203B
GT-203A - Test Drive Inspection - (you are here)
GT-203B - Open Inspection - (you are here)
GT-203C - Disassembly, External
GT-203D - Disassembly , Internal
GT-203E - Disassembly, Gear Clusters
GT-203F - Disassembly, Gears and Synchronizers
GT-203G - Reassembly
Open Inspection
 With the gearbox on the workbench, clean, degrease, wash and dry the outside before disassembly.
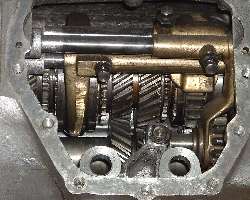
When you open the gearbox, there are some specific things to look for. You can do a ten minute inspection to determine if the gearbox is in serviceable condition, or if it may need to be disassembled to replace some parts. First remove the side cover and count all the teeth just to be sure that they're still all there. That should not be a problem (normally). If you click for a larger picture here you may see there are a couple of broken teeth on third gear in the center of this picture. You will want to keep this picture handy for discussion.
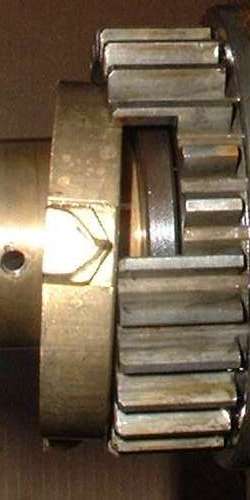
Check the synchronizer rings after removing the side cover but before disassembling anything else. Move the sliding hub away from the brass synchro ring to expose the doghouse shape ears an the ring. Press the synchro ring as tightly as possible against the mating cone surface, then try a 0.020 inch thickness gauge between the flat surface of the brass ring and the adjacent side surface of the steel gear. If the feeler gauge fits without binding, the synchro will probably work OK for at least the next 40,000 miles or so.
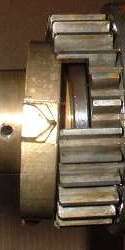 Also look at the angled surfaces on the triangular ears (doghouse shape when new), and compare the most worn ones (probably second gear synchro) with the least worn ones (probably fourth gear synchro). I have never known these brass rings to wear out the conical brake working surface, just the outer ears. This picture shows the 2nd gear synchronizer ring. A close look at this one reveals more wear on the downshift side of the ear (top angled surface) than on the up shift side (lower angled surface). Here the up shift from 1st to 2nd gear probably went smoothly, while the downshift from 3rd to 2nd may have been on the verge of grinding the gears occasionally. When the brass ears are worn this much it's time to install a new ring. They can get much more worn than shown here. When half the thickness of the ear is gone the synchro will not work at all.
The early model MGB with 3-synchro gearbox uses the same parts here as the MGA. The late model MGB with 4-synchro gearbox uses steel synchro rings, which last a LOT longer before wearing out. This is particularly pertinent for 2nd gear, which gets more use and abuse than the others. There is an "improved" steel synchro ring available for the earlier gearboxes, but it requires also changing the mating 2nd gear. The steel ring and new gear combined may cost up to five times as much as a replacement brass ring, so this may not be economically justified. The layshaft wears out about as fast as the brass 2nd gear synchro ring, so the box is likely to be open again anyway by the time the brass ring needs replacing.
The 3rd and 4th gear synchro rings usually do not wear much, and certainly a lot less than the 2nd gear brass ring. In most cases I find only a small amount of wear on 3rd gear ring, and almost negligible wear on 4th gear ring. These are the same part number, so I will commonly swap positions with 3rd and 4th gear synchro rings to even out future wear. To date I have never found the need to replace these parts, but for sure it will happen on occasion. A serious road racer who spends a lot of time vigorously shuffling around 3rd gear may wear out the 3rd gear synchro ring as fast as I wear out 2nd.
Before disassembly, you should measure the amount of radial play for the laygear. You do this with the gear mounted in the housing. Using a couple of light pry bars, nudge the laygear up and down on the shaft and measure the motion (repeat at both ends of the laygear). With a new shaft in place this motion should be minimal, not more than a few thousandths of an inch, hardly noticeable at all. When the wear is such that the motion here is more than .010" you should not hesitate to spend the cash for a new shaft. It is not uncommon to find more than .020" play here, but in that condition the gearbox would probably have been whining lightly in 2nd and/or 3rd gear. When play here gets greater than .020" the gear mesh is misaligned such that the working load is extended towards the tip of the gear teeth placing additional stress on the parts and increasing the likelihood of breaking gear teeth.
You can also measure end float for the laygear. This is s lot easier after disassembly when you can re-install the laygear and shaft and thrust washers with nothing else in the way. With the entire unit assembled it will be impossible to use a feeler gauge at the thrust washers. But if you're a bit creative you might use a dial indicator to measure motion when you push the laygear back and forth to opposite ends of the box. End float should be .002 to .006 inch, but with oil film on the thrust washers the end float might be less (like near zero). If it appears to be much more than .006 inch you can adjust it by changing the rear thrust washer. These were originally available in various thickness, but may be hard to find today. Laygear end float usually does not change much with age and use, but if you have to replace the laygear it is a very good idea to check and adjust end float with the new part.
With the selector in neutral, spin the input shaft by hand to see if the input bearing runs quiet or might make some noise. The big ball bearing should be perfectly smooth running with very little perceptible noise, maybe just a light swishing sound. This ball bearing does have some internal clearance, so do not be alarmed it the nose end of the input shaft wiggles sideways up to 1/8". If wobbles 1/4" or more, the input bearing likely needs to be replaced.
You can also spin the output shaft by hand. This is easier with the 1600 type gearbox with flanged output. Check for noise in the center ball bearing (at back of the main case), and the ball bearing in the tail of the 1600 type unit. Also check the motion of the manual gear selector mechanism. Shift it through all gears and look far any excess motion (slop) in the mechanism. If everything looks and sounds good you may choose to use the gearbox as is, or replace a few gaskets and seals before putting it back in service.
|