The MGA With An Attitude
WIPERS TWO SPEED, A Bit Tricky -- ET-218
MGA Two Speed Wiper Motor Conversion - by Joe Kaiser
 Three years ago during a heavy rain storm I became disenchanted with the windshield wipers on Daphne our 1958 MGA Coupe. Daphne is already the recipient of many modifications, so I decided to see what could be done about changing out the one speed wiper motor.
I began looking at the retail parts catalogs from several of the companies you know (M, VB, etc.) (I am by the way using their catalog terminology where possible to describe the parts or items utilized). It appeared that the MGB two speed wiper motor would adapt easily to the MGA.
I contacted Barney Gaylord (mgaguru.com) and he had never heard of it being done but thought it might be possible.
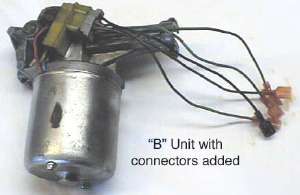
Next I obtained an MGB unit with the mounting strap and about one foot of wiring loom from a parts car at a local MG shop (Rafael's Autoworks in Tallahassee, FL).
After studying the "B" wiring diagram and looking over the "B" unit I decided to put male connectors on all the leads.
 First I removed the "A" wiper motor and top bracket, this turned out to be somewhat harder than the manual leads you to believe.
I attached the "B" unit to Daphne's wiper drive system, which attached easily. Wow, this just might work!
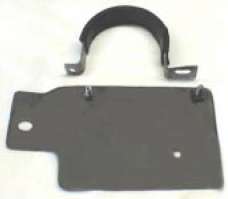
Next I constructed an oversize top bracket from 1/8" aluminum plate using the original as a pattern but enlarging the mounting surface considerably. My next step was to reshape the mounting strap which was a matter of shortening the length because I was not using the MGB pad or packing piece to allow more space to work.
I then installed the fabricated top bracket using the original attachment points and bolts. Next, I installed the "B" unit and placed the mounting strap in place and marked where the hold down bolts should be placed. After removing the "B" unit, fabricated top bracket and mounting strap I drilled holes in to the plate and inserted the hex head bolts through the fabricated top bracket from the underside and held them in place with JB Weld.
 Reinstalling the fabricated top bracket, "B" unit and then the mounting strap using hex head nuts with captive lock washers, I also marked the fabricated top bracket to show excess area for removal, thereby allowing more working room.
Then after removing all conversion items I cut down the fabricated top bracket as marked and sprayed it with black paint.
I then made minor changes to the "A" wiring by putting a female connector on the Green wire (17) and a female connector on the Black with Green wire (62) taping off the Black wire (57).
Then reinstalling the entire lot was easier with the cut down fabricated top bracket and of course experience. I connected the black lead from the "B" unit to the Black lead and the Green wire from the "A" wiring to the RLG "B" unit wire.
Smoke-test time! First damping the windshield, ignition, wipers! The wipers ran well, just a bit too far both ways off the windshield but no smoke!
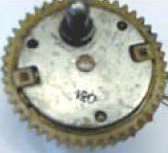 After a call to the "wiper guru" Laurie Rhoads (www.british-car-part-restoration.com) he knew the answer - I needed a 120° gear for the motor to reduce the sweep, the stock MGB unit has a 130°.
After searching ebay and purchasing a couple of other Lucas units I ended up with a 125° and a 110°. Still not the right sweep.
On the internet Yahoo came up with a NOS Lucas Dealer, John Hastings (john@noslucas.com) who had a NOS 120° gear and shaft unit. John shipped it right out.
Shipment arrived I installed it, but still too much sweep, still running off both sides of the windshield.
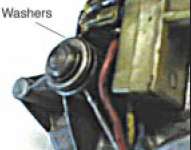 Puzzling about why the new gear and shaft did not work I went to the parts box and retrieved Daphne's original "A" unit. I removed the top plate with parking switch. The answer is the "A" 120° gear is a different diameter and the drive pin on the gear is located in a different position. No way will the "B" 120° gear work! So I removed both gear and shafts from the units and put the "A" gear and shaft in the "B" unit. The shaft was too short, so carefully I removed some excess material from the bottom of the plastic gear so it fitted as the original 130° gear had. Now it was to long, so I added washers to the outside end of the shaft to take up the end play.
After which another opportunity presented itself! The original top plate would no longer fit because of the longer drive pin for the "A" park switch on top of the gear.
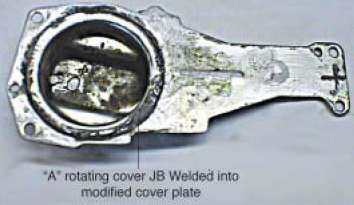 I put the top plate on the bench grinder and removed the plateau of the raise portion. I removed the wire and switch from the "A" parking switch and I then peened the soft rivets to fill the holes and then fitted it into the modified "B" unit top plate and secured it with JB Weld.
After the JB Weld hardened, I dressed it up a bit (who can see it in the car anyway) with a file and sandpaper and sprayed the outside with aluminum paint.
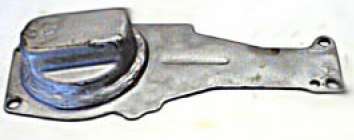 Reassembled modified "B" unit returned to Daphne. Attach wiring. Test - It works - no more sweeping clear off the windscreen.
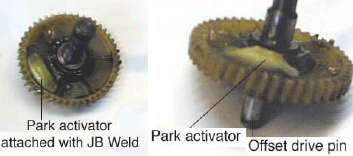
Next opportunity - two speed and park? After locating and testing the "B" unit mounted park switch and finding the actuator was mounted on the bottom side of the plastic gear, I was able to easily pry the park actuator off the plastic gear. Then I trimmed the two mounting posts on the park actuator and when it fit flush in the same area as on the "B" gear I attached it again using JB Weld, first roughing all common surface areas with a jewelers file.
 When the JB Weld had cured overnight I reassembled the unit except for the modified top plate and tested it electrically to make sure that the switch was activating properly. Checked to make sure that one circuit makes the other break when the actuator depresses the switch.
After studying Rick Astley's MG Electrical System pages on the internet, the "A" and "B" wiring diagram I started trying switches.
I bought an early "B" dash mounted wiper switch, various RadioShack switches, marine switches, none had enough contacts and positions to accommodate the speed and parking function. Also I wanted a switch to locate in the original "A" wiper switch dash hole providing both functions and looking normal.
After searching on the internet I finally settled on a APEM toggle switch #12164a. Which cost about $33.00.
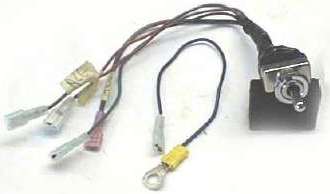 I used solder connections with pigtails and slip joint connectors because the size of the switch is small and the illumination light for the gauge is right under the normal switch location. After making the solder connections it was tested for correct operation with the unit.
Then starting at the bottom half of the switch body plastic tape was wrapped creating a neat pigtail that keeps the wires together and makes locating the switch in the dash easier. A short single wire was assembled as pictured to provide the ground from the top bracket forward attachment bolt and the "B" unit Black connector.
Because of Daphne's many modifications to the dash area and electrical system it is somewhat more difficult to route any new wiring.
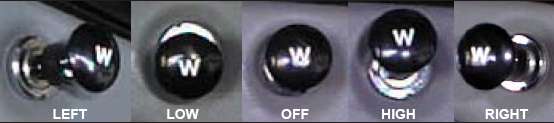
I had to drill the dash hole slightly larger. Then using a standard chrome Lucas jam nut to mount the new switch. Heat shrink insulation tubing was used to enlarge the switch toggle. After which the dash knob was shortened by .375", then with minimal force pushed onto the enlarged toggle and looks reasonably normal.
The secret is all in the gearing and switching!
Safety Fast - - jk
BACK of the switch with the Keyway at the TOP
Internal Connections in the Toggle Positions
| HIGH |
G1&2 |
E1&2 |
C1&2 |
A1&2 |
|
| OFF.park |
G2&3 |
E1&2 |
C2&3 |
A1&2 |
|
| LOW |
G2&3 |
E2&3 |
C2&3 |
A2&3 |
|
BACK of the switch with the Keyway at the TOP
G=HOT ULG=HIGH NLG=PARK RLG=LOW
BLACK WIRE FROM MOTOR TO GROUND
Editor's notes:
Function of the APEM toggle switch may be easier to understand in the right light. In the diagram above, the left two poles of the switch are wired to serve as a 1-pole 3-throw switch with center off. This toggles between the high and low speed wires. The right two poles of the switch are wired to serve as a 1-pole 3-throw switch with center on. This disconnects the park wire when the motor is running. The following page shows a diagram with a slide switch which makes it much easier to enderstand tne switching logic.
The late MGB motor provides longer travel for the drive cable, and the late MGB wheel boxes are larger diameter to provide the desired wiper stroke with the longer cable travel. The late gearbox was modified here to give shorter stroke to work with the original MGA wheel boxes, which have smaller pinion wheels like the early MGB wheel boxes. Modification of the gearbox keeps all of the mechanical changes in the local exchange of the motor with no change requiired for the mechanical drive behind the dash.
If you use the late model MGB wheel boxes which match the stroke of the late model MGB motor, no modification of the gearbox would be necessary. The same applies to conversion of MGA and early MGB wiper drives to the late MGB setup. For the MGA you may need to change the 130° drive cam to 120° drive cam for slightly lesser wiper sweep on the smaller MGA glass. That extra 10° of sweep equates to slightly more than 2 inches of travel at the top end of the wiper blades.
There is an early MGB 2-speed wiper motor which is a direct physical interchange with the MGA or early MGB 1-speed motor. It has no dynamic braking function and one less wire, so it can be switched with a simple SP3T toggle switch (but it may run a little slower).
Addendum May 2006:
It has beem brought to my attention that the late model MGB wheelboxes will not fit on the MGA, even with extensive fiddling, because the spindles are too short to extend through the length of the angled bezels on the MGA. Good news is that there is a "105 degree" crank wheel available to fit the late model MGB wiper gearbox which will shorten the cable stroke enough to make it work nicely with the original MGA wheelboxes. I hear this part is available from Brown and Gammons, but still waiting for a part number.
|