The MGA With An Attitude
ORIGINAL TYPE SWAY BAR Adapted Underneath -- FS-103A
Fitting an MGB sway bar to an MGA -- from Bill Spohn
The Moss Motors catalogue (and probably other vendors as well) sells MGB sway bars for use on the MGA and rather optimistically states Some fabrication will be required to mount the sway bar brackets to the MGA frame. Id never bothered researching this, as I use specially made sway bars on my MGA race car, using rod ends and solid mounts. When I went to fit a stock MGB bar to my 62 MGA coupe, I discovered that there were considerably more problems than the Moss reference had suggested.
As most MGA people will know, the MGA had a rather strange and inconvenient method of mounting the factory bar you removed the front apron of the car, and then the front frame extension, drilled and bolted the brackets above the frame and mounted the bar, and then replaced all of the bits, including extension and apron. The stock location is shown in the V shaped depression on top of the extension in the picture below.
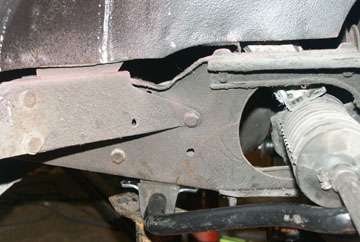
Not the easiest way to mount a sway bar, and some early MGAs did not have the frame extensions with the mounting point in any case! If you buy one of the MGB kits, you couldnt mount it that way as the rubber mounts and brackets are the wrong shape, so presumably Moss intends you to mount the bar under the front extension where any sane person would put it. Only one problem. The links provided in the mounting kit, while correct for MGB, are the wrong length for a bar mounted under the front frame extension of an MGA.
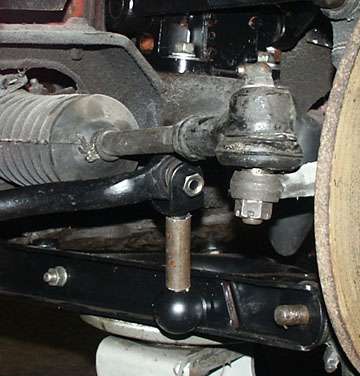
The only accurate way to measure and design proper links is to assemble one corner without the spring, and move it with a jack through the full range of normal suspension travel to see what hits what. Here is a full length link at full compression of the suspension:
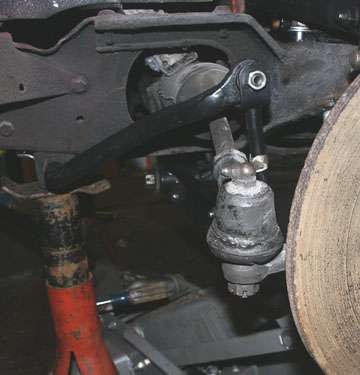
The sway bar is sitting on the tie rod.
Here is the same link shown at full droop of the suspension:
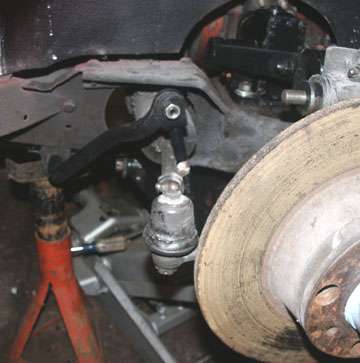
No interference at that extreme.
Clearly the angle of the sway bar is not optimal and the bar interferes with the tie rod at full depression of the suspension.
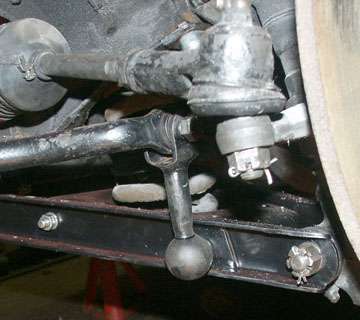
The better answer is to use a much shorter link and to have the sway bar end under, instead of on top of the tie rod. I cut the link to remove a section and mocked it up to test fit with a section of tubing.. Here is this shorter link at full depression:
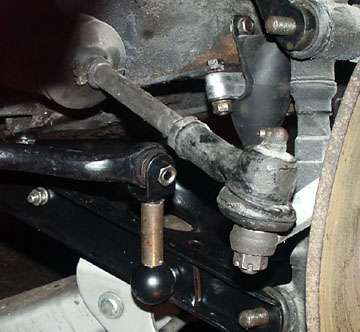
Lots of clearance there. At full compression it looks like this:
The sway bar eye is much closer to the tie rod, but still clears it by at least a quarter of an inch and the arm of the sway bar is much closer to level and thus pulls the link at much less of an angle as the suspension travels through its normal range.
The short links are set up for testing by cutting a section out of the stock link
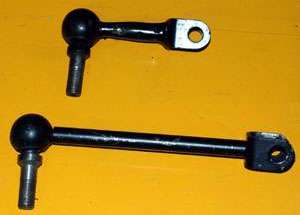 and using a piece of tubing to hold things together while checking clearances, before welding. Once length and angle of the clevis has been accurately set up, the joining tube can be MIG welded to the ends, paying suitable attention to the Metalastic end to prevent undue heat build up. Here are the results once welded. The original link is 8.5 inches from the top to bottom, and the shortened link is 4.5 inches.
When fitted the new shorter link offers sufficient clearance between steering tie rod and sway bar, and the angle of the bar is not so acute as to cause any problems as it sweeps through the full range of movement. This is what an MGA sway bar kit should be provided with, not the MGB links that are useless for the task.
Here is the final product:
It is also a very good idea to make up a backer piece from a bit of sheet steel or band-iron with two holes in it, to sandwich the frame extensions when fitting the cages to them. Simply bolting the cages to the fairly thin sheet steel that makes up the frame extensions will probably result in cracking and breaking eventually, if you dont add these custom washers as reinforcement above the frame extensions.
OK - here is some technical stuff you may or may not be interested in. Technophobes can tune out now.
The bar is a ¾ factory special tuning part C-AHH-7924, the largest bar offered from the factory (although many current race cars use 7/8 or better). I have found that it offers a decent result without needing to change the rear roll stiffness. If you go any stiffer on the front, you may have to add some roll stiffness at the other end of the car.
Please note that referring to sway bars simply by diameter is almost meaningless unless you are talking about bars with a fixed arm length. Here are some formulas that may be of use to you in deciding what sway bar to fit or build for your car:
If you want to know how one bar compares to another of the same design (when only the diameter of the bar changes)
% increase in stiffness = (new diam./old diam.)^n
In the case of solid bars, n=4, so if you add a small amount in diameter you get a large increment in stiffness. Going from an 18 mm. bar to a 19 mm. bar, for instance, gives you a % increase of 23% !!
The other very important factor in how stiff your new bar will be is the length of the moment arm. Intuitively, it makes sense that a bar mounted with a long arm (i.e. in an MGA, with the bar mounted far forward on the frame horns) has more give in the arms than a short bar mounted close in. The actual relationship for a solid bar is arithmetic, so if you have a ¾ bar that has 10 arms, it will only be half as stiff as one with 5 arms.
That is why it is meaningless to talk about diameter without mentioning arm length. A short armed 5/8 bar can be stiffer than a long armed ¾ bar, and when one car guy tells you I needed to go to a 7/8 bar to get it stiff enough he isnt imparting much in the way of information unless he also gives you the length of the arms on his bar (properly measured from the centre of his bar to the centre of the attachment point of his link).
If anyone has any questions about this material, please feel free to contact me at WSpohn4@aol.com
Bill Spohn
Vancouver BC
|