The MGA With An Attitude
OPENING YOUR FIRST RUST BUCKET - RT-201
This is a serious course in disassembly and inspection, what to look for, and how to inspect for RUST.
First you need to determine the condition of the sheet metal, especially the parts inside of the sills next to the frame. If it is truly solid (not very likely actually), then you can leave any undercoating alone and go after the external paint job. These cars were seldom ever rustproofed when new. The body sills are assembled from three pieces of sheet metal which form a box section with an added contoured outer cover. This was originally painted on the outside only, leaving four internal surfaces exposed to the elements to rust, and they do rust in all but the driest of climates. There is more on rust in the sills to follow, and if you read all of this before buying a car, maybe you will pass on a few and manage to buy one that doesn't have too much rust.
The bodies were spot welded together out of bare sheet steel, and then painted as an assembly, and the fenders bolted on last with unpainted fender piping. If it has been repainted, and there is paint over the fender piping, that's sort of a sin against nature, as there will inevitably be some dirt trapped under the paint along the piping, and the paint will eventually chip off and leave it looking pretty bad (also just looks funny to the trained eye). That leaves you having to remove the fenders to at least sand off the lumpy and chipped paint along the joint area before you can do a decent repaint. In any case the fenders should be removed for repainting so you can paint the inner surfaces, and the facing surfaces of the joint, and the splash panels, and install new piping.
For a decent repaint you need to remove all of the trim, both bumpers, grille, front valance, and then the front fenders. Some bolts holding the front fenders are in the passenger compartment behind the kick panels. For the rear fenders you first need to remove the door latch striker, the rubber door buffers, and the shut face plate. If the car was never before disassembled, you need to remove the trim strip along the bottom edge of the sill before either front or rear fender can be removed. If this strip is missing, then there might be just a few screws there holding the bottom edges of the fenders. A few bolts holding the rear fenders are hiding behind the rear interior side panels, and you can only remove those panels after removing the frame for the rag top, and the top frame screws are likely to give you trouble being rusted in place. The captive float nuts are located inside of the door post box section, so if these need repair it inevitably leads to cutting and welding something.
Having gotten that far, you can dismount the hinges to remove the doors. There ear only 4 bolts from the inside holding the windshield posts, and that whole assembly lifts off. Only 6 small screws each for the bonnet and the boot lid hinges, one of the easier removals. Or maybe you have already decided that this is too much work, and you just paint over the fender piping without removing the fenders. SHORTCUT !
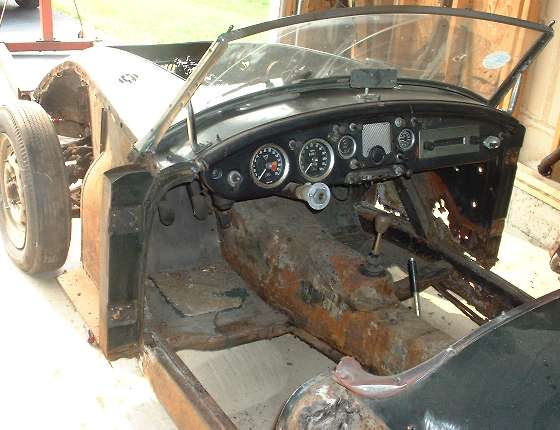
Long before this you should have already decided if you are going to remove the body from the frame. If so, then you remove the steering column, the master cylinder and pedal brackets, and the heater box. There are a few things passing through the front bulkhead that need to come out, most notable the sensor line for the temperature gauge which runs to the front of the cylinder head below the thermostat, having to be disconnected from the engine, because it's a permanent part of the gauge. Also the small steel oil line running from the RR corner of the engine bay to the same gauge for analog oil pressure. And you will find there are only 6 screws securing the dash panel, so maybe you remove that as an assembly. Then you have exactly 24 bolts holding the body to the frame, you'll find them all eventually, and the main body shell lifts off (hopefully all in one piece). If it wasn't for the controls being disconnected, you would still have a driveable car without the body.
If it looks like the sills are badly rusted, then you should consider bracing the door openings before removal to retain the shape and dimensions for proper fit and function of the doors when it's reessembled. You can do this by tack welding a couple pieces of thick steel strap or small angle iron across the door openings front to back. The welds can be broken and ground off after the sill repair work is finished, before painting. Even more prudent might be to do the sill repairs before the body is removed from the frame. Before removing the body from the frame you would be well advised to read Reassembling The Body Sills.
This might surprise you, but when I bought my car I had gotten this far with the body sitting on saw horses just 6 hours from the time it rolled into the garage. I did break a bunch of bolts in the process, and it was less than 20 years old at the time (not too badly rusted), so you might take quite a lot longer to get this far.
Scraping the carpet loose might be a chore if someone had glued it in place. The floor boards are in fact boards (plywood) screwed to angle strips on the frame. You might expect the plywood to be badly deteriorated, and those screws to be badly rusted in place. The seat lower slide rails are (originally) attached to the floor boards with 3 wood screws in each end of each rail (12 screws total), and the seats lift out as assemblies. The plywood floor pieces are on top of the tunnel flanges, so the floor has to come out before the tunnel can be removed (hand brake attached to the tunnel).
By this time everything is laid open in clear view, and much easier to see and tell where the rust is. If you know where to look in advance you can find most of it before disassembly. The most common obvious rust in the frame is the bottom trays of the battery carriers. Next most prevalent is on the vertical surfaces adjacent to the edges of the floor boards, where carpeting holds moisture long after it gets wet in a rain storm with the top down. With badly rusted frames the bottom surfaces along the side rails might be so weak as to collapse if you try to lift it with a floor jack, but hopefully yours won't be that bad. The formed angle pieces all around where the floorboards attach are prone to rust, as well as the flanges on the tunnel sections.
By far the most serious rust in these cars happens in the body sills below the doors. This area has the curved rocker panels spot welded on the outside. The inside surface of the sill next to the frame rail is a flat vertical piece of sheet metal running the length of the sill from just aft of the front splash panel to just ahead of the splash panel near the rear tire. You should start by putting your fingers here, up between the sill and the frame before removal, to see if this panel is still in tact. Or (more likely) you may find rusty Swiss cheese and raw air and maybe come back with bloody fingers. If you find any perforation here (most likely), then the entire sill section would need to be replaced (which is a rather large job). If you drill out spot welds to remove the outer rocker panel, you would find inside one more panel forming a box section against the inner flat panel. As mentioned before, the body was originally painted after assembly, so 4 of the 6 surfaces of these 3 panels were never painted, which is why they are so prone to rust.
If the rust in the sills is particularly bad it may extend upwards into the bottom of the door posts, which were also not painted on the inside. In really bad cases the lower 8" of the body might all be Swiss cheese, and some are even worse. If you go to the effort and expense of repairing the sills, this is something you will never want to do again, so you do your best to paint these panels prior to reassembly. I had mine dipped and etched to bare steel before installing the outer rocker panels. Then everything was coated with a caustic etching primer and a couple coats of epoxy paint applied with a small brush to get into spot weld joints as well as possible. The rocker panels were also painted on the inside, and finally attached with pop rivets. Holes were drilled in the ends of the sill box sections and Waxoil was sprayed inside to coat the inner surfaces, and ditto for the box sections of the door posts. Just some ideas.
If the sills are badly rusted, and you remove the body, it may come off in two pieces. When repairing the sills (installing new panels) you should have the body on the frame for alignment. The most important part of body alignment on the MGA is getting the doors aligned and working properly. After that the fenders are aligned to the doors during assembly. And if you're sharp you have it all reassembled once and working, and then remove the outer panels again for final painting. This is all the subject of the more advanced course RT-402, Reassembling The Body Sills.
Even if you don't think you need to repair the sills, you might still decide to remove the body from the frame for cleaning and painting. The original factory paint job was not particularly good about exposure to the elements for 40 to 45 years, so there may be very little of the original paint left on the underside. The very best of these with no rust perforation (very rare indeed) still want to be painted underneath. It's easy to tell if the body has even been off before. Look straight up from below in between the body and the frame just aft of the front splash panels. There is an area of the inside vertical sheet metal here extending all the way to the top of the frame, nearly to the top of the fenders, where it is virtually impossible to paint with the body on the frame. This is likely to be 90% light surface rust, and if you're lucky you might be able to tell the original paint color here. If this area has a decent paint coat, that's most likely indication that the body was off once for repaint, and you might be lucky and not need it again. Otherwise you should seriously consider removing the body to paint the underside, and to clean and paint the frame while you're at it.
The down side of all this is that once you commit to removing the body from the frame you may catch shipfitters disease, a bad case of the might-as-wells, and it could be years before you get it back together again with a full restoration. A lot of these projects die in mid stride, leading to sale of the world's largest jig saw puzzle, and usually for a pittance of the money invested. If you decide to tear into it in this fashion. I hope you have lots of time (and money) and plenty of determination to get it finished.
>Any real good books you could suggest for me?
Moss Motors Parts catalog. (Free) www.mossmotors.com
Factory issue "Series MGA Workshop Manual" ($44.95 list) hardcover about 200 pages. If you don't buy a copy of this and read it, I don't waste my time talking to you about mechanical repairs and maintenance.
"Original MGA" by Anders Ditlev Clausager ($34.95 list) hardcover 112 pages. This one is loaded with details of production changes and beautiful color pictures that might help to keep your adrenalin up long enough to finish the project. It has a few photos showing how bad the rust can get, but not much information on repairing it.
"MGA, A History & Restoration Guide" by Robert P Vitrikas ($39.95 list) soft-cover 240 pages. Lots of history, lots of B&W pictures, much more information and pictures on where to find the rust, but still not much instruction on fixing it.
The actual rust repair work is sort of general knowledge for panel replacement or patching, surface preparation and priming. Panel fitting and alignment will involve a certain amount of patience and finesse. It helps to have a MIG welder handy, and a Sawzall and other hand power tools, a compressor and paint sprayer. Painting is also in the general knowledge area, or sort of learn as you go. For some good show and tell about rust repair and sill replacement, check the links on my web site for the Sebring MGA #43, and the series of articles on the Twin Cam Called Ratty. These are both MGA Coupes, but for the most part everything below the belt line is the same as the roadster (except the door latches).
After painting and body reassembly you get into fabrics and trim. I have an article about carpet fitting on my web site. Seat coverings are fairly straightforward (just expensive), as long as you have complete seats to start with to use for reference. The rag top, tonneau cover and window bag are well covered on my web site. Chrome trim is mostly bolt on. Windscreen glass replacement can be a bear of a problem with bad replacement parts, but I have that well covered too. I am about to install a new interior panel and door pocket kit, new door weatherstripping, and again recovering the cockpit trim rails, so I expect to have this information on my web site as well, possibly as soon as mid winter.
Best regards,
Barney Gaylord
|