The MGA With An Attitude
RING And PINION GEAR Adjustment #1 - RA-121
At 06:29 PM 2/17/2007 -0500, Gregory Brown wrote:
"Have you ever written any instructions on the assembly and proper set up of the differential?"
Yes, once, but I didn't publish it before. My first memory of the procedure comes from a time when my older brother did it for an early 50's American car when I was about 12-13 and he was about 18-19. I think it might have been a Hudson, but could otherwise have been a Kaiser or a Ford. It doesn't matter, because they all work the same, including MG. By that age I was intimate enough with machinery to understand how the mechanism works, so the setup was pretty simple, at least in concept. The factory tools allow mass produced interchangeable parts to be set up and assembled in a single pass without much fiddling. It does take a little fiddling to do it without special tools, but the procedure is as generic as the mechanism.
The pinion gear is mounted in two bearings. An adjustable thickness washer (call it "back washer") behind the rear bearing inner race determines the fore/aft position of the pinion gear. Shims behind the front bearing inner race are used to set the bearing preload. Assemble it initially using a mid range back washer. Use enough shims in front to make near zero clearance for the bearings, but preload is not critical during initial setup. You can even leave out the front shims during initial setup if you tighten the front nut just enough to remove bearing clearance but not apply too much preload.
For the differential cage carrying the ring gear there are shims between the side bearing inner races and the cage (call them "side shims"). Set this up initially with equal shims on each side, enough to make near zero clearance, and preload is not critical for initial setup. There should be some working clearance in the gear teeth. If it should turn out to have interference fit or too little clearance for the teeth, adjust side shims to move the ring gear over a bit to get some tooth clearance. Measure backlash at the input flange. If excessive backlash, then adjust side shims to reduce backlash (or vice versa) to within specified range (0.008 +/-0.003 in.).
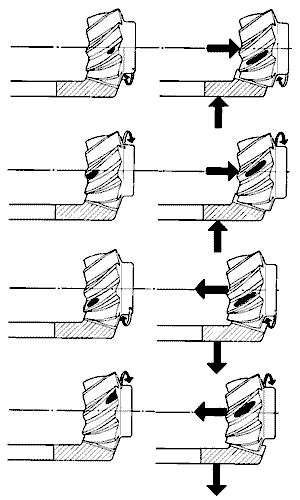
Wash the gears with lacquer thinner, blow dry, and apply machinist's bluing to the ring gear teeth. Mark two or three teeth only at 90 degree increments on the ring gear. Hold ring gear with palm of hand to apply resistance while you turn the pinion gear (clockwise for normal input direction), making marks in the bluing on the gear teeth to indicate the contact point. Contact point should be about equal position all the way around, and backlash should be about equal all the way around, verifying that the ring gear runs in a flat plane. If not, you need to fix that before going on.

|
Contact point should be about midway front to back along the ring gear tooth. If too far forward, increase back washer thickness (and vice versa).
When contact point falls mid way along the gear teeth, then re-check backlash and re-adjust side shims as necessary to set up correct backlash.
Adjust front shims for specified bearing preload (10-12 in.lb.) without oil seal and with front nut tightened to specified torque. Remove front yoke, install oil seal, reinstall front yoke, and tighten front nut to specified torque. Pinion bearing preload torque should increase about 3 in.lb. for the seal contact (13-15 in.lb. total).
Final check on backlash. Then check side clearance for the carrier bearings. Then adjust side shims to provide 0.002" preload pinch each side on main bearings, and you're done. If you like you can leave the bluing on the gear teeth for future reference (assuming it might not wash off in oil with normal use).
For a single setup this should be quicker than making the special alignment tools. I think this general procedure may have been included in workshop manuals prior to the mid 50's, but was ultimately changed to specify the use of the special setup tools when gear machining improved to make more consistently interchangeable gears.
|
