The MGA With An Attitude
REBUILDING YOUR ENGINE FROM MILD TO WILD - PP-202
At 10:39 PM 4/5/02 -0600, Chris Barnhart wrote:
>"Can you recommend any good books on "power" tuning the MGA 1500 engine?"
For the MGA 1500-1600 with original cylinder head you can check the factory produced "MGA Special Tuning Manual", available from Moss Motors for all of $4.95 list. Not a large book, but such a bargain.
>"Was looking for something like the Peter Burgess book for the 'B' series engine."
You may know that MGA and MGB engines from 1956 to 1980 are all B-Series blocks with interchangeable cylinder heads. Most anything that applies to the MGB will also apply to the MGA. You might get a copy of Peter Burgess book "How To Power Tune MGB 4 Cylinder Engines", available from Moss Motors for $21.95 list.
And now you will get a little more than you asked for. First review "Cylinder heads for the MGA".
The MGB 18GB engine 1964-1967 was the first 5-main-bearing engine. This used a small flywheel and was mated to the 3-syncronizer gearbox. If you want to install any 5-main engine in your MGA you will need the flywheel and rear plate from this engine. Also the 5-main engines do not have the mechanical tach drive, so for this you need the electric tach from the 1964-1967 MGB. From 1968 on the 1800 engines had larger flywheels and were mated to the 4-syncro gearbox (larger bellhousing and heavier guts). None of the MGB gearboxes are direct bolt-in for the MGA (because of the rear mount), but most of the internal parts on the mainshaft of the 3-syncro units are the same as the MGA parts and interchangeable.
>"Just picked up a '58 MGA roadster .... and have thoughts of making it crank out a few extra horses."
How many extra horses? Would 100bhp (or a bit more) in mild streetable form with a nice idle suit your fancy? I have arrived at a nice solution to this spec for not too much money. I started with a 1600 engine with .030" overbore for cleanup (1625cc). Then got an early "18" head (larger valves like 1622 engine), shaved it .047" to bring the chamber size down to 38cc for the proper compression ratio for the 1500-1600 engine. This combination builds the engine to be virtually identical to the 1622 engine spec.
While rebuilding the head I had installed hardened steel valve seats to make it a no-lead head for durability with no-lead fuel. Because I run an engine hard, trailer towing and autocrossing regularly, I also use Stellite exhaust valves, giving more than twice the life for the valves (big deal for me). I also use bronze valve guides, as they will last virtually forever when properly installed, but they do need a tad more running clearance down the bores than iron guides (difference in thermal expansion). So far this has only to do with longevity, not power output.
In the process of installing the new valve seats, the shop doing the work used seats with a slightly larger inside diameter, then machined the seat chamfer to mate with the valve head near the edge of the valve head rather than in the middle of the chamfer on the valve head. This had two advantages. First is that it transfers heat just a bit better (or differently) from the valve head into the seat so as to avoid the hot edge that might occur on the valve head which can cause preignition and/or run-on problems when using cheap low octane fuel (which I do). Secondly, it gives a little better breathing when the valve is just starting to open, and just before it is fully closed. Then because of the slightly larger ID of the seat, the ports in the head were ground out just enough to match this ID for smooth flow here, but no radical grinding or porting was done (nothing very expensive). The end result is almost like using one size larger valves.
The final ingredient that yields the last 15% (or thereabouts) power increase is a Fast Street Camshaft. The one I use is sold by Moss Motors as their stock number 222-270. This is actually a Crane Cams part 342-0010, and you can often get a much better price through a local speed shop. This is not a racing cam, but is a nice upgrade street cam that will yield significant improvement in torque through most of the speed range (above 1500rpm), still have a nice idle, may have a little loss of torque below 1500rpm, but is all around very drivable on the street (and if you like, it will allow the engine to rev freely through 7000 rpm). This is the only upgrade replacement cam I know of that is made from a new forging and not a regrind from an old camshaft. As such, it has slightly taller cam lobes for increased lift. Stock cam lift .355 at the valves. This one is .399 for the intake and .419 for the exhaust valves. The increased lift yields better breathing while having very little affect on low end torque and virtually no change in idle characteristics. It does have a mild change in valve timing for more open time for the valves and later closing of the intake valve, which gives it better breathing at high speed, and is what causes the slight drop-off of torque below 1500rpm. I am including a copy of the timing card for this cam so you might compare it with other upgrade cams.
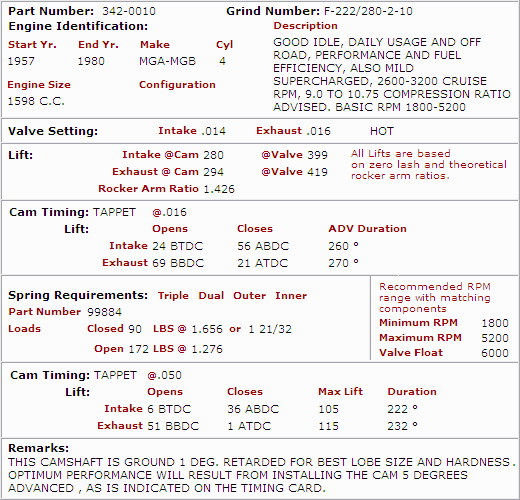
 You can get lots of information about this cam and installation and timing procedures from the Crane Cams web site. One significant feature of this cam is that is gets some of its increased breathing from increased lift so it doesn't need so much change in valve timing to achieve the same affect, which is why it retains a smoother idle than some of the other available cams.
Now one of the problems you run into with increased valve lift, especially if done in combination with shaving the head, is that you reduce the running clearance between the top of the block and the valves in the wide open position. Here you need at least .060" clearance for the intake valves and .080" clearance for the exhaust valves. You also need at least .100" clearance between the valves and the piston at all times, but not to worry about that, as these parts never get very close in these engines, because the valves are never full open when the piston is near the top of stroke. The fix for the clearance from valve to block is actually quite easy, adding eyebrows to the top of the engine block, and you can do it yourself, just check here: .... Adding Eyebrows
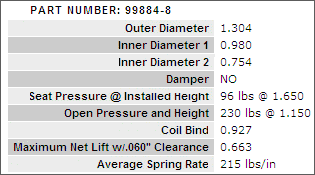
The other problem you run into when increasing valve lift is the increase of inertia in the valve train components because they have to move farther in the same amount of time, so they will be moving a bit faster with greater acceleration. This causes valve float (failure to close completely in the time allowed) to occur at lower engine speed. The stock MGA or MGB 3-main engine with double valve springs will encounter valve float at about 6500-6600 rpm. With increased valve lift this will occur right at 6000 rpm, which is somewhat disturbing when you have just prepped the engine so it wants to rev freely to higher speeds. The easy solution for this is to install the heavy duty valve springs (under $50 for the set), which will allow it to run to at least 6600rpm (similar to original spec) before encountering valve float.
Or if you're like me and don't want to think about keeping an eye on the tach, then you may go for reducing the mass of the valve train parts to reduce inertia. You can use the alloy valve spring caps (about $50 for the set) which are about half the mass of the original steel parts and will reduce the inertia enough to allow revving to about 7000rpm (or maybe a little higher). Since you are buying a new cam you will also have to buy a new set of tappets. Here you can change from the original type parts (tall tappets and short pushrods) and use the short hollow bucket tappets and longer pushrods from the 18V engine. This makes even more reduction in mass than the alloy spring caps. When you do all of these things together the engine can rev to at least 7500rpm without valve float (been there). As a bonus, the short tappets are cheaper than the long ones, with the savings being about half the cost of the new pushrods. New tall tappets are about $56 for the set. Short tappets about $36 for the set, and the long pushrods about $40 for the set.
Oh, I did something else too. I installed a flywheel from the MGB 3-main bearing engine (8 pounds lighter) and the MGB diaphragm clutch to go with it. The lighter flywheel does not (technically speaking) increase power, but it can improve acceleration in the lower gears by reducing inertia. It does give a little quicker throttle response and a livelier feel (more fun). The MGB clutch is only marginally stronger than the MGA clutch, but the replacement parts are cheaper. Check here for clutch and flywheel upgrade information.
Having done all of this to my engine (with the 1600 block), it is now a real hoot to drive, and it revs so freely that it is almost unnatural to shift up before 6000rpm. It also tows my luggage trailer nicely up mountain hills in top gear at 70 or 80mph without losing speed, where I used to be buzzing up the same hills at 60mph in 3rd gear because it wouldn't pull it in 4th. Of course I also bag autocross trophies regularly. I haven't tried it on a dyno yet, but my best guess is just a little over 100 BHP, maybe close to 90 BHP net at the rear wheels (optimistically).
One last word on this camshaft (which is not mentioned in the Moss catalog). It needs a change in timing (indexing of the cam drive sprocket), but you do not need to buy the expensive adjustable sprocket (sticker shock) to do this. The Crane cam is ground 1 degree retarded from original stock cam specs (presumably to make asymmetrical cam lobes while grinding about the same amount off of both sides of the lobe). It also wants to be installed with 5 degrees advance (at the cam) to achieve the specified timing numbers. This all requires reindexing (advancing) the cam by 6 degrees. You can do this by skipping the timing chain over 1 tooth (9 degrees advance with a 40-tooth sprocket) followed by retarding the cam by 3 degrees with an offset cam key. This requires a cam key with a 1/32" offset (yielding the 3 degree change for the sprocket). You might buy the offset key for about $6-$7 if you can figure out where to get it. Otherwise you start with the 3/16" thick crankshaft key and mill 1/32" from each side partway up to make the 5/32" thick key with 1/32" offset for the cam sprocket.
Something else you might do with not much expense is to replace the somewhat restrictive MGA exhaust manifold (with the short unequal runners and funny 3-way junction) with one from an early MGB (with the long center branch) and then use the MGB 2-into-1 exhaust head pipe. This exhaust manifold is about as good as anyone's tubular headers up to about 6000rpm, much quieter than tube headers, and cheaper (swap meet part). In fact everything I have mentioned up to now might be passed off as stock if you don't mention it to anyone. The MGB exhaust manifold may interfere with the steering column on the MGA. The fix for this is to take a 1 degree angle finishing cut on the gasket face of the manifold to reposition the bottom end of the manifold a little closer to the engine block. Mind you I haven't done this myself (yet), but I did recently poke the MGB manifold into the MGA engine bay. It initially appeared to have too much interference with the steering column, more than could be removed by angling it toward the base of the block. So proceed at your own risk here, but if you do manage to succeed, please let me know.
If you were so inclined a set of sticky road racing tires is a little over $500, and you should have 5-1/2" or 6" wide wheels to accommodate them. There is definitely a lot of the "YEE-HAA" factor here, but they don't last long before they're down to the wear bars and no longer street legal.
Some other closing comments. If this car is to be primarily a street driven car and not a competition race car, do avoid the overkill of a full race camshaft. The fast road cam or full race cam will give it terrible idle characteristics, and will kill low end torque so badly as to make it very unwieldy to drive on the street (just ask any race car driver). Also, larger carburetors will do almost nothing for increased power below 5000rpm, but they may screw up the idle and reduce low end torque some (and they would definitely get you tossed out of Stock class with any autocross club). The stock 1-1/2" carbs are enough to turn out 100 HP, and will turn the 1600 engine faster than the 1800 engine, so power from the 1600 can be within a few HP of the 1800.
If you want to go for more power than the easy mods I have mentioned above, then you need to do several things in concert, as these mods are synergistic (the total improvement is more than the sum of the parts if done properly). A full race engine (very expensive, maybe $6000) needs a radically ported cylinder head with larger valves, radical camshaft, larger carburetors, larger bore exhaust headers, some modifications to the oil pump, and lightening of the connecting rods if you want to run it regularly past 6500rpm. Also for racing an aluminum flywheel and competition clutch, stronger (custom) propshaft, wide alloy wheels, sticky race tires, upgraded brakes would be in order. And serious competition use needs strong sway bars (especially the front one), and possible lowered suspension, probably a non-slip differential, total gutting of the interior and removal of most of the lighting system and bumpers for weight reduction. All of this effectively renders the car not street legal, but even if it was street legal (keep the lights and bumpers) you probably wouldn't enjoy driving it much anywhere other than on a race track.
So getting back to the original question, just how much additional power did you have in mind?
Regards,
Barney Gaylord
1958 MGA with an attitude (but still civil street manners)
|