The MGA With An Attitude
CRANKSHAFT BEARINGS, WEAR and REGRIND -- CS-205B
Connecting Rod Bearings
Crankshaft bearings is in 5 steps spanning 5 web pages.
Click green arrow at bottom to follow pages in sequence.
A - Bearing Wear and Oil Pressure
B - Connecting Rod Bearings - (this page).
C - Main Bearings
D - Crankshaft R&R and Regrinding
E - Bearing Installation
When removing connecting rod bearing caps, be absolutely sure to keep the bearing caps in the right order with their original mated con-rods. When originally machined at the factory the bearing cap was cut and assembled to the con-rod first, and the bearing nest was bored afterward. The bore is almost never exactly centered on the split line, so mixing up the bearing caps will always result in some bearings being loose and some bearings seizing up on the crankshaft. It is a good idea to mark the con-rods and bearing caps for mating. If you don't have number stamps, punch makes will work as well. Put one punch mark on the end of the bearing cap and a matching punch mark nearby on the con-rod. Ditto for all parts. One punch mark for #1 rod, two punch parks for #2 rod, etc.
To remove a con-rod big end cap, bend back the lock tabs (when so equipped), unscrew the bolts or nuts, give the cap a little tap on one end or the other to knock it loose, and withdraw the cap. Then you can push the piston up into the cylinder bore to get the con-rod free from the crankshaft. In most cases the bearing half shells will stay nested in the con-rod and cap and will require a little pry with a small screwdriver tip for removal.
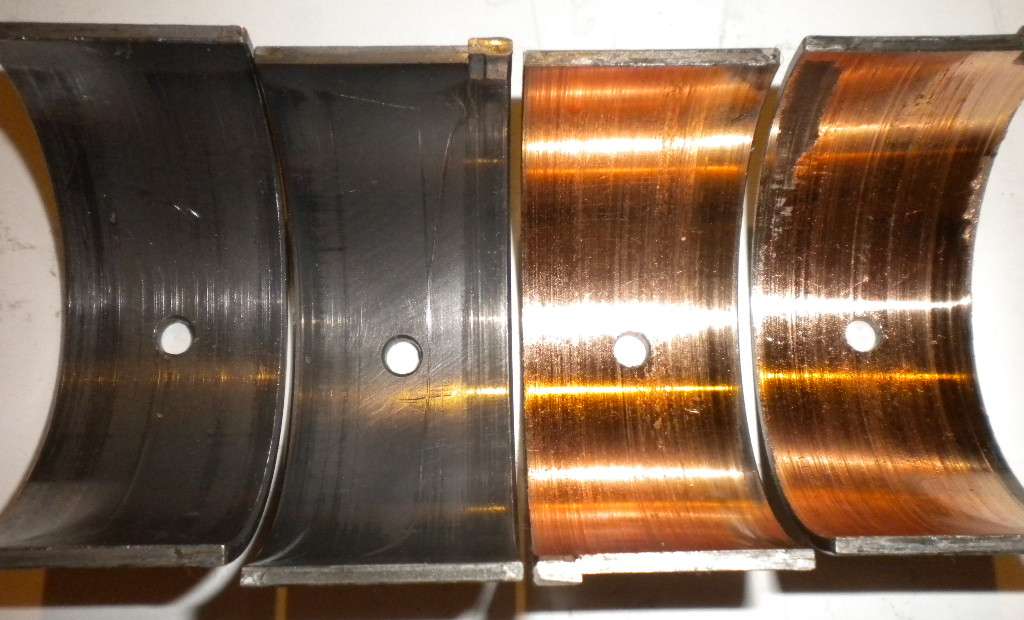
Bearing shells are composed of a thick steel backing piece with a very thin copper plating and a little thicker layer of soft white metal on the inside. When new the inside bearing surface has a soft buff finish all the way around. As it wears it develops a shiny surface in the middle (all the way across), but may have very little wear near the ends. You will likely find more wear on the upper bearing shell than on the lower one. If you see only white metal on the bearing there is a very good chance the crankshaft is still in good serviceable condition. If you see a very small amount of copper showing through the white metal it's a toss up. If you see any of the steel backing shell showing through the copper, the crankshaft will most likely need to be reground.
This photo shows connecting rod bearings in good condition (left) and badly worn (right) with all of the soft white metal worn away to expose the intermediate copper layer. The copper layer is very thin, so a little more running time would have the steel backing plate exposed to cause severe damage to the crankshaft rod journal surface.
Run your finger across the bearing journal on the crankshaft, front to back. The journals should be mirror clean and perfectly smooth. Repeat on top, bottom, and sides of the journal. If you can feel even the slightest roughness it needs to be re-ground. If it passes the finger tip test, use a 2" micrometer capable of reading .0001" increments to measure the diameter of the bearing journals on the crankshaft. Measure in two or thee different orientations, as the journal may not be round. Refer to the shop manual for correct diameter. If it is more than .001" undersize in any direction it needs to be reground. Regrind sizes will be in increments of .010" undersize. Undersize bearing shells will usually have the undersize designation stamped on the steel back side, such as 010, 020, etc.
|