The MGA With An Attitude
FUEL GAUGE Damping Circuit -- ET-213A
This article was provided by Manuel Aparicio in Madrid, Spain.
 Since I purchased my MGA 1600 some years ago, I have been quite disappointed by the oscillations of the fuel level gauge needle when accelerating, breaking, turning right, turning left, going up the hill, going down the hill or driving on an irregular ground. The fuel level readings were also quite inaccurate. I started trying to find a solution to this, and after a number of attempts found the mgaguru.com website, where several excellent articles appear on the structure of the MGA fuel gauge, as well as on how to repair and tune it. Following the recommendations, I first adjusted the fuel gauge readings from E to F... but the needle oscillations were still there. Since I purchased my MGA 1600 some years ago, I have been quite disappointed by the oscillations of the fuel level gauge needle when accelerating, breaking, turning right, turning left, going up the hill, going down the hill or driving on an irregular ground. The fuel level readings were also quite inaccurate. I started trying to find a solution to this, and after a number of attempts found the mgaguru.com website, where several excellent articles appear on the structure of the MGA fuel gauge, as well as on how to repair and tune it. Following the recommendations, I first adjusted the fuel gauge readings from E to F... but the needle oscillations were still there.
I then started to investigate a way to dampen these annoying needle fluctuations and eventually found a website offering a "fuel gauge dampener" at an affordable price (approx. 15 USD). The dampener was, in principle, designed for a certain old Porsche model. Although the seller was unable to confirm that such dampener would work in my MGA, I ordered one. When I received the dampener, I fitted it following the seller instructions (with the only exception of the polarity since the Porsche is negative grounded). I noticed a very slight reduction of the needle fluctuations towards the F side, and almost no change of the strong fluctuations towards the E side. The dampener was covered by a heat-shrink sleeve; I removed it and found that the dampener was just an ultra-capacitor of 0.1 F suitable for a maximum of 5.5 V.
I then requested the assistance of a friend (Salvador Luelmo, electronic engineer) who explained me how a capacitor gets charged and discharged in DC circuits (by that time I had some knowledge on how a capacitor works in AC circuits, but knew nothing about the behavior of a capacitor in DC circuits). We have spent time during the last couple of months designing and checking different dampening circuits based in ultra-capacitors, and eventually got what seems to be a good solution for the needle fluctuations. The final circuit is attached to this paper, where I also included the values of the components fitted to my MGA. I must say that, with this circuit properly installed in my car, the needle oscillations became insignificant in all circumstances.
Notice that I had to do some modifications in the gauge itself:
1) Fit two new terminals (M and N) properly isolated from the gauge body.
2) Weld the end of coil B and the beginning of coil T to these new terminals.
The key elements of this circuit are capacitors CB and CT, which function is to dampen the fluctuations of the voltage applied to the gauge active coils produced by changes of the sender resistance.
Diodes DT and DB are also important elements since they oblige the capacitors to discharge through the gauge active coils, thus maintaining its dampening effect during the capacitors discharge. Switches MS1 and MS2, when turned off, permit an immediate reading of the fuel level even if the charge of the capacitors is not in a stable situation (capacitors charging or discharging).
Switches ROS1 and ROS2 are relay operated switches. They disconnect both capacitors when the ignition switch is turned off, impeding its discharge, so that the gauge reading when turning the ignition switch on again is the same that the reading before it was turned off.
Diode AD and resistor AR are intended to protect the ignition switch against the sparks the relay coil tends to produce when it is switched off.
Capacitor CT is made of two ultra-capacitors of 1.5 F suitable for a maximum voltage of 5.5 V in parallel. Capacitor CB is made of three groups in series, each of such groups made of six ultra-capacitors of 1.5 F suitable for a maximum voltage of 5.5 V in parallel. Each ultra-capacitor of 1.5 F cost me around 3 , i.e. a total cost of 20 x 3 = approx. 60 .
There is, however, a problem we have not been able to fix (yet?): It takes some minutes for the gauge to read "F" when filling up the tank from an "E" initial situation. In my opinion this is a minor problem as compared with the former strong oscillations of the gauge needle.
Madrid, May 22nd, 2013
Manuel Aparicio
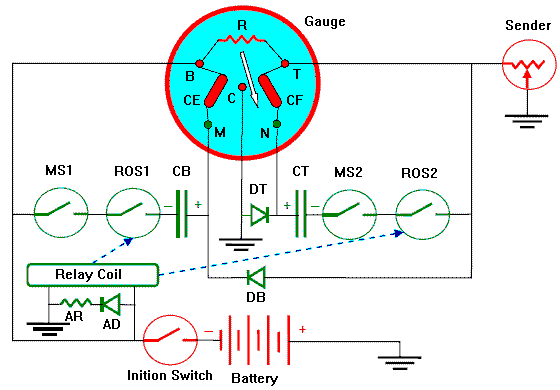
Fuel gauge damping circuit
Color codes:
Red = Existing components
Green = New components
Blue dotted-line arrows = Pointing switches operated by the Relay
References and values:
| Sender (1.4 / 82.0 ohm) |
| R | = Passive resistor (155.5 ohm) |
| CE | = Active coil "Empty" side (103.9 ohm) |
| CF | = Active coil "Full" side (103.9 ohm) |
| B | = Existing B terminal |
| T | = Existing T terminal |
| C | = Existing center terminal (grounded) |
| M | = New terminal (isolated from the gauge body) |
| N | = New terminal (isolated from the gauge body) |
| MS1 | = Manual on/off switch |
| MS2 | = Manual on/off switch |
| ROS1 | = Relay operated on/off switch |
| ROS2 | = Relay operated on/off switch |
| CB | = Capacitor (dampener for the "Empty" side coil) (3.0 F; 12.3 V max) |
| CT | = Capacitor (dampener for the "Full" side coil) (3.0 F; 5.3 V max) |
| DB | = Diode ("Empty" side) (1.0 A max) |
| DT | = Diode ("Full" side) (1.0 A max) |
| AD | = Auxiliary Diode (Relay) (1.0 A max) |
| AR | = Auxiliary Resistor (Relay) (34.0 ohm) |
|