The MGA With An Attitude
LIGHTING SWITCHES, Old and New - ET-117
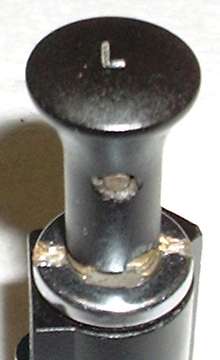
 Your first encounter with an MGA dash switch will likely be figuring out how to remove the knob. The trick is to press in on the little button on the bottom, and pull. If that doesn't do it, press harder, and pull harder. If that doesn't work, get a Vice-Grip and crush the knob into little pieces.
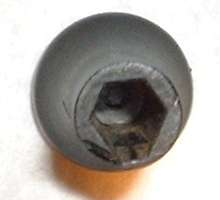
Looking at the back of the knob you will see a hexagonal hole that is slip fit on the switch shaft. At the bottom flat of the hex there is a small ramp that serves as a lead in for the retaining pin. This becomes more significant later.
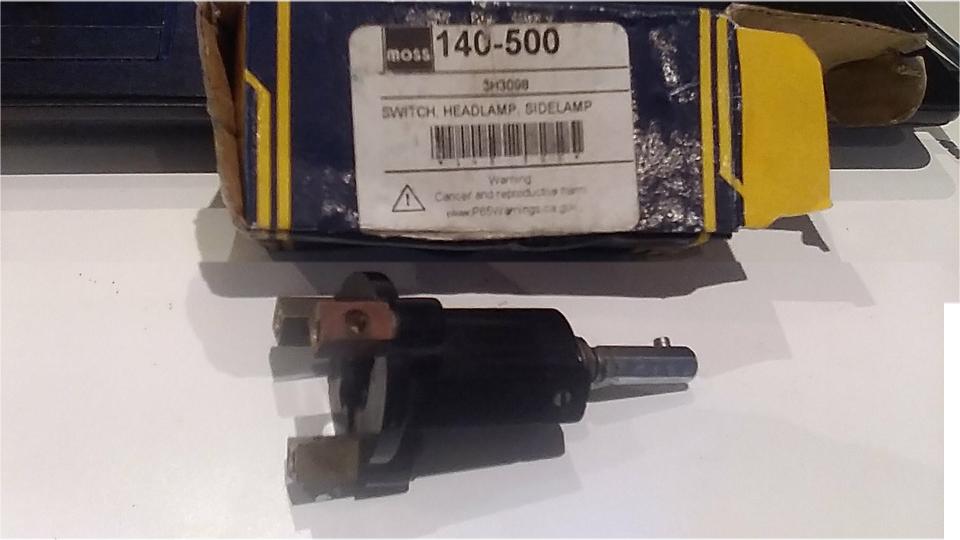
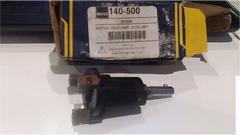
For the rest of this article we will be looking at two types of lighting switches, one original equipment and the other a modern replacement type switch from Moss Motors. They both fit and work, but there are significant differences in appearance (and sometimes quality) such that the aftermarket switch would never pass concours inspection and may have some long term functional problems.
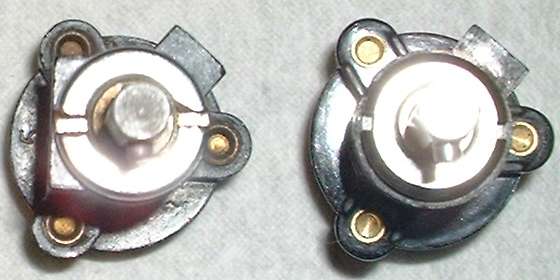
With the knob removed you encounter the panel nut. Here we have the original switch on left and the replacement switch on right. The panel nut on left is flat with a slightly rounded shoulder and slot across the face. In a pinch you might place a narrow screwdriver in the slot at one side, then place an adjustable wrench across the switch spindle and the screwdriver to unscrew the panel nut. Otherwise you need a special panel nut wrench. The panel nut on the right is flat faced with a wide 30 degree chamfer on the shoulder. The slots in this one are on the edge, making it very difficult to remove with common tools without scarring up the dash panel. It will require a different non-original type of panel nut wrench (which you may not have), may look different than other panel nuts in the same car, and of course it will not pass concours inspection.
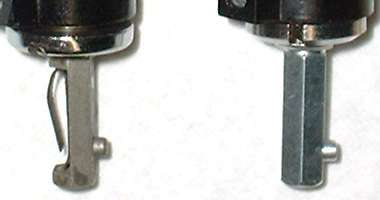
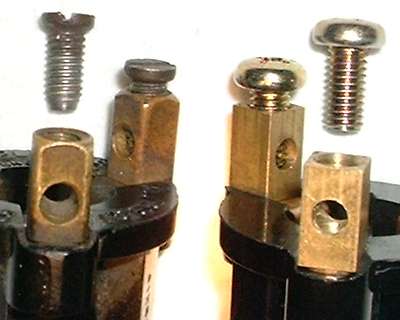
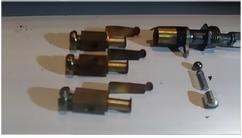
Looking at the side of the shaft you can see the spring loaded pin that secures the knob on the shaft. For the OEM part the pin has a small flat head and extends through half the thickness of the shaft for a long bearing surface and fairly stable pin, and there is a leaf spring to hold it in place.
 When you place the knob on the shaft the pin is easily pushed back as it slides up the little ramp inside the knob. Pushing further the knob captures the top side of the leaf spring forcing it down to apply strong pressure on the pin. With the knob pushed fully home the pin snaps out to engage the hole in the bottom side of the knob to hold it securely on the shaft. Additionally the leaf spring maintains pressure on the knob making the knob one with the shaft to serve as an anti-rattle device. These can be disassembled decades later with a push on the pin and pull on the knob.
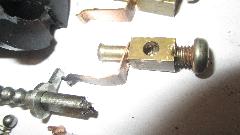
For the replacement type switch the pin also has a small flat head. This is placed into a drilled hole in the shaft along with a compression coil spring, and the side of the shaft is swaged to hold the pin in place. The pin has very short engagement with the shaft, so it tends to wobble around easily. The pin also protrudes a little farther than the original part, so you have to depress the pin bit before the knob will pass over the pin. Then press the knob home, and the pin snaps into the hole in the bottom of the knob to secure the knob on the shaft. The difference here is that the knob is still a loose slip fit on the hex shaft, and there is no anti-rattle device, so the knob will wiggle around a bit on the shaft. I have never heard anyone complain about the knob buzzing with resonant vibration while driving the car, but it can have an uncomfortable feeling of being loose when you pull the knob to switch on the lights. Another issue with this is that the spring loaded pin in the blind hole may tend to load up with dirt or rust over time making it difficult to depress the pin to remove the knob many years later.

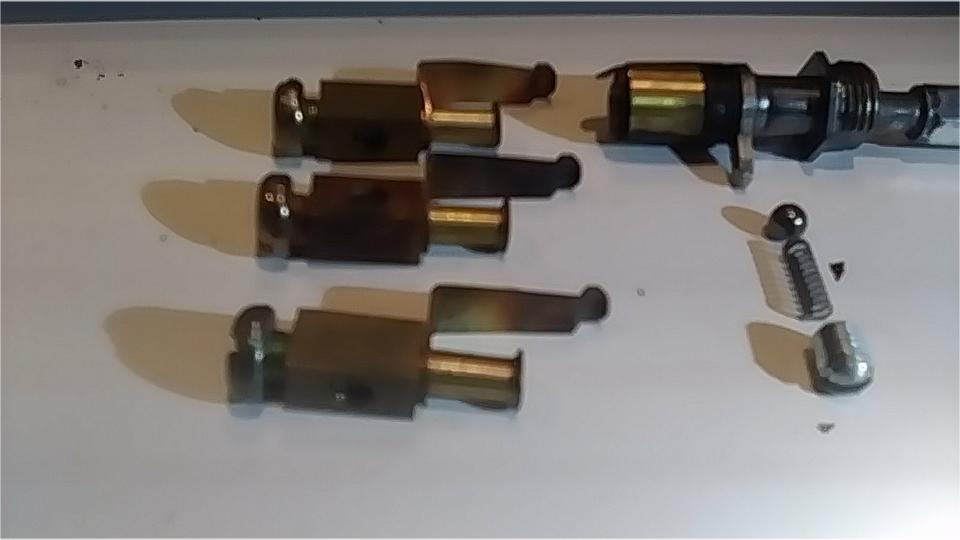
Here we have a side view of the switches, OEM on the left and replacement type on the right. Notice the staggered slot in the side of the housing and the small metal finger attached to the shaft. This gives the two stage effect requiring pull-twist-pull to move the switch from off to parking lights to head lights. It also requires push-twist-push to switch off. This gives a positive feel for finding the intermediate position for parking lights without having to look or double check afterward.
Now notice the shape of the slot. The OEM switch has an angled ramp on the left side. If you pull the knob straight out it will follow the ramp to go easily from off to full headlights position in a single pull. If you twist the knob slightly anticlockwise while you pull it will go from off to half way and stop when it encounters the ramp, giving a positive feel for the intermediate position. To switch off from full on still requires push-twist-push, but when you become accustomed to it you can twist while you push and it easily goes full stroke off in one motion.
The replacement switch has a squared off staggered slot with no ramp. This one will always require pull-twist-pull and push-twist-push for two stage operation whether you like it or not. The only way to go full stroke in one motion is by applying a very strong twist while you pull or push, which may be uncomfortable and unnatural to accomplish.
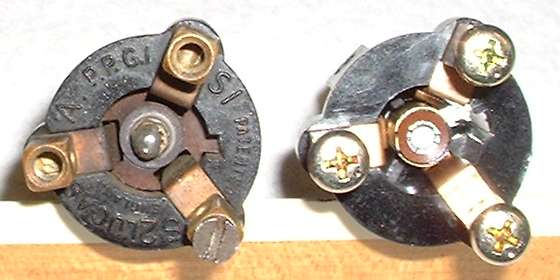
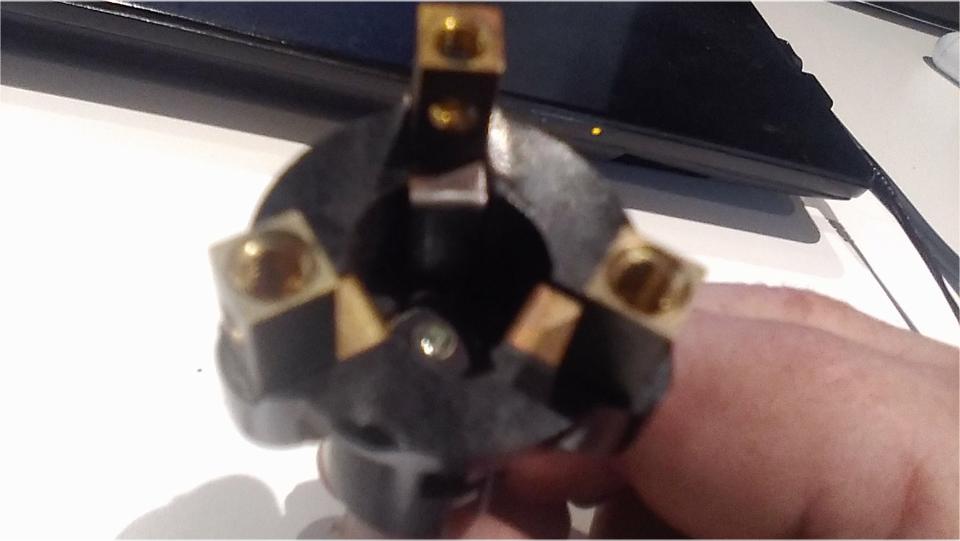
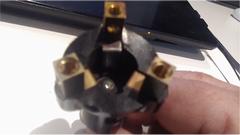
Here we have a view of the back end of the switches in upright position as they would be installed in the car. The OEM switch has the Lucas name and the terminal markings A, S1, and S2. The aftermarket switch has no markings anywhere on the switch, so you may have to guess which terminal gets which wire, or use a test light to determine which terminal does what. Fortunately the replacement switch has the same terminal functions, so if you have this picture in hand you can know the correct terminals without further tinkering.
Notice that the OEM switch has a flat washer and a small hex nut on the tail end of the shaft with a dab of solder to secure it. The replacement switch has the tail end of the shaft swaged over a bit onto the fiber part like a tubular rivet. This is the feature that first brought my attention to the replacement part when the switch fell apart one day and dropped the contact cylinder on my foot while I was driving, resulting in no lights. Luckily it was a slightly overcast day, and I could get by with no lights until reaching my destination. Not being able to repair the switch on the road, I moved all of the wires to one terminal post so the lights were permanently on, and used the battery cut-off switch to kill power when parked.
Also notice there is a difference in the terminal screws. The OEM part has #10-32 slotted screws with a slightly tapered point, similar to a dog point set screw. These screws are common to all of the OEM dash switches. The replacement part has 5x0.8mm metric screws with Phillips slotted heads and flat screw tip. These are not interchangeable with the original parts. If you replace one switch only this results in the need to use two different screwdrivers for electrical work an different switches (also not concours material).
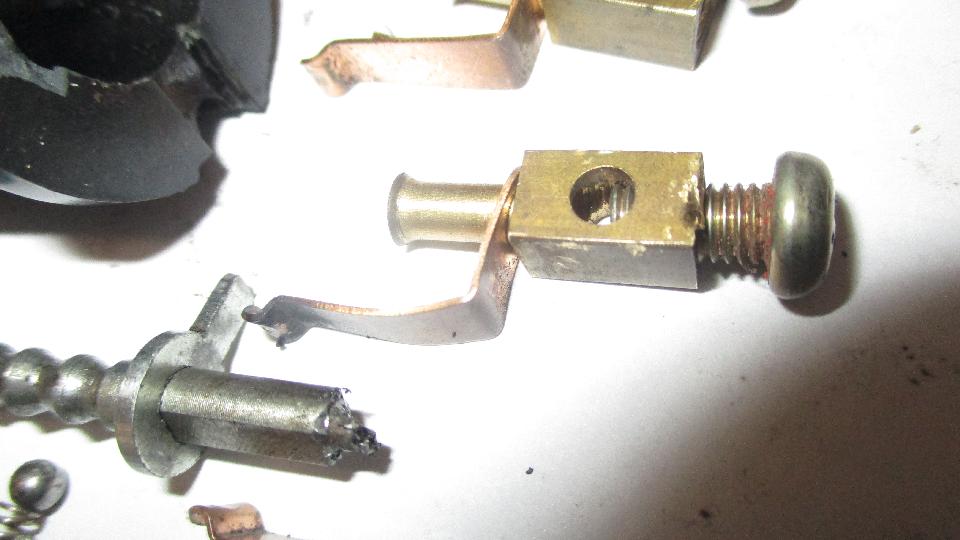
Now comes the functional problem. The terminal block on the OEM switch has a neat cylindrical cross hole to hold the wires. The drilling for the screw threads stops short of touching the far side of the cross hole, leaving a smooth surface to seat the wires. On the replacement switch the drilling for the screw threads goes beyond the cross hole. This was presumably done to allow tapping of the thread deep enough to allow a plain screw tip to go far enough down to clamp the wires, therefore allowing use of a standard (metric) screw.
Unfortunately, this penetration of the drill point past the far side of the cross hole makes a sharp cornered depression in the surface where the wires have to seat. That results in a guillotine effect that will crimp and possibly shear some of the strands of wire each time the terminal screw is tightened. A crimped wire with broken strands is more likely to break off during operation of the vehicle due to bumps and vibration. If you later loosen the screw to remove the wire(s), it may take a strong jerk to extract the wire and could leave a number of tiny loose wire fragments and a badly damaged wire end. For reconnection you might have to cut and strip the wire to restore a clean wire end.
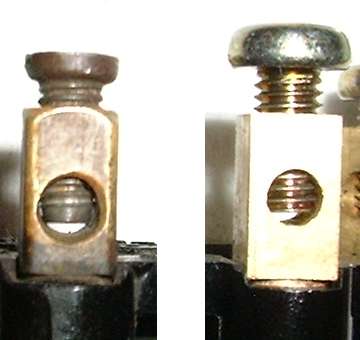
This last picture shows the difference with the terminal screws almost seated. The proper set screw closes down to hold the wire nicely on a smooth seating surface, while in the replacement part the screw bears down into the counter-drilled hole beyond the nominal seating surface, possibly shearing the wire. Notice also all rounded corners on the original terminal block and all sharp corners on the replacement part. Long career mechanics will understand the advantage of the rounded edges.
In summary, what began as a parking lot repair of a failed replacement switch ultimately resulted in close inspection and disclosure of a number of flaws and deficiencies in the new part. This gives me cause to seek out a good original part for a spare or replacement rather than buying a new aftermarket part. There is often truth to the saying "They don't make them like they used to". It seems like the old Lucas conspiracy was pretty quality conscious after all.
Addendum, September 2010:
Having lived with the new switch for a couple of years, I can now post some follow up notes. Good news is, it still works (sort of). Bad news is, it has a couple of significant functional problems. When switched to the intermediate position for parking lights, it often makes internal contact to have headlights on at the same time, which should not happen. With some conscientious fiddling it can be make to drop the contact for headlights, leaving only parking lights on as intended. But if the knob is bumped the headlights may be reconnected. This may not be a safety issue, but it may run the battery down too soon if the car is parked (not running) with parking lights on, and the headlights are also on inadvertently.
I have encountered a more serious problem, so far twice fairly recently. When the switch was pulled to turn lights on, there was no contact at all, and no lights. The first time this happened (on a dark street) I fiddled with the switch for two minutes and could not get it to work. Wires on back were secure and had input power. I decided to drive it carefully to a more lighted venue (service station) for additional tinkering. After two blocks of driving the car hit a bump and the lights come on. After that the switch worked as before, and it is hard to diagnose an intermittent problem when it is working.
The next time it happened in my home garage, switch on and no lights. No amount of fiddling with the knob could get it to work. Wires are still secure with power input. After some fiddling around the back end, I ultimately poked and wiggled the rear end extension of the switch rod, and the lights came on. I have been able to duplicate this situation a couple of times, so it seems the internal contacts are somehow intermittent. I have just reported this to the vendor, awaiting reply.
Addendum, September 2012:
Years have passed, and I never got any feedback from Moss on these issues, so I suppose they are still selling the same parts.
On 03 October 2012, Steve Gyles in Church Crookham, Hants, England wrote:
"I had all the issues when I bought a new switch back in about 2007. I was actually trying to adapt such a switch to operate my windscreen wipers and washers. First pull put on the wipers; second twist and pull the washers. It kept shorting out, resulting in random, sometimes unstoppable water sprays giving me a 'facial' behind the sports windscreen. The switch is now in my junk box".
Addendum, May 21, 2015:
I paid a personal visit to Moss Motors in Goleta, CA, and had a chat with Kelvin Dodd about this switch. The primary functional problem being shearing of the wires when tightening the screws.
Addendum, February 18, 2017:
Ultimate switch failure shorting power input to ground and burning the power wire in the harness. This elevates the part from poor quality to Faulty Replacement Part. See new page on the failed part at FT-088.htm.
Addendum, April 13, 2020:
Latest report is that the new bezel nut is non-original, and also has different threads. So the new bezel nut will not fit the old switch, and the original bezel nut will not work with the new switch. If you buy the new switch you will have to use the new bezel nut that comes with it, even if it doesn't look right (obvious in pictures at top of page).
Addendum, January 1, 2023:
Another Moss Motors Classic Gold MGA lighting switch bit the dirt today. They must
 be very proud of their merchandise to keep putting the same fancy label on the same classic junk for 15 years now. I have been buying these two at a time to have spares, since they have proven to be so unreliable. The last failure shorted to ground and nearly burned up the wiring harness. This one just gradually lost the headlight connection while parking lights still worked. Had to fiddle with the switch each time it was turned on to be sure it would actually light up. Sometimes hit a bump and headlights would go out. Finally they just refused to make any connection at all, having to change the switch again.
Being a riveted assembly requires breaking the Bakelite shell for disassembly for internal inspection. The one clean contact was the S1 terminal, only carrying 3 amps total for all parking lights and dash lights (and maplight). The half burned and half blue contact was S2 terminal for the headlight output, carrying 10 amps regularly for the two hallogen lamps. The totally burned and black contact was the A1 input terminal carrying current for parking lights and headlights together. My best guess here after failure, is that the contacts do not have enough spring force to make reliable electrical connections.
|