The MGA With An Attitude
With temperature cycling the coolant expands on heating to blow some coolant (about one pint) out of the system, and then contracts on cooling to leave some air space in the top of the radiator. If you fill it to the top again it will just blow out the excess coolant the next time it warms up to running temperature, and then your right back where you started. As such, there is this "constitutional" requirement for some empty space in the radiator top tank. Since the MGA radiator filler neck has a right angle bend just below the filler cap, it is impossible to see directly into the top tank, so it's hard to tell the coolant level. Removing as little as one pint of fluid takes the fluid level to the bottom of the filler pipe, after which you can't see the fluid any more, so you're never really sure exactly how much fluid might be missing. And if you try to check the coolant level when the system is hot you could scald yourself.
For a cross reference list to other manufacturer and vendor part numbers, see article CO-126, Radiator PRESSURE CAP and Interchange Parts List 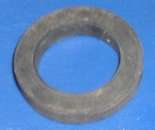 The next solution for this problem is to use a packing piece to enable you to use a short neck cap in the deeper filler neck. The NAPA-Balkamp cooling system pressure tester kit contains a 1/4 inch thick rubber washer which is used exactly for this purpose when attaching the short neck pressure tester to the long neck radiator. This rubber washer has a part number and can be ordered as a replacement part for the pressure tester.
 Cooling System Pressure Tester Replacement Spacer NAPA Part #: BK 7009520 -- Line: Balkamp 700-9520 -- $3.39 (July 2023) If you do use this piece under your pressure cap, you also need to be careful not to lose it when you remove the cap for servicing. The final solution to this problem is to replace the long filler neck with a short filler neck. This is about a two minute job for a radiator shop. They just solder in the replacement part, which they get from any number of radiators that are scrapped every day. They may even be able to do this without removing the radiator from the car. You may notice that some of my pictures show the short filler neck installed in my MGA radiator. Okay, now that we have the pressure cap tech cleared up we can get on to the easier part of the job. You will need a catch bottle for the fluid that does escape from the radiator. This needs to hold more than one pint of fluid, and it works well if the bottle is clear plastic so you can see the fluid level at a glance. It needs to have a hose connected to the bottom of the bottle. If the hose is connected to the bottle cap, it needs to have a tube inside extending to the bottom of the bottle so it can suck most of the fluid out to be returned 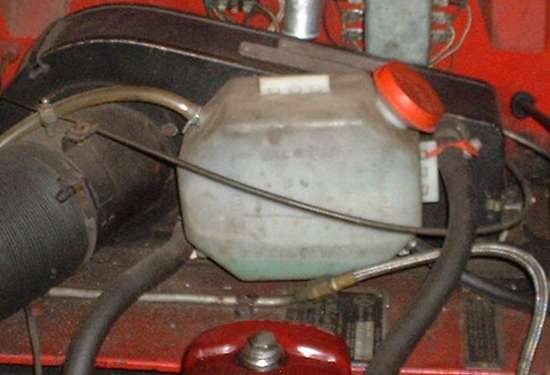 to the radiator as it cools. The catch bottle can be mounted anywhere, but is most convenient if it is somewhere near the radiator and in clear view.
 The large coolant recovery bottle shown here came as a kit from Pep Boys for under $7. It has the pop-off filler cap at one corner, and mounting brackets on top and one side, so it can be mounted as shown or in the more vertical orientation. There are hose connectors on opposite corners, so regardless of orientation one connector will be at the bottom for the fluid port, and the other connector will be at the top for a vent. In this case I have a clear plastic tube attached to the top vent and directed down between the inner fender and frame near the ground to provide a spill point in case it should ever overflow (which it could do if the radiator boils) and not dump antifreeze on the heater shelf. The bottom connector gets the hose which comes from the radiator overflow tube. I have this bottle tucked in ahead of the heater box in my MGA, not a pretty location but convenient. Between the heater control cable in front and a tie-wrap on the end, it seems to be secure enough to satisfy the SCCA guys, and it has been sitting right there for many years (80,000 miles as of November 2006). This smaller bottle shown here on the right is actually an original type Tudor windscreen washer fluid bottle. This is large enough (barely) for the coolant overflow on the MGA. It is also small enough that it could be base mounted with the original bracket on the body horizontal air pan just in front of the radiator, a nice out of the way location (being careful not to interfere with the oil cooler if your car has one of those). The later style Tudor bottle with the larger cap might be even better. 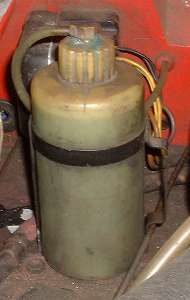 To use this bottle you would need to use a larger hose with 5/16 inch bore to match the radiator overflow pipe. You could drill out the hole in the cap to pass the hose through the cap. The end of the hose then needs to be positioned near the bottom of the bottle, without touching the bottom so as not to obstruct the fluid flow. A touch of silicone sealant might be used to hold the hose in position in the bottle cap. The bottle also needs a 1/4 inch minimum vent hole at the top, which can be a simple drilled hole in the cap, if you don't mind the possibility of an occasional spill of coolant around the area of the bottle mounting location. Otherwise you may want a second hose attached to the cap to direct drainage closer to the ground.
 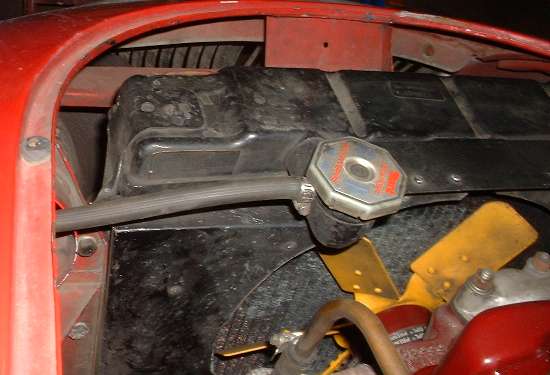 The final step is to connect the recovery hose to the original overflow tube on the radiator. The picture here shows the original steel tube cut short with the hose connected right at the filler neck. You do not have to cut the original steel overflow pipe. The hose can just as well be connected at the bottom end of the original pipe, as long as that pipe and all the connections are air tight to provide for drawing fluid back into the radiator with a slight vacuum.
 With the coolant recovery parts installed you can fill the coolant fluid right to the top of the radiator filler neck and install the pressure cap. Put a small amount of fluid in the recovery bottle, just enough to cover the end of the pickup tube near the bottom of the bottle when the cooling system is cold. As the engine warms up some fluid will be expelled from the radiator to partially fill the recovery bottle. When the engine cools down the fluid will be drawn back into the radiator. At all times the radiator will be full of fluid to the top with no air space. If there is air in the system to start with, it will be expelled from the radiator with the first heating cycle, and liquid will be drawn back to take its place upon cooling. Fluid level in the recovery bottle will rise when the engine is hot and will drop as the engine cools. As long as you can see a little coolant still in the recovery bottle when the engine is cool you can be assured that the radiator is full to the top, and you will never again need to remove the pressure cap for inspection or refilling. If perchance all of the fluid should ever disappear from the recover bottle, this is immediate indication that fluid is somehow being lost form the cooling system. That might happen if the coolant was to boil, which would require either failure of the pressure cap or running elevated system temperature beyond the end of the temperature gauge scale (higher than 230dF). Otherwise if it loses fluid you should inspect and test the pressure cap, followed by a pressure test on the radiator. When the cooling system will not hold pressure you need to find the leak point. A leak at the water pump or one of the hoses will result in a visible fluid dribble. A leaking heater core may dribble fluid on the tunnel carpeting under the heater box. A leaking head gasket might dribble fluid from the head gasket joint where you could see it on the outside. Or it might leak the fluid internally into a cylinder where it can get past the piston rings into oil sump (a very serious condition). A cracked cylinder head might also leak coolant internally, either into a cylinder or into an exhaust port (or much more rarely into an intake port). So you see the coolant recovery system can have multiple uses. This includes serving as a daily inspection and diagnostic tool, whereby any coolant leakage might be more immediately noticed and dealt with in due time so as to prevent any additional or more serious (expensive) repairs. Here's wishing you many thousands of miles of carefree and happy motoring. |
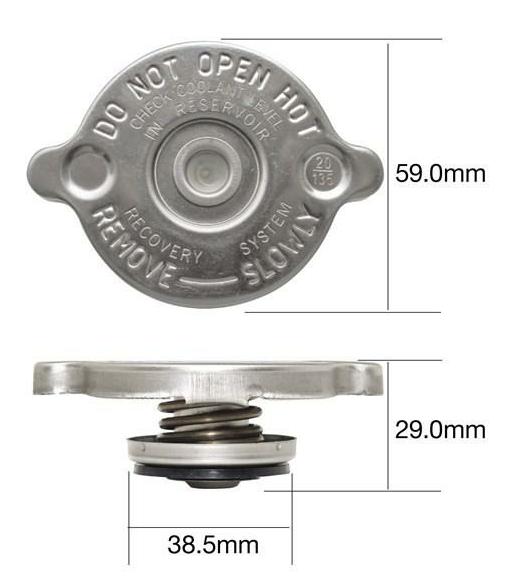
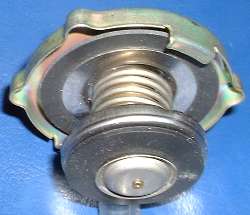 The primary feature of the cooling system pressure cap is a spring loaded foot with a rubber seal on the bottom. This sits against a step in the bottom of the filler neck. Pressure inside the radiator will displace the seal foot to allow fluid to escape so it doesn't explode the radiator, with the relief pressure determined by the selected spring force. Higher pressure allows for higher working temperature without allowing the coolant to boil. Early production MGAs used a 4 psi relief cap. Later production cars used a 7 psi relief cap, which is generally considered to supersede the earlier part.
 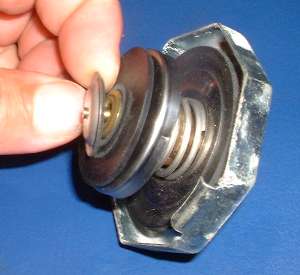 SPECIAL NOTE: Some Chrysler cars in the mid to late 60's used a zero pressure cooling system with a similar poppet valve, which was NOT spring loaded. This valve would hang open by gravity and allow free flow in both directions, thereby never producing any pressure in the cooling system during normal operating conditions. If perchance the fluid should suddenly overheat and boil, the velocity of the escaping steam and vapor would suddenly push the poppet valve closed, and the system could then develop pressure up to the value of the relief spring force. This way the system might prevent blow out or boiling away of the coolant for some elevated temperature during temporary unusual conditions of higher than normal temperature. I'm not sure who's idea this was, but this type of cap is definitely NOT suitable for use on the MGA.