The MGA With An Attitude
KEEPING YOUR COOL - CO-101
CO-101 is a general primer on why your MGA might RUN A LITTLE HOT, and what you might be able to do about it.
I think I got past this problem years ago. Mostly I just ignore the temperature gauge unless it starts creeping up on the 230 mark. See Trailering in Montana
Not to over-stress the obvious, but first things first. Check to be sure there is adequate coolant in the radiator, that you have the correct pressure cap on the radiator, that the front of the radiator core is not plugged up with dirt and/or bugs, and that the fan belt is properly tensioned. Also be sure the pressure cap is sealing at the bottom pressure foot seal so it will retain pressure and not just belch fluid out with the first warm-up.
It is fairly common for the MGA temperature gauge to be out of calibration, or for the hand to be disoriented on the spindle. Remove the sender bulb from the side of the cylinder head, stick it in boiling water, and see if the needle points somewhere near the 212 mark (really 210, just marked 212 to get your attention). Mind you that water will boil at a slightly lower temperature at higher altitude. Then when you apply pressure with the radiator pressure relief cap the coolant will boil at higher temperature with the higher pressure.
Assuming the temperature gauge is working okay, the next thing is to come to an understanding of what "normal" is for an MGA. In cool weather the thermostat should control the minimum operating temperature. That is, if you have a 180 thermostat installed the operating temperature should quickly come up to 180 and never again go below 180 as long as the engine is running. The thermostat has nothing to do with the engine running at any higher temperature, as it will be wide open and allowing free flow of coolant any time the temperature is higher. The proper thermostat for all around driving for the MGA is 190, but these are very hard to find today. Even when you see one listed in a catalog as 190 it will usually be a 195 thermostat. So when you may think you have a 190 installed, and your temp gauge is constantly pointing between 195 and 200, don't worry about it.
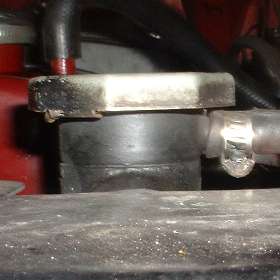 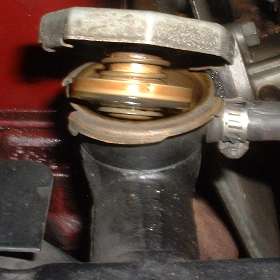
One VERY important thing to notice is that the original MGA radiator has a long filler neck, 1 inch deep from the top rim to the inner sealing flange. Newer radiators have a 3/4 inch deep neck. You must have the proper radiator cap to reach all the way to the bottom of the filler neck to affect the pressure seal. The long neck demands a 1-1/8" reach pressure cap that will compress the spring 1/8" when installed. The shorter neck needs a cap with 7/8" reach. The longer cap will not fit onto the shorter neck. The shorter cap will fit on the longer neck, but will not seal. You have to have a pressure seal to allow cooling system temperatures higher than the normal boiling point of coolant. With a proper 7 PSI long reach pressure cap and 50/50 mix of permanent antifreeze/coolant and water you can peg the temperature gauge at 230 without boiling the coolant. The engine will be perfectly happy running that way all day long, as long as you keep it moving so the carburetors don't overheat and go into vapor lock.
For each psi increase above atmospheric pressure (14.7 psi) the boiling point of water (212dF) increases 3.25dF. The 7 psi pressure cap therefore increases boiling temperature to 235dF. Boiling temperature will be even higher with a mix of antifreeze and water (but the antifreeze carries slightly less heat).
One small side note here. The original type long neck radiator caps (probably) CANNOT be found with the proper seal around the top flange to be used with an external coolant recovery tank. See additional notes on installing a coolant recovery system. If you want to install a coolant recovery system you can have a radiator shop change the original long neck filler to the newer short neck filler, so you can then use the newer type radiator cap. The newer caps are available with the top flange seal that will allow the suction return of coolant from the remote bottle, and are also available in a wide variety of pressure ratings, and even available with a pressure relief lever on top. A sharp eye might notice the picture above shows a transplanted 3/4" deep filler neck on my radiator, and a rubber hose attached to the overflow tube.
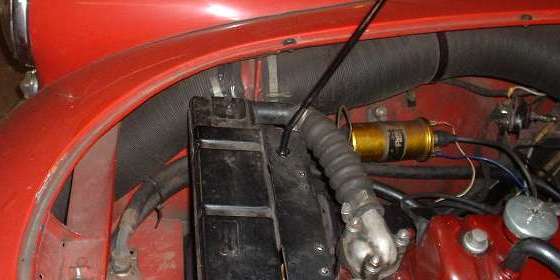
The next thing to pay attention to is to seal all the air gaps around the radiator to prevent hot air from flowing around from the back to the front to recirculate again through the core. For starters, all three of the 4 inch vent hoses must be in place and attached to the cowling beside the radiator. You see two in the picture above, one long hose from the radiator diaphragm back to the heater box, and another shorter hose in front bringing up cool air from just inside the grille. There is another short 4" hose on the other side ahead of the radiator to bring up cool air to blow at the carburetors (which only works when the car is in motion). If your car does not have a heater or fresh air defroster box, you are excused from having the longer 4" air hose. If either of the 4" diameter ports through the radiator diaphragm are left open, hot air can get through to recirculate around the sides of the radiator.
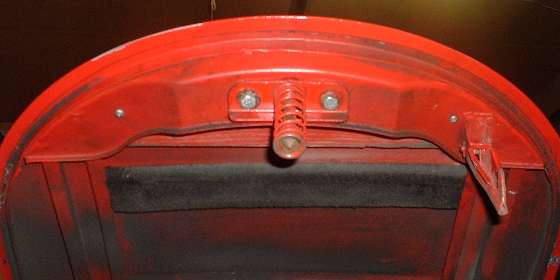
Another thing you need that is often missing is the felt pad that is glued to the underside of the bonnet and comes to rest on top of the front edge of the top tank of the radiator. Without this pad in place hot air can recirculate over the top of the radiator. Any hot air recirculating back through the core for a second pass is displacing the cool air that should be going through the core, and thus reducing the cooling capacity of the radiator. For a system that is marginal to begin with, just a little reduction in cooling will make a BIG difference in the coolant operating temperature. If you have need to make your own felt block, it is 3/4-inch x 2-inches x 13-1/2-inches long.
The MGA radiator is mounted directly on the car body, so it is subject to a lot of vibration and physical shock. It is common for the radiator to develop leaks along the solder seams where the top and bottom tanks attach to the flanges on the core. A radiator shop can unsolder the tank, clean the joints and resolder the tank to stop the seam leak. However, if you drive the car a lot, and particularly if you drive it on rough roads, the seam leaks can return again.
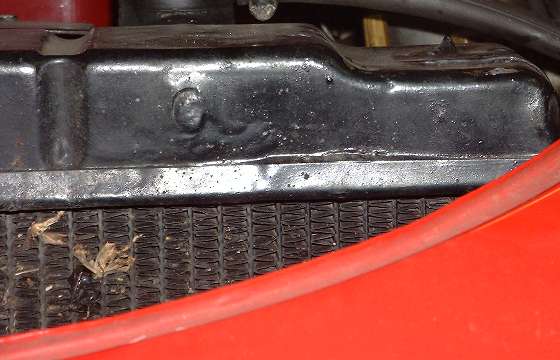
The solution for this is to have the radiator shop reform the sheet metal at the solder joint while installing a new core. The original joint is two horizontal flanges soldered together, which will be in tension and wanting to pull apart with pressure in the tanks. A radiator shop can reform the flanges on the tank to be vertical and flush with the sides of the tank (like no flange), and then form the flange on the mating core to vertically overlap the sides of the tank when soldered in place. This puts the solder joint in sheer loading, which is much stronger than the original tensile loading. I had my radiator done this way several years ago (photo above), and the shop finished by pressure testing it to 25 PSI. I have since done another 100,000 miles without another seam leak.
The original MGA cell core radiator was apparently quite good. After more than 50 years there are some survivor cars with original cell core radiator that will run under 190dF all day long in hot weather, and will never go above 200dF. However, there are very few original MGA radiators still in use. Most have long since been re-cored, and the newer cores are commonly a bit lacking in cooling capacity. Any radiator shop worth its salt can talk a blue streak about upgrading to a better core. Common practice is to install a VT type 4-row core, which means four rows of vertical water tubes. Even then there are variations, with options of having more fins closer together to provide more surface area. It is apparently possible to over do this though, as when you get too many fins taking up space you can be obstructing the air flow through the radiator. That's what is in the photo above, a 4-row VT core with closely spaced fins. With closely spaced fins it is also more likely to clog up with small bugs and dirt, so you may need to backwash it with a pressure hose occasionally.
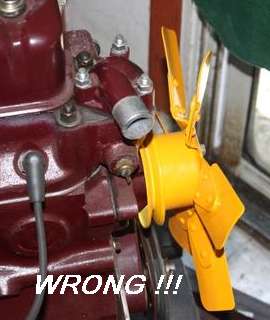
In the next pictures notice the orientation and curvature of the fan blade. The convex side of the blade should be forward, as in the photo below. If the cooling fan is installed backward (photo at right) it will still pull air in the same direction, but it will move MUCH LESS AIR. This problem is actually quite common, as some people mistakenly install the blade backward figuring it should be farther away from the radiator.

One last thing you can do to help the cooling system is to install a radiator fan shroud. This is a closed shell that fits on the back of the radiator to form a pocket an inch or two deep with a fairly close fit around the edges, and with a center hole slightly larger than the fan blade. This forces air coming through the radiator to also go through the fan. More importantly, it keeps air that does go through the fan from spilling over the tips of the fan blade, and from recirculating around the ends of the blades to pass again through the fan. Think of it as a vacuum chamber where the fan draws a vacuum in the box to pull air through the radiator at a nearly equal flow rate over the full area of the core. The combination of improved fan efficiency and use of the entire core area for air flow gives a marked improvement in cooling at low speed. It can save your britches if you get caught in stop and go traffic in hot weather. For road speed over 40 mph it probably doesn't make any difference at all, but won't interfere either.
My fan shroud is bent up from sheet metal and riveted together at the corners. It is also made in two pieces with the split point on the vertical center line so it can be installed without removing anything else. Loosen 6 radiator mounting bolts, remove center bolt on each side, and nudge the radiator forward slightly to leave a small gap at the mounting flanges. Rotate each half of the shroud in turn around the fan blade into position, and slide a flange of the shroud between the radiator to body joint. Align shroud generally concentric with fan blade, and tighten the radiator mounting bolts. Reinstall two center bolts. The top and bottom bolt holes in the shroud are slotted, but not the center holes, which is why the center screws have to be removed.
I bought this one from Specialty Parts & Service, 1050 Lafayette Rd, Medina, Ohio 44256, USA, (800) 700-7057. I paid $49.95-USD plus shipping in early 1997. I had it shipped to San Antonio, Texas, 2nd day air, at the beginning of my Alaska trip, and installed it when I got to Texas. It made a HUGE difference puttering around town in the Texas heat. After installing the fan shroud, no matter what I do to the car, the temperature gauge will never go higher than 220dF as long as the engine is running, even sitting and idling in the hottest conditions. But it does still have the vapor lock problem when the carburetors get hot.
Addendum July 2010: The guy who made the steel fan shroud has since died. The company is now named Medina Motorsports, same address and phone number. They are going to redesign the part, and it should be available again in the future (sometime).
This steel shroud was not quite as easy to install as the advertisement would say. What should have been a 20 minute installation took about 45 minutes, as there was a little bending and filing involved. It looked like the guy who made the shroud had a car with sagging engine mounts, because with good engine mounts the fan blade was wanting to touch at the top. Otherwise once fitted, it is quite easy to R&R for other servicing. Another thing is that at certain engine speeds the thin steel shroud likes to sing a little as it resonates, but that's only minor at certain speeds, and quickly gotten accustomed to. I did make a small sheet metal angle bracket which I riveted to the radiator top fan guard to suppress vibration of the shroud at that point. You can see 4 rivets in the picture, but the bracket is hiding.
Moss Motors now sells a plastic fan shroud for the MGA. Check here.
My guess is that it might be a little quieter than the metal one, not to either vibrate or sing, but you may have to remove the radiator to install it. Having long term visions of keeping my car on the road forever, I might be a little concerned about the longevity of the plastic part. But considering some vibration noises I sometimes get from the metal one, it's a toss up between long life with ease of servicing, or a quieter part with a bit more work for installation and maybe having to replace it every 10 years if it cracks. And I guess the plastic one probably looks better, except that any plastic part looks a little strange on an MGA.
In short, you need the 4" vent hoses in place, and the felt pad above the top tank, a pressure cap with the proper length neck, and the fan blade mounted the right way around. A fan shroud will help considerably for in-town cruising in hot weather. As long as you keep the coolant in the engine, and the coolant is not boiling, the engine will be at least safe (if not perfectly happy).
Any time you spend a prolonged period idling along or sitting still with the engine running in hot weather you have a good likelihood of suffering from vapor lock in the carburetors. This is because the carbs are physically located directly above the exhaust manifold with minimal shielding in between, so with the bonnet closed and not much air circulating, the engine compartment acts like a Dutch oven to cook the carbs. When the carburetor body gets hot enough to boil the fuel inside you get vapor bubbles in the fuel jets where you should have only liquid fuel. The result is very lean mixture, resulting is bad running, stumbling, rough idle, very slow idle, and even the engine may die if you can't keep the idle speed up. Also when you hit the throttle to go it will stumble badly and have very little power.
The immediate fix is to pull the manual choke all the way out to enrich the mixture, and then when you get the chance pan the throttle to run a lot of fuel through the engine until the incoming cooler fuel can cool the carburetors down a little. When you find a stretch of open road and can get the car up to speed again the vapor lock problem should go away in a few minutes with the increased air flow through the engine bay and the increased fuel flow through the carbs.
There is one more temporary type fix for a very hot running MGA. On the occasion where the temperature gauge is getting nervously close the 230 mark, you can push the heater temperature control all the way to max heat. This will give the engine a slug of cool water out of the heater core, which will affect an immediate drop of 5 to 10 degrees in the water temperature within a matter seconds. The heater core also acts as a small additional cooling radiator, so if you keep the heater blower turned on that will increase the capacity of the cooling system just a bit, which will usually be enough to get you through a temporary tight spot. I may use this technique occasionally when approaching the top of a long uphill grade, and I don't care to ease off the throttle when I know cooler times are just a short hill crest away.
Once you go through this a few times you will be getting used to the character of the car, and all will be "normal", and all will be right with the world in spite of the fact that it may run badly for a while when soaking hot under the bonnet at slow speed. Keep the coolant in the engine, and keep the pressure on the radiator cap, and keep the temp gauge under the 230 mark, and just enjoy the ride. If you should ever happen to see a big cloud of steam and vapor come out from under the bonnet, that's when it's time to get off the road and shut it down. The only time this ever happened to me was one time cruising through the dessert south of Phoenix, Arizona, at about 115 degrees ambient air temperature (and towing a trailer at about 75 MPH) when the top tank of the radiator blew a seam with a big "POP". Two hours in a radiator shop In Gila Bend set that right, but I always was a little miffed about it, because the thing had just been re-cored the spring before.
So stop worrying about the temperature gauge, and enjoy driving the MGA.
|