The MGA With An Attitude
PRESSURE TEST - Looking for leaks - CO-106
At 08:03 AM 6/26/04 -0400, John Cole wrote:
>"I'm concerned about the amount of water I'm replacing .... as much as 2 pints to bring it up to full again. .... how much water does an MGA naturally use?"
Starting full to the top, doing one heat cycle to full running temperature will expel about one pint of coolant due to thermal expansion. Going back to cool will leave that much space in the top of the radiator. Adding coolant to top it off will only result in expulsion of the extra coolant with the next heat cycle. It needs that pint or so of air space in the top tank to prevent overflow. But if it loses much more than one pint of fluid, it has a problem.
The physical configuration of the radiator with the filler neck on the back side of the top tank makes it hard to tell exactly how much fluid is in the radiator when it gets to a pint down (or lower). If you want to know for sure if it is retaining the fluid properly you can fit a coolant recover bottle, and then you can watch the rise and fall of the fluid level externally. See Coolant Recovery System.
>".... thought that one of the hoses might be leaking under this pressure but there's no evidence when its stationary. Someone said that you can test the radiator water for acidity to see if exhaust gasses are leaking into the water."
Acid test is not within my area of expertise. I don't know if a radiator shop might be able to do that. But there are other ways to find leaks.
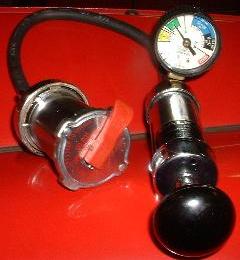 You should start with a pressure test of the cooling system. If you don't have the tool any radiator shop can do this for you. Test the pressure cap first, as this is easy to test may reveal a fault immediately, and is cheap to replace. If the cap doesn't hold pressure, all else is for naught, and you must replace the cap. The picture at right shows the pressure test tool attached to a radiator pressure cap securely holding 7 PSI pressure.
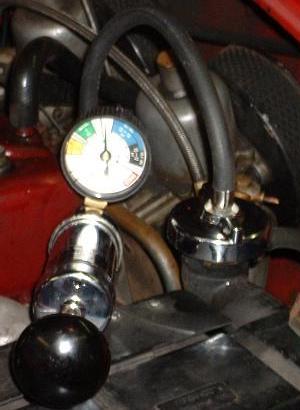
Next fill the radiator to the top with no air space. Run the engine for a bit with the heater on if necessary to expel any air from the heater core. Install the test pump in place of the filler cap, pump it up to 10 psi, and wait a minute to see if it holds the pressure. If the pressure is dropping, the coolant is escaping somewhere. The picture below shows the pressure tester connected to the radiator and holding 10 PSI pressure.
Check first to see if it is dribbling on the ground. Obvious leak points would be hose connections, water pump, heater valve, or the radiator. Those parts can be replaced. The radiator may spring a leak at the solder seams where top and bottom tanks attach to the core. It may also leak within the core if the water tubes have corroded through. If the radiator leaks you need service at a local radiator shop.
 Less obvious (and a lot less likely) may be a leak in the heater core. That would eventually leave the carpet wet starting at the top of the tunnel. For that you need to remove the heater box from the car before you can open the cover to remove the core for servicing.
Another place to find an external leak may be at the head gasket, usually just above the spark plugs. For that you can try re-torquing the cylinder head, but in most cases it doesn't help and you need to replace the head gasket. Laminated copper head gaskets are notorious leakers. The black fiber type is the best, should never leak.
If the system is losing pressure, but there is no external leak, then it must be leaking inside of the engine. This may be putting the coolant into the oil sump, which is of course bad, bad, bad. This will raise the oil level, and likely cause condensation inside the valve cover (looks like shaving cream). If you're lucky a new head gasket and an oil change may fix it.
If you have the original deep filler neck for MGA (1-inch deep neck), you may need a
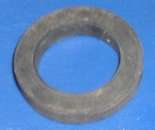 rubber sppacer washer to put in the neck for the short reach (3/4 inch depth) pressure tester to work. The NAPA-Balkamp cooling system pressure tester kit contains a 1/4 inch thick rubber washer which is used exactly for this purpose when attaching the short neck pressure tester to the long neck radiator. This rubber washer has a part number and can be ordered as a replacement part for the pressure tester. rubber sppacer washer to put in the neck for the short reach (3/4 inch depth) pressure tester to work. The NAPA-Balkamp cooling system pressure tester kit contains a 1/4 inch thick rubber washer which is used exactly for this purpose when attaching the short neck pressure tester to the long neck radiator. This rubber washer has a part number and can be ordered as a replacement part for the pressure tester.
Cooling System Pressure Tester Replacement Spacer
NAPA Part #: BK 7009520 -- Line: Balkamp 700-9520 -- $3.39 (July 2023)
If you do use this piece under a short reach pressure cap, you also need to be careful not to lose it when you remove the cap for servicing.
Another type of internal leak is more serious, being a crack in the casting of the cylinder head (not uncommon) or the engine block (lots less likely). This sort of breach in the water jacket will cause bubbling in the radiator when the engine is running, which may be hard to notice. But if you install a coolant recover system it is easy to see the bubbling in the external bottle. This may also result from a leaky head gasket. If a new head gasket doesn't fix it, you need to check the head for cracks in the combustion chamber area, most commonly near the exhaust valves, and more often in the center near #2 & #3 exhaust valves.
One more type of leak is tougher to spot. Occasionally you may have a compression leak into the water jacket past the head gasket, but it may only leak one way and only under high compression conditions. A cooling system pressure test may look like it holds pressure, and it may be perfectly fine with engine idling. But leave the pressure tester attached to the radiator and pull that throttle hard for a second or so. If the head gasket leaks under high compression this will show as a sudden increase in pressure on the test gauge, and the pressure will stay high after releasing the throttle. A new head gasket should fix this problem.
|