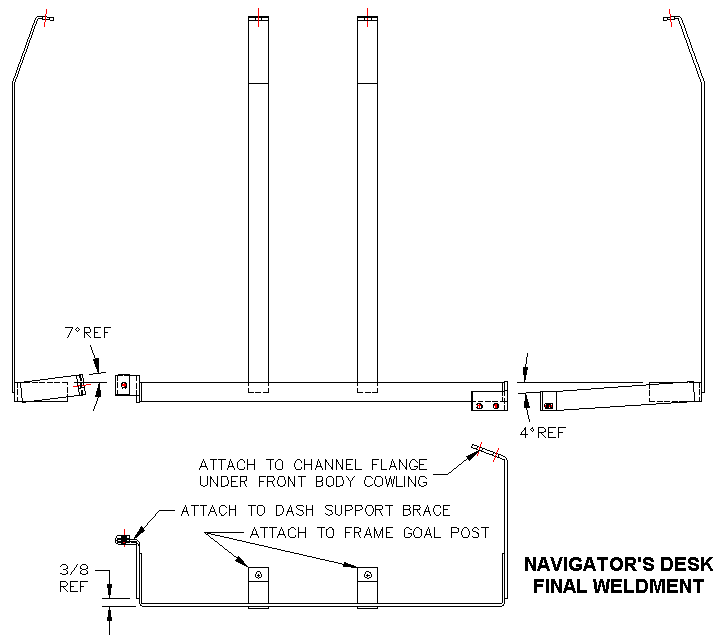
Here during final assembly you discover why the side brackets are separate pieces. This allows for easy alignment, eliminates a certain amount of design work, negates the need for more accurate forming of the parts, and allows a certain amount of latitude for choice of positioning at final installation. Here you can align the assembly in the car. Attach the front ends of the bottom brackets to the car frame with 5/16 inch fine thread screws. Slip the left side bracket over the edge of the dash support rail. Attach the right side bracket with a small clamp to the body brace channel under the front cowling (high behind the dash). Position the front bar between the side brackets, and clamp the side brackets to hold it in place.
The 3/8 inch reference dimension at each side should make the front bar level and about 2-1/2 inches below the bottom edge of the dash. Here you might choose to drop the cross bar an inch lower to provide more space above the shelf (and less knee room underneath). When you have it positioned to suit your preference, tighten the side clamps to hold it in place. Mark locations for holes to be drilled in the dash brace and the body brace channel flange. Remove the assembly from the car, and weld or screw the side braces in place.
Drill one 9/32 inch hole in the dash brace. For this you may like to have the left bracket installed on the dash brace, and drill through the assembly. You may even prefer to remove the dash brace from the car to do this. Drill two 9/32 inch holes in the body brace flange for final attachment on the right side. The reason for using two bolts here (one would easily support the load) is to make a more solid mounting for the top end of the right bracket. This helps to stiffen the entire assembly to reduce vibration (technically it increases resonance frequency). It also helps to prevent a single screw from working loose with small motions of the bracket.
Attach the front brackets with 1/4x3/4 inch bolts (preferably fine thread) and hex nuts with lock washers (or self locking nuts). Attach the bottom brackets with 5/16 inch fine thread screws, 1/2 inch minimum length (most likely hex heads), with lock washers. You can paint the new bracket black to match the car chassis for least visual intrusion. Or you might paint it dash or body color, or even chrome plate the thing if you had a burning desire to show off your handiwork. The shelf is just an 18 inch square of 1/4 inch plywood, but you let your creativity go nuts if you like something special there.
As always, enjoy your new gadget.
|