The MGA With An Attitude
ENGINE REMOVAL The Easy Way - BE-105
On 14 October 2006 at 23:02:02 UK time, Ray Ammeter wrote:
"Is there any one archive site that best describes the process to remove the engine without removing the tranny?"
Chuckle. The MG Series MGA Workshop Manual tells you to remove seats, carpet, floorboards and tunnel to remove engine and gearbox together. By now we should all know you don't have to do that, and that you can remove the engine by itself. Furthermore you also never have to disassemble the interior to remove the gearbox, except on very early production cars that did not have a removable top cover on the tunnel.


To pull engine, drain and remove radiator, disconnect everything attached to the engine, and disconnect engine from gearbox. Remove valve cover and attach a 16 to 18 inch length of 1/4 inch log chain to the valve cover attachment studs using flat washers and hex nuts (tight). Lift out engine with a roll away hoist, or lift engine straight up and roll the car out from underneath.
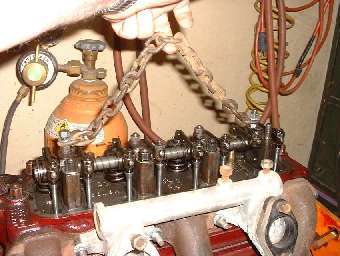
Above, 16 inch long 1/4 inch chain. At right, 1000 pound direct pull cable hoist (cheap) attached to a long lag screw eye bolt screwed into a STOUT roof joist.
Notice in the picture above that the chain end links are screwed down tighly and in intimate contact with the rocker pedestal nuts. In this condition the angular pull of the chain applies a shear load and a tension load on the stud, but it is not bending the stud. As long as the rocker pedestals are bolted securely in place, the highest stress point on the stud is at the bottom nut (at bottom of the bottom nut to be more precise). Word of caution is, do NOT leave the top nuts loose.
The crankshaft pulley is a close fit and may scrape paint off the steering rack housing if you're not careful. Do not catch the speedometer cable between the bell housing and tunnel, as that would reduce vertical travel and cause more interference at the crank pulley. When installing engine, lift gearbox with a floor jack until the bell housing hits top of tunnel. Also use the cheap plastic clutch alignment tool to center the clutch splines, and you should be able to align the splines in a minute or two to mate engine to gearbox.
When the engine is nearly in place, and it comes to mating the splines between clutch disc and gearbox input shaft, put gearbox in any gear (4th works good) and roll the car a bit to rotate the gearbox input shaft until the splines align. Rock and nudge the engine a bit until it will slip together. It has never taken more than a few minutes for me to get past this little alignment issue. If the car cannot be moved you can still put it in gear and set the hand brake to secure the input shaft, then turn the crankshaft a bit to align the splines.
For bellhousing to rear plate bolts, there are two holes slightly smaller than others to serve as alignment pins. Install the top right bolt (next to the oil outlet pipe) and the bottom left bolt (near the exhaust pipe) first. Once these two bolts are in place you can snug them up, and the rest will slip right in with your fingers, including starter motor bolts.
|
