The MGA With An Attitude
DIGITAL CAMERA BASICS - DC-101
This article presents some basics you should know before buying a DIGITAL CAMERA to be sure you get some features you need, and not to spend too much cash.
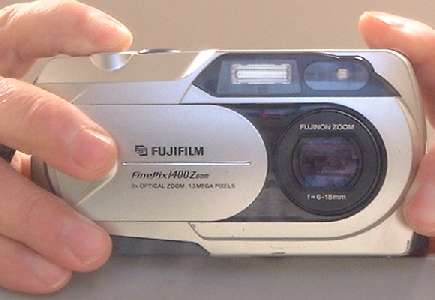
Photo snapped in a mirror with room light only, no flash,
image digitally mirrored to correct orientation,
cropped from 640x480 to 435x300, and
saved using JPEG compression quality 60.
Image file size only 13KB.
My digital camera is a FUJIFILM FinePix 1400 Zoom, as shown in the picture above. Resolving capability is 1.3 megapixels (millions of picture elements, commonly known as pixels or dots). This allows for the following picture size, stated in width and height of image in pixels.
1280 x 960 pixels in high res mode
640 x 480 pixels in low res mode
Most pictures on this web site are lower resolution, 640 wide or smaller. Also some post processing compresses the image data file size considerably, which is taken up in another course to follow.
If the intention is to print physical color glossies, then 2 megapixels or higher may be desireable. However, the combination of the extra expense of the camera, the color film printer, and the photo paper may end up making that more expensive than using a film camera. If you use 1280 x 960 resolution and print it on a color printer at 300 DPI (dots per inch) it makes a pretty nice 4.2" x 3.2" image, or maybe even up to 6" x 4" (just over 200 DPI). If the printer does interpolation and fills in dots in between, then you can print at something like 720 DPI and get up to 8" x 5" prints in near photo quality. Beyond that more megapixels are required to improve the glossy print image quality.
In my case so far 99% of all use of my digital camera is for images on my web pages, or to attach to e-mail messages to send to friends. In most cases I shift the camera into low res mode and take 640 x 480 images, exactly the right size to completely fill the screen on a VGA monitor. If I'm putting the images on a web page I usually crop the edges some to reduce the width to about 580, so the entire image is visible in a browser window on a VGA display without panning.
Notice that I speak of image size in terms of pixels, not inches or millimeters. This I do because the digital camera produces images a certain number of pixels wide and tall. Pixels are spaced differently on different devices, making the image appear in various physical sizes. A 12 inch diagonal VGA format monitor (640 x 480 pixel display) will have 72 DPI (0.35mm dot spacing). A similar size monitor in SVGA format (800 x 600 pixel display) will have (about) 90 DPI (0.28 or 0.29mm dot spacing), so the same image will appear smaller on the screen. Printed dot for dot on a 300 DPI printer the image will be tiny by comparison. One thing to keep in mind is that pixels are data when stored in memory, and lots of pixels require lots of memory space and lots of transmission time. The data file for the image above on this page (435 x 300 pixels) occupies much more data space than all of the rest of the web page data. The 1.3 megapixel image is 1280 wide and 960 high, and will not fit on an VGA or SVGA monitor without being physically squeezed. Enough about image size, as that will be covered further in another course.
I purchased a 32MB memory chip for my camera, and this will hold up to 99 high res images or about 330 low res images in "normal" JPEG image quality mode. If the quality mode is switched to "low" quality (which is still pretty good quality) it will hold nearly twice as many images. A 64MB chip in low res and low quality mode could hold over 1000 images. If shifted to "high" quality mode the data files get nearly twice as large, so my 32MB chip might only hold about 50 images in high res mode. High res and high quality with a 4MB chip may only hold 6 images (bummer). More megapixels means more data and fewer images capacity. These cameras usually have only a 4MB to 8MB memory chip supplied with the original camera package, so plan on buying an upgrade chip.
 The memory chip physical size is about like a large postage stamp and thinner than a dime, so you could carry as many as you like, just that the loose chips are easy to misplace (small). Larger capacity chips are cheaper by the MB, so one or two larger capacity chips would be better than several smaller ones.
If you are taking lots of pictures at some weekend event, and you are using up the memory space, then you can use the small LCD display on the camera to review the images and delete any redundant or poor quality images to free up memory space. At Road America BRIC race weekend I probably took 500 pictures, deleted a lot in the process, and come home with about 200 nice images. Maybe if you were taking wedding pictures in high res mode you might need a larger memory chip or extra chips.
Common memory chip physical format is either Kodak compatible or SmartMedia, with the SmartMedia probably being more common and cheaper. Other physical formats (like SmartStick for instance) may have a few advantages (like smaller size) but may be more expensive, harder to find in a pinch, and not compatible with any other camera or external docking hardware.
Another important issue is batteries. These things suck up battery power like crazy, especially when using the flash. You might get only about 100 flashes before the batteries are dead. Without flash you may take 500 pictures on one charge. For a weekend stint you might take along extra batteries or a charger. After the first few days of extensive use taking pics of every car at autocross events, when the thing ate up a set of 4 akaline batteries every day (without using the flash), it was a no-brainer to pay $29 for a charger and 4 Ni-MH batteries (which have about the same power density as alkalines). Stay away from expensive single purpose batteries. Get a camera that uses the standard AA's, in which case you could revert to using akalines in a pinch.
Digital cameras have a (universally) slow exposure speed, about equal to 125 film speed, so don't expect clear high speed action photos without really bright sunlight, or a fairly close flash. You will always need flash indoors, and sometimes even outdoors on a heavily overcast day.
Do not confuse digital zoom with optical zoom. In most cases digital zoom just duplicates pixels or fills in the extra pixels by interpolation, so the image quality will degrade with larger zoom factors or larger images. In other cases the camera shifts to high res mode, but then crops the sides to produce a low res image with 2x zoom, but you could do the same thing yourself starting with high res mode and no zoom. Optical zoom moves the lense, same as for a film camera, so the image quality stays the same. One trick I use with mine is to snap a picture at the track in high res mode, 1280 x 960, using the optical telephoto zoomed to the max, and then crop the sides of the image to save a 580 x 385 image out of the middle of the picture. That has the affect of about 5X zoom with full resolution quality.
On the low end you can buy a digital camera for under $100, but these would be small (usually thin) point and shoot units with very few features, usually 640x480 resolution (0.3 megapixels) that might be reduced to 320x240 resolution. These still take pictures suitable for web use, but no close ups, no zoom, and maybe no flash. And if you start there and crop the edges you end up with a smaller image.
Skip to bottom of page for more recent notes on prices
Cameras with 1.0 megapixels have a few more features and can be bought for under $300 (probably $239 by now). Expect built in flash, 2x digital zoom, maybe 2x optical zoom, and a built in serial connector to download data directly to your computer (slowly). It might take several minutes to download 16MB of data. In this case you might consider purchasing the small ($29) docking module that will take the memory chip (physically) from the camera and download data on a USB interface at higher speed.
In early summer (2000) I paid about $400 for my FUGI camera (1.3 megapixels), plus $99 for the 32MB chip and $29 for a charger and 4 AA NI-MH batteries. Base price may be down to $349 by now (might drop even more right after Christmas). This one has 3x optical zoom, going from the film camera equivelant of 38mm (wide angle) to 114mm (2.3x zoom). It also has a retractible lense and sliding lense cover, which makes it nice to carry in your pocket. The built in flash is good for up to about 10 feet, but some of the club christmas party pics were flashed up to 20 feet away (see MG club web site xmas2000 photos). One of the most important features is the built in USB port, where it can download 32MB of data in under a minute, several times faster than a standard serial port.
There is an external wall plug power pack available, but with the fast speed of the USB interface for download, and an extra set of batteries always at the ready, I have never had the slightest hint of an urge to plug into stationary AC power, so I never bought the transformer. All it wants is 5VDC, so any supply with the right size coax connector will do.
My camera also has a 1.6" diagonal LCD display on the back which can be used for reviewing images, or can be used to view the object when framing and focusing. Many of the setup features are done via the LCD display. It has a Macro feature that allows focusing as close up as 4" without any additional lense attachment. For good example of a closeup, check this fuel gauge internal picture.
The camera can be set to automatic mode (most uses), or forced flash (close objects with bright background), or no flash (time exposure indoors). There is also a mode for night scenes called Slow Syncro flash, which used the flash with a slow shutter speed, which will yield great pictures of a foreground subject and still capture the background which is out of flash range (city skyline for instance). It also has a red-eye correction feature. Next is a 10-second self timer with 3-second beep warning, for when you want to get into the group picture. There is also a manual mode (vs auto) which I am so far too faint of heart to attempt to use, where you can set the brightness and white balance (whatever that is).
In setup mode you can set image quality to basic, normal or fine, where basic produces smaller data files and fine produces the best quality image with larger file size. You can set frame size (resolution) to either 1280x960 or 640x480. You can set time and date, which allows it to keep track of date and time for each image. You can set the beep volume to high, low or off (I usually use high) which gives audible indication of the progress (particularly important in knowing when it is focused or how soon you can take the next picture).
In the display mode you can zoom in and pan around the image in the small LCD display and zoom in up to 4X in the LCD viewer. You can set it to thumbnail mode and get 9 (really small) images at a time on the display, usefull for browsing through a lot of images when searching for something. You can format the image chip, or erase a frame (or all). You can mark a frame (or all) for protection from erasure. You can resize an image to a smaller size to reduce memory occupied, going from 1280 to 640 or from 1280 to 320 or from 640 to 320.
You can also set a marker for individual frames for DPOF, which means Digital Print Order Format. With this you can set the frames to be printed and the quantity to print, and imprinting (or not) of the time and date. You can also do DPOF trimming, which allows you to pan and zoom to frame the part of the image you want to print. Finished with that you can send order via e-mail or take it to a local shop for hard copy printing.
Other accessories available include floppy disk adapter, PC card adapter, and card reader with USB interface, none of which I feel the need for when the camera and my computer both have the USB port built in. You can also get a Digital Photo Printer, which allows printing of glossies directly from the camera or from the PC, and display of images on a common TV monitor. This last function might be useful in a hotel room without a PC, but it's a function of the digital photo printer, not of the camera itself. Of course you need a short linkup cable ($10) which may or may not come with the initial camera package.
You should always get included with the camera package some software for downloading and displaying the images, and possibly some image post-processing software, usually supplied on one CD. (Check to be sure it is compatible with your current computer operating system). You cannot write to the camera or erase images from the PC. Erase images with the camera itself. One function of the software supplied with my camera will allow the computer to treat the camera memory like a removeable hard drive when plugged into the USB port. As such it is easy to mark multiple files, copy and paste into a directory on your internal hard drive. With this software and the USB port I can download the whole 32MB from the camera in just under a minute, and a few individual files almost instantly.
In my initial search for a camera I set the minimal requirements at 1.0 megapixels (something like 1140x920 resolution), 2x optical zoom, a closeup function, serial data port and LCD display. Kodak makes a model 315 with these features for $299 (last summer), and I nearly bought it. I would also have bought the $29 USB docking station for a total of $328, plus more memory, batteries, etc, and I wasn't impressed with the exposed lense with separate plastic lense cover, as it wouldn't go in my pocket. For just a little more money you get a lot more camera. Add another $71 and I got 1.3 megapixels, 3x optical zoom, retractable lense and sliding lense cover, and built in USB port for fast downloads. The 1280 wide resolution was marginally appealing because I just happen to own a 20" high res monitor with 1280 wide display, and 1.3 megapixels will fill the screen on my big monitor.
These days you can probably get 2 megapixels for under $300, but as far as I'm concerned the only use for it would be for occasional glossy prints. 4 megapixels will produce a nice 8 x 10 glossy enlargment. 8 to 16 megapixels might be for professional magazine covers and poster size prints. But at this time you still pay mega-bucks for mucho megapixels, and the huge data files related to the higher resolution is a problem for storage space and download time (especially for web pages). And the megabucks cameras will also likely come with lots of additional features that may be more confusing and which you may never use unless you are a professional photographer. I just keep the old 35mm film camera handy in case I should want to take family portraits.
Enough for now. Happy to answer any other questions I can. Feel free to drop a note. Final disclaimer: In these days of rapid technical developement all digital camera features and prices are subject to change without notice (so this web page may already be obsolete by the time you read it).
January 1, 2002 update: A little casual web browsing finds these links and prices. Links may be out of date by the time you read this, but prices are still dropping.
1400-zoom refurbished $165.95
32M Smart Media Card $16.95
DP01 Lenmar Pro 29 Battery Kit $19.99
LN02 NiMH 4 AA 1600maH Batteries $9.99
|