The MGA With An Attitude
WINDSCREEN REBUILD - WT-101
This is the first easy course in how to rebuild the windscreen on your MGA roadster. Mind you that the course is easy, but the actual rebuild can require considerable patience and persistence.
Question:
>.... replacing the Windshield Glass on my MGA and wondered if there is any difference between the Moss windshield and the Victoria British glass. Has anyone purchased a windshield from either of these suppliers? ....
I dunno about VB, but I bought MGA glass from Moss a couple years ago, and it was a very nice piece merchandise. However, ....
In the Moss MGA catalog there is a full page copy of a Service Memorandum, dated 2 July 1962, related to "Windscreen Re-glazing". This makes a big deal about how you need to put a packing piece in the bottom frame rail to support the glass. This is to assure that the bottom corners of the glass do not sit on the L-shaped metal corner brackets inside of the frame, which is known to cause cracking of the lower corners of the glass. Well, the Moss supplied glass is different than the original glass. The general size of the piece is a bit larger in height, and then the edges are relieved a little for the first couple inches from each corner. This allows the glass to sit on the glazing rubber at the bottom without touching the corner brackets, and also eliminates the need for the extra packing piece in the bottom. Same goes for the other edges and corners of the glass, no way for the corners to touch anything except the glazing rubber. So, no extra packing piece is needed in the bottom frame (won't fit), and you can dispose of the original piece of wood you (may) find there.
Next a caution note about the fasteners. The original windscreen screws were British Association 2BA, looking for all the world like an American standard number 10 screw but with a different thread pitch and slightly smaller screw heads. The original screws were 31.4 threads per inch, 4.7-mm (0.185") diameter. Number 10 UNC and UNF threads are 24 and 32 threads per inch respectively, and SAE 10-32 is similar to the UNF standard. For some years past the screws and all new brackets being supplied by Moss Motors had #10-32 UNF (or SAE standard) threads. These screws are not compatible with the old brackets, and vice-verse. Current records show Moss has been supplying parts with the correct 2BA threads at least since 1999.
Disassembling an old MGA windscreen will probably result in damage to some of the original fasteners. It is highly advisable to get a complete new set of fasteners before reassembly. In case thread pitch on new parts may not match your existing parts, it is a good idea to disassemble and check before ordering new parts. It is also a good idea to get new tapping plates for the sides and corner brackets for the bottom corners. (No, I didn't forget the top corners, just getting to that).
The next note of caution is about the top corner brackets. I have searched high and low, and from every conceivable source I know. In many cases the new brackets are garbage. With some the top posts are pointing in the wrong direction, some have the brackets too wide so they don't fit in the channels without serious filing, and some have the tapped holes misplaced so badly that it's impossible to get the screws installed. If someone has very recently purchased some of these top corner brackets that actually fit I would surely like to hear about it. Otherwise, I recommend you retain the original top corner brackets, touch up the threads if necessary, and maybe have them re-plated. New brackets from Clarke Spares and Restorations do have the correct threads and will fit perfectly. New parts from Moss Motors will now have the correct threads, but I can't say if the brackets would fit. The last time I had Moss top corner brackets in hand they did not fit, that being a few years ago. This is covered in another article.
If you have a MGA 1500 that does not have the later model top center latch installed, now might be a good time to consider installing one. I find this device does a really nice job of keeping the center of the top bow down at highway speed, in turn keeping out (most of) the wind and/or rain that might otherwise blow in your face. A tiny bit of soft rubber fastened under the front bow can take care of the rest of that problem. When you drill the top frame to accept the catch bracket screws you will be removing chrome plating. Not to worry, as the underlying frame is brass there will be no rust to worry about.
If you should perchance take this opportunity to have the frame re-chromed, don't forget to remove the "AUSTER" plate and drive rivets in advance. These bits are readily available and inexpensive.
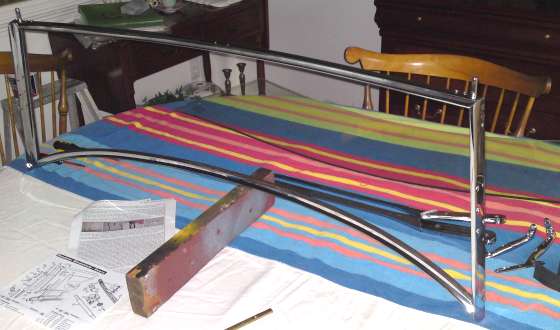
Before installing the glass, preassemble the entire frame to be sure the fasteners and brackets all fit nicely. Check inside the frame to be sure none of the screws protrude appreciably through the inside of the brackets where they could chip away at the edges of the new glass. A small abrasive wheel in a hand grinder can make short work of making the inner ends of the screws flush with the brackets.
For final assembly put some soapy water on the glazing rubber and you will be able to easily (relatively speaking) press the new glass and the new rubber bit into the channels of the frame. After assembly the glazing rubber should protrude from the frame on both sides of the glass. Use a razor knife to trim the rubber flush with the edge of the frame.
The rest of the job is mostly time, common sense and TLC, but not particularly difficult. Rise to the challenge, and enjoy the success. On the following page you will find links to lots of photos and notes on a more recent MGA windscreen rebuild, which should make it even less mysterious.
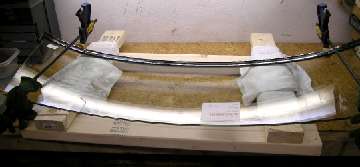
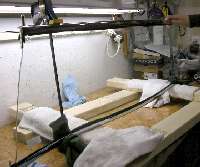
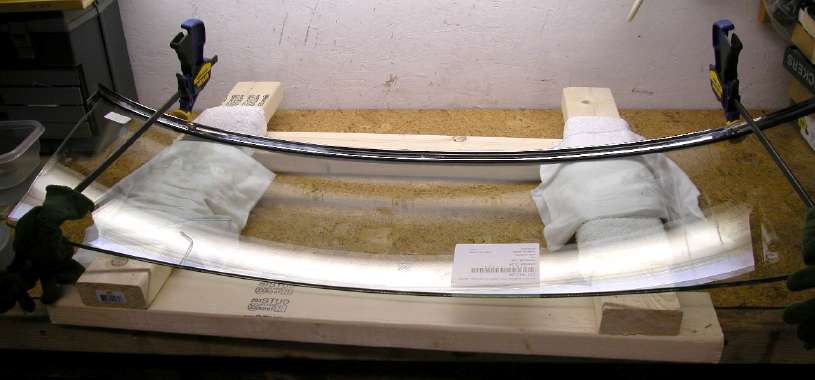
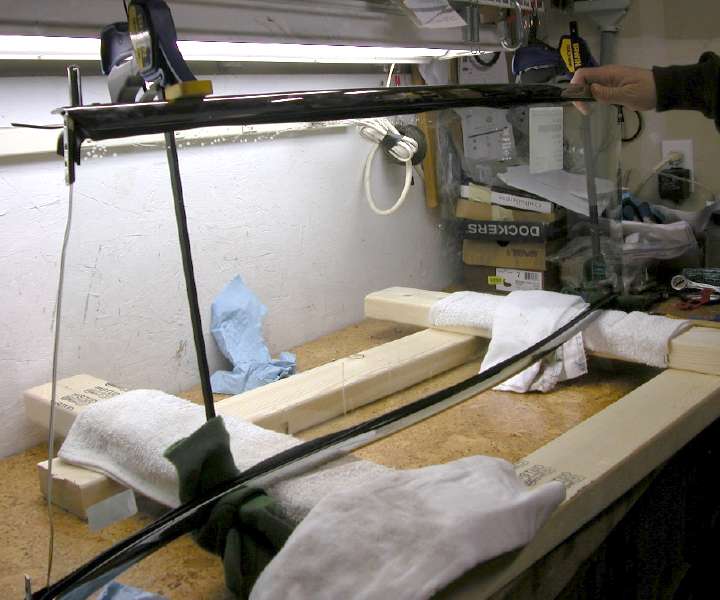
Claude Spinosa in Boise, Idaho, has a suggestion for a third hand jig.
"I could not hold all the stuff with my soapy hands. Finally I built a rig with scrap 2X4s that kept the glass still while I applied soapy water to the glass and pressed it into the rubber with two well-padded carpenter clamps".
|