The MGA With An Attitude
Valve Refacer for Home Use - TS-301
There may come a time when you would like to do refacing of the engine valves in your home shop. Maybe they only need a little touch up, or maybe you're on a tight budget, or maybe you need to get the car back on the road immediately. The tools and processes described here may be good for an interim stop gap repair. If you can handle the tools well, such a repair may work well and may last a long time.

The first tool, shown at right, looks really cheap, and it is. J.C.Whitney sells this tool for $9.99, and you can buy replacement stone and more sticky sandpaper for $4.99 (Mar 2004). But it can work okay with proper handling (read that "finesse"). The curved cradle holds the valve stem while the working angle of the valve head rests against the flat side of the free-wheeling grinding stone. Put a little oil on the stone (and the valve stem), and spin the valve with an electric drill to refinish the working surface of the valve head. You can change the angle of the stone if you might like to grind an extra angle on the underside of the valve head. Good results depend on having the angle adjusted "in the ballpark", and keeping the valve from wobbling about (much) when it's turning.
After the valve has been cleaned up, you can apply a couple bits of sticky backed sandpaper to the working surface of the valve, drop the valve into the cylinder head, spin it again with the electric drill to re-finish the valve seat to match the angle on the valve head. Good results here depend on a valve guide in decent condition (not worn too sloppy). You also don't want the interface land area of the seat to be too wide when finished. You can review my CH-101 article for the information on land width and how it affects performance.
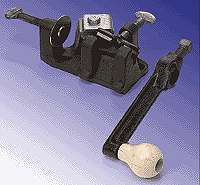
J.C.Whitney has another valve refacer that works different, and costs all of $14.95. See picture at right. You can also buy a replacement carbide cutter for $6.99
I have a user report on this one, and it apparently works quite well. Clamp the fixture in a vice or screw it to a bench. Put the valve in the fixture, and attach the manual crank handle to the valve stem. Use the thumb screw on the opposite end to bring the valve head into contact with a carbide cutter as you rotate the valve. The angle of the cutter is adjustable (may require a little fiddling to get the angle spot on), so you should be able to use this tool to put an extra angle on the underside of the valve head if desired. This fixture uses machined v-block surfaces to hold the valve stem, so slobber a little oil on the valve stem when using it. It is more rigid than the sheet metal fixture, and it works quicker and will give a more precise angle and very clean finished surface.
Refacing of the valve seat might work the same as with the prior cheap tool setup. Put a couple bits of sticky backed sand paper on the working angle of the valve head, drop the valve into the guide, attach an electric drill to spin the valve to grind the seat angle to match the valve head.
One final note here. Either of these tools will reface a Stellite exhaust valve. However, once you remove the Stellite hard coating from the working surface of the valve head it will revert to the wear characteristics of an uncoated steel or stainless steel valve.
|