The MGA With An Attitude
SAND BLASTER - TS-118
User Notes for Sand Blaster model TA2A0257 from Pit Bull Tools
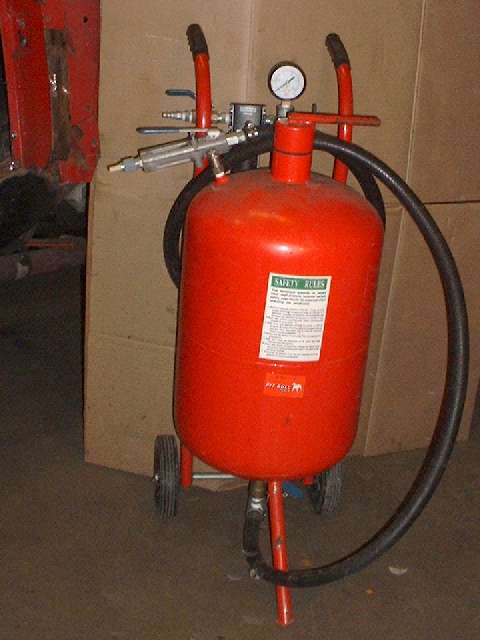
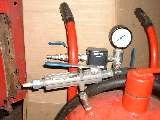
 This is a pressure feed sand blasting unit I borrowed from our club tool lending program. At time of this writing the canvas hood and filling funnel are missing. I haven't found a user manual or parts list yet, but this unit is nearly identical to a Central Pneumatic pressurized sand blaster #38375 from Harbor Freight.
110 lb. abrasive capacity for big jobs. Efficient pressurized blaster moves abrasives at 80 to 90 percent of air speed for real blasting power. Equipped with a nozzle end shut-off valve, pressure gauge, ceramic nozzle, 9 foot hose, filling funnel, water trap, 6" rubber wheels, and canvas hood.
Overall dimensions: 40''H x 24''L x 15''W
Working PSI: 60 to 125
Working CFM: 6 to 25
Tool weight: 57 lbs. (plus media fill weight)
-----------------
"Black Beauty"® (a registered trademark of Harsco Corporation): A coal slag abrasive material for use in removing paint and rust from steel and concrete. Available in multiple grit grades, Utility, Medium, Fine, and Extra Fine. The fine grade is good for light paint and rust removal. Coarser material tends to clog up the nozzle on smaller blaster units (including this one). If you buy it without knowing the grit grade you are likely to get the coarser grade. Can be found for about $9 for 25#.
----------------
I bought Aluminum Oxide abrasive blast media from Harbor Freight. Somewhat expensive at $19.95 for 20-25 pounds. They had 80 grit and 70 grit. I bought 70 grit "aggressive abrasive" for "remove paint and rust". This is much finer powder than the Black Beauty stuff that was previously in the blast unit, and will not clog the nozzle (usually). It works well for general use, but for lots of heavy rust removal I might prefer something more coarse.
--------------
Cautions and Warnings first:
Read and head all warning and safety notes on the side of the blaster tank. I would say read the entire user's manual, except that it is missing, so my best advice now is to read this entire memo before using the sand blaster.
Description and air requirements:
Notice the pressure rating and air flow requirements. A rather LARGE air compressor is best to run the blaster. It will work with a smaller compressor, but with a shortened duty cycle. I have a 2-hp 20-gallon compressor that can supply 9.0-scfm @ 45-psi or 7.5-scfm at 90-psi. Air consumption for the blaster will be nearly proportional to the pressure being used. With continuous open air flow the pressure eventually drops and stabilizes at 45-psi with my compressor. That pressure is non functional with this unit, but it indicates a rough air consumption figure of 9.0-scfm @ 45-psi. At 50 psi this unit stops supplying abrasive material. At 60 psi it will work to remove paint and mild rust, but it works much better (more aggressively) with 75-psi or higher pressure. In the 75-90 psi range it will consume 15-18-scfm of air flow. As such it will work with 50%-60% duty cycle with my compressor, giving one minute of trigger time
 followed by one minute of pressure recovery time for the compressor. Longer trigger time goes to lower pressure until it gets too slow be useful, then stop and wait for pressure recovery. If you have a big job to do and want continuous trigger time, you would need at least a 5-hp compressor to give about 19-scfm @ 90-psi.
This unit is on the larger end of the scale for a home shop blaster. The tank can hold up to 110 pounds of abrasive material. Figuring about 2/3 pound of abrasive use for each minute of trigger time, a full tank could keep you working for 165 minutes of continuous use. If you want to sweep up and recycle the abrasive media you would need to sift it through a window screen to remove any large trash particles that would clog up the blast nozzle. You might also use a fan to blow away the finer dust while sifting. More notes on media type below.
It is necessary to keep the blasting media dry to prevent clogging. If the compressor is supplying humid air the filter bowl will accumulate water and needs to be drained occasionally.
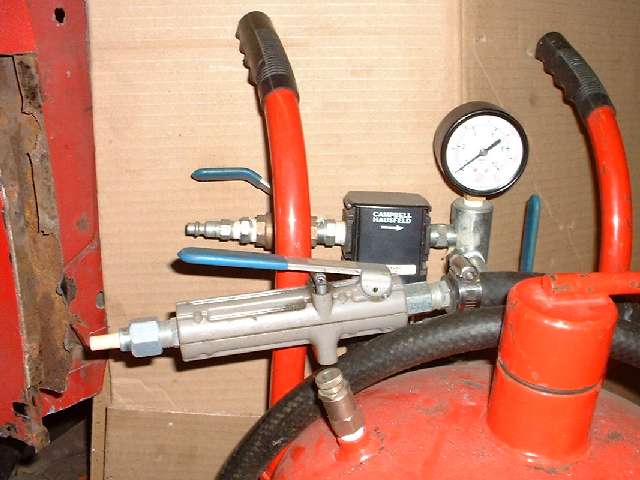
There are three ball valves on this unit, not counting the control valve at the blasting head. There is an air supply shut-off valve at the input air coupler, followed by a water separator filter and pressure gauge. The pipe then splits with one pipe going to pressurize the media tank. The other pipe has the air control valve leading to the venturi located at the bottom of the tank. Between the bottom of the tank and the venturi is a medial control valve. At the output working end of the hose is the nozzle control valve in the blaster head (which is not a ball valve here but could be for other blaster models).
There is a sealed filling and inspection cap on top of the pressurized media tank. You MUST relieve tank pressure completely before removing the tank cap. The fill neck has a fat O-ring seal on a depressed shoulder at the base of the thread. This O-ring must be in place before the cap is installed and tightened. Be nice and clean any grit away from the O-ring gland to preserve life of the seal.
Hints for use:
The media control valve at the bottom of the tank seems to leak a little when shut off, probably due to being constantly exposed to the abrasive material. The nozzle control valve at the blast head also leaks, sometimes a little once it is shut off, or possibly a lot when it refuses to shut off. If you close all the valves and walk away it is likely to lose tank pressure through the media control valve and blast head.
Pressure in the tank is normally somewhat offset by pressure in the venturi supply circuit. If you close the air control valve that supplies air to the venturi, and leave the media control valve open, then tank pressure will force copious amounts of abrasive media into the work hose clogging up the output hose and the blast nozzle. Always close the media control valve on the bottom of the tank before closing the air control valve. Likewise, always open the air control valve before opening the media control valve.
If you want to disconnect the air supply coupling, close the input air valve before disconnecting to retain air pressure in the tank. If you disconnect the supply hose, then open the shut-off valve, tank pressure will force backflow of air at the input coupling. This is how you relieve tank pressure before opening the tank cap to check or refill media material. The sudden backflow of air can also purge some water out of the input filter and water separator (but will not empty the water bowl completely). Always disconnect the air supply and relieve tank pressure before attempting to remove the top fill cap from the media tank. A broom handle makes a good dipstick for checking media level in the tank.
Keep in mind that the media tank is also a compressed air tank with a fairly large volume (about 10 gallons). If you disconnect the air supply and relieve the tank pressure, then re-pressurizing the tank will require some air flow from the compressor before continuing operation.
Keep the input valve and air control valve wide open at all times when blasting. For gross removal of paint and rust you may want maximum pressure on the blaster (do not exceed 125 psi safe pressure limit). For less aggressive treatment of the work surface you may want to reduce input air pressure from the compressor. This unit does not otherwise have its own input pressure regulator. If you have a smaller compressor (less than 15-scfm supply), there may be large swings in system pressure during use. If you find the blaster to work well at 80-90 psi, you may want to reduce the input supply pressure not to exceed 90 psi, as higher pressure will consume more air than necessary and reduce productivity (available trigger time).
The pressurized media tank has the capability to feed out a large amount of media, probably much more than you want or need for your blasting job, and could clog up the hose or nozzle. Also finer grain media will seem to put more dust into the air and obscure visibility. A good approach to media control is to open the air control valve, then open the nozzle control valve to get the blast air flowing, then open the media control valve slowly until you have a minimal amount of media coming out of the blast nozzle. This may be enough media flow to do your job. Otherwise you can open the media control valve a little more to have more media flow to the nozzle. Unless you have a very large compressor and a large and aggressive job to do, you would probably never want the media control valve to be wide open.
Blasting technique should become readily apparent with only a little use. To minimize damage to the work surface use the least pressure necessary to get the job done, or more pressure to work faster. The blast spot on the work surface will be 1/8 to 1/4 inch diameter depending on distance of the blast nozzle from the surface. Greater distance gives a larger blast spot for quicker progress. Closer distance gives a smaller blast spot and more aggressive blasting for stubborn rust removal. Speed of the media particles can be 80% to 90% of the velocity of the air blasting through the nozzle, so it can be very aggressive when held close up with high pressure. Removing heavy rust from steel parts is a cinch, as it can ultimately remove steel from steel parts.
When removing paint or light rust from sheet metal you may need to reduce air pressure and use finer grain blast media to prevent excess damage to the work piece. Attempting to blast aluminum sheet panels or soft brass parts is tricky business to be approached at your own risk. This sort of finicky task may require a much longer learning curve before you can do it without damaging the parts. For fine finishing work there are lots of alternate media types available such as glass or plastic beads or ground walnut shells. For big jobs at minimal expense you might use sifted play sand (assuming you can keep it dry). There will be no attempt here to turn an amateur blast operator into a skilled professional by words alone. Proceed at your own risk.
Trouble shooting:
If the blast nozzle becomes clogged during use, immediately close the media control valve at bottom of the tank. With pressure still on the blast head you may poke a wire into the ceramic nozzle, and with luck this may clear the clog. Of course always wear gloves and face protection, and never get your face in front of the blast nozzle. If the clog persists, then you may need to shut off the blast air and remove the nozzle for cleaning. If the nozzle control valve does not shut off completely, then close the air control valve before removing the nozzle. Once the nozzle is removed you can use the air pressure (working the air control valve) to blow out the hose and blast head. On the chance that a clog may still persist in the head or hose, you may have to disconnect the blast head from the hose to blow out the hose. If that gets the hose clear you can turn the blast head around and use the air pressure to back flush the blast head (with the head valve open), then reassemble the head to hose and reinstall the nozzle. This may sound like a lot of fiddling, but you should soon learn to regulate and limit the media flow to minimize clogging of the blast head.
The nozzle control valve on this unit has a thin wall rubber hose inside of a heavy plastic housing. When you release the control lever a spring loaded blunt nose pin crushes the hose to shut off air flow. When the lever is pressed the pin is retracted so the hose can open up to full bore for clear passage of air and media grit to the blast nozzle. This setup had a problem when I first used it, as the blast head would sometimes clog easily and repeatedly. On disassembly of the valve head I found the shut-off pin had made a hole in the side of the thin hose. My expedient repair was to apply a couple turns of vinyl tape to the hose and switch ends to put a clean part of the hose under the shut-off pin. The hose is contained in a close fitting bore of the valve housing, so the tape repair may survive for a long time. It may be appropriate to order a replacement hose for the inside of this control head, along with a few spare ceramic nozzles. I didn't like the heavy spring loaded blast control valve. I didn't like the heavy handed operation of the control lever, so this may be better if it was changed to a ball valve. Difference is, a ball valve does not shut off automatically if you drop it. Then again, this control valve didn't always shut off by itself anyway.
Personal Equipment, Dirt and Cleanup:
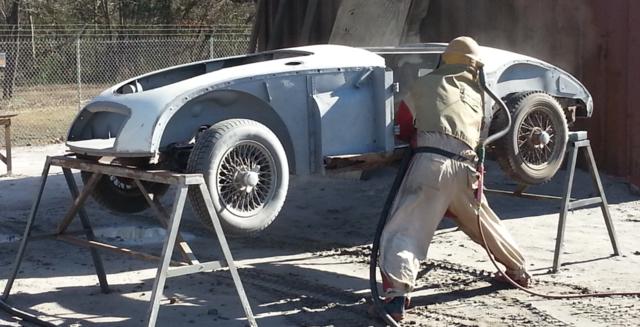
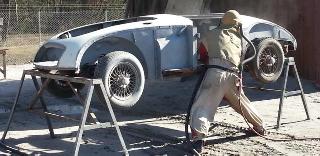
I can say right off that open room sand blasting does a nice job of cleaning up blistered paint and rust, but it is a very dirty job. Personal equipment calls for (minimally) long sleeves, gloves, closed goggles, full face shield and a filter mask. Even then you would have your hair and ears full of gritty dust. Instructions with the sand blaster call for using a hood, which is a canvas full head cover with a clear shield in front. A possible short use alternative is a pillow case with a site hole cut out and fully closed goggles. The grit goes everywhere, so don't have an open engine or gearbox in the room when doing this.
After doing some blasting in my 16x21 foot shop space, the place at first appeared to be a horrible mess with about 20 pounds of grit and dust on the floor and all over everything, including inside the car. I was walking around in the grit and not wanting to touch anything. But then I was pleasantly surprised to discover how easy it was to clean up, at least in the areas I could reach and touch. The grit and dirt does get into everything, but it does not stick firmly to anything (except grease or oily items).
The grit is similar to granulated sugar. The shop vac will clean a smooth floor in a single pass. The fuzzy round brush attachment for the shop vac did a nice job of cleaning out the car interior and all over the car body and everything I could reach in the boot and engine bay (and anything else I could reach on the work bench and shelves. The grit was mostly limited to areas below shoulder level where it's not hard to reach, except it gets underneath things that need to be moved for clean up. Vertical surfaces and anything higher up is subject to a fine coat of static cling dust that is fairly easy to wipe off or vacuum up. One hour with the shop vac and a few paper towels had it almost back to just normally dusty and acceptable for more restoration work.
When I finally take the body off the car for underbody painting there will be more grit on the heater shelf, under and around the engine, and on the suspension parts. It would have been better if the bonnet and boot lid were in place to keep most of the grit out of the boot and engine bay, but that didn't bother me much with the body coming off anyway. For grit and dust on or inside the car, doing it outdoors may not make much difference (but it would keep the shop clean).
|