The MGA With An Attitude
PAINTING THE MGA ENGINE BAY - PT-102
PT-102 is about Painting the ENGINE BAY and other chassis colors (or lack thereof).
Here's a thought to get you started. If you are going for a show car finish, get a copy of "Original MGA" by Anders Ditlev Clausager. This book is candy to the eyes, quite good on originality issues, and lists most of the smallest detail changes by production date and car numbers. Paint the engine per information on the prior page. Then this page gives rundown for painting the peripherals and other parts of the engine bay and the chassis of the car.
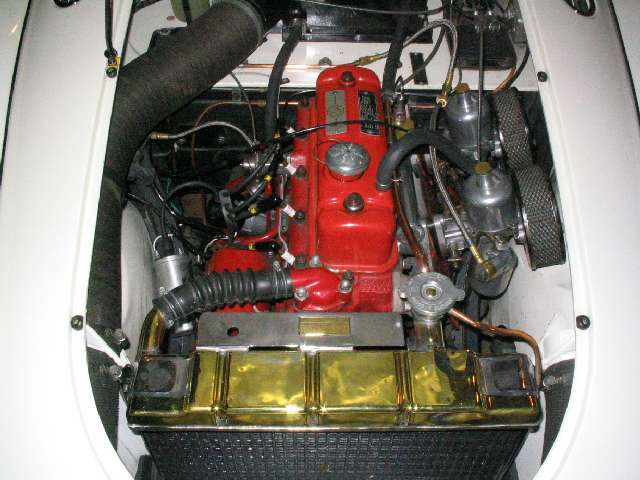
One thing you might want to spend a little extra time and money on is the yellow fan blade. The paint on that thing takes a whale of a beating from dirt and bugs when it's spinning at high speed, and the paint quickly gets beaten off the leading edges. You might consider having the fan blade powder coated and baked. Maybe also the belt pulleys and the generator fan (but do not paint inside the pulley V-grooves).
Early MGA 1500's had the fan blade and water pump pulley painted dark red in assembly with the engine. The fan blade was switched to safety yellow sometime during the 1500 production run. When in doubt paint it yellow and say it's a safety update. I always paint the pulley red as did the factory. Safety Yellow is commonly known as School Bus Yellow, Duplicolor T-211. "School Bus Yellow" is available in spray cans at many auto parts or hardware stores. It is commonly available in the Rustoleum brand, but that stuff takes forever to dry, and it probably won't cover completely in one coat without sags and runs.
Clean the fan blade as well as possible. Patience and effort will pay off here. Spray the first coat VERY THIN to avoid runs, and allow to air dry at least several minutes. Then spray on a second coat just a little heavier, but still don't expect it to cover completely yet. Don't rush it. Avoid runs. Allow to dry for several minutes. Bake at 250dF for 30 minutes. Allow to cool to room temperature. Spray on another coat of paint, dry for several minutes, bake as noted, and repeat for a few more coats. After that it holds up quite well to the onslaught of high speed dirt and bugs impinging on the leading edges of the blades. In any case, use enamel, not lacquer.
The starter and generator were originally painted dark red along with the engine at the factory. However, all of the replacement starters and generators were always painted satin black (not full gloss), because they were to be used on a variety of different cars with engines of different colors. Consequently, almost all MGAs now have black starters and generators. So do dark red for a show car or black for a daily driver. If you're trying to reproduce a competition car, go with the update colors and replacement bits, as any car with any significant driving time on it always had these parts "serviced" or replaced.
Air cleaners were always painted satin black (semi-gloss) as well as the heater box, radiator, and a lot of loose brackets in the engine bay The frame and all the chassis parts were originally chassis black (flat black). You may notice that many show cars have these parts in high gloss black, which actually looks a bit strange to me (and makes my car look bad even when it is perfectly original). But for some reason the general public likes to vote for these cars, and I have never known a concours judge to deduct points for it (well, not for an MGA anyway). To this day I still use semi-gloss black, and I like it and don't care if the general public doesn't. It's easy to match and requires no extra labor for finishing, and you can leave it dirty to be exactly correct. These cars were built to drive, and the spit shine and polish models are in the definite minority. A select few premier concours events may deduct points for improper gloss, but that would be very rare and unlikely (read the rule book).
The aluminum intake manifold and thermostat cover were originally painted dark red with the engine, but to be perfectly original you should do a poor job and miss a lot of spots, especially on the under sides. As a result of this original condition deteriorating with time, many people just strip the paint and leave the intake manifold and thermostat cover in bare natural aluminum. To me that looks just as good and natural as a black starter and generator, because that's what most MGAs have been wearing in public for the past 40 years or so.
The SU carburetors were originally left bare and would collect a nice fading patina. Like other aluminum parts they clean up nicely with lacquer thinner of brake cleaner, and may be made brighter with certain chemical bath. Polishing the carburetors to a chrome like finish is not particularly difficult, but will look somewhat odd to the trained eye. Chrome dashpot covers are available, but anything chrome under the bonnet "should" look out of place. Overly chromed cars (street rod appearance) will often collect votes at a popular vote car show, but maybe a little less so at exhibitors vote car show. I happen to prefer "low maintenance original".
>"What do you use for exhaust manifolds and other items that see high temp?"
Nothing. I leave the exhaust manifold as cast, let it rust, same as original. However, if you want something different there are high temperature paints that can be used on the iron exhaust manifold (but probably wouldn't stay on tubular headers or exhaust pipes). I don't like bright silver aluminum or chrome paints, but high temp paints are available in a variety of more subtle colors, like cast iron gray, dark blue gray, or black. Ask your local auto paint store, or check at an auto parts store. Also check the Eastwood catalog for all sorts of restoration paints and finishes. I might prefer stainless steel pigment which is more gray and not so shiny. If you have lots of money and like a classy finish you can go for "Hot Jet Coating" (use a search engine for this one).
The steel bracket for the optional Tudor windscreen washer bottle was originally painted "Tudor Blue" (imagine that), like Royal Blue, but most will often be repainted black with restoration.
You may note that there was originally no chrome anywhere in the engine bay. The oil filler cap was zinc plated. Valve cover retaining parts were painted in assembly, including the rubber grommets. Most replacement hardware is plated zinc or cadmium or nickel, and replacement black rubber grommets are generally left bare. Distributor housing and heater valve were left bare. The bracket holding the choke and throttle on top of the manifold was originally red, but is most often painted black with restoration work, especially if the manifold is left bare aluminum.
The copper water return pipe from the heater forward was left au natural and allowed to accumulate a nice dark patina with age. You can clean this up shiny with lacquer thinner and wire wool, and it will soon go properly dark again. Some show cars will have it polished to a high gloss and clear lacquer coated, which looks just as strange to me as chrome plating. Occasionally some real whacko will leave the copper top tank of the radiator bare and polished, but again it might as well be chromed if you do that.
Oops. I fear I may have offended someone with that last remark.
 At 12:03 AM 10/20/04 -0400, Tom Pollak wrote:
>"Included are photos of my MGA. You will please note the radiator that has been this way since 1972. .... Let's see, 1972 just might make me the ORIGINAL "real wacko"!
>
>Really, the beautiful British brass polishes very easily and is eye catching at shows. Admittedly, it is not original but it is a lot easier to maintain than paint."
The master cylinder and wiper motor were never painted by the factory, just left to rust. If you want to keep these looking nice without rust, just buff them up a bit and spray them with clear lacquer. The sheet metal body was all one color, being originally painted in assembly before mounting on the chassis. The chassis was painted in assembly, always all black. As a result, the heater shelf is body color while the bulkhead below it is black (part of the chassis). See more body and chassis paint detail in the next article. These cars were originally built on the cheap, no chrome under the outer skin, natural black rubber bits, and quite a few small steel parts (like wire hose clamps) with no coating at all.
Have fun painting and detailing. Nothing spiffies up a neat old car more than a nicely detailed engine bay. As for me, well I just treat paint as a preservative, and don't give a hoot for car shows. Drive 'em till they drop, and then restore 'em again to drive 'em some more.
|