The MGA With An Attitude
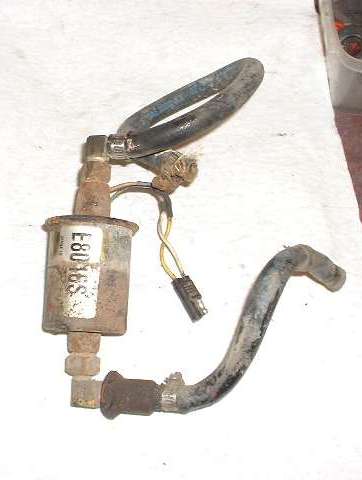
Here we have an aftermarket fuel pump for emergency use (or permanent installation).
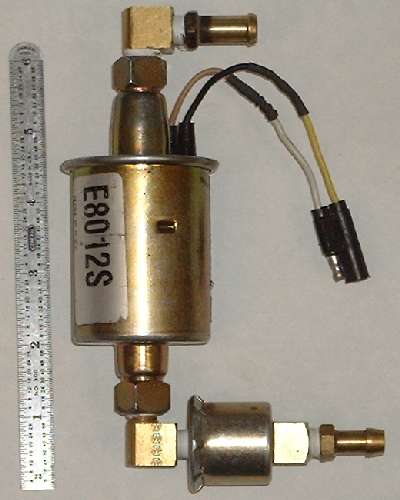
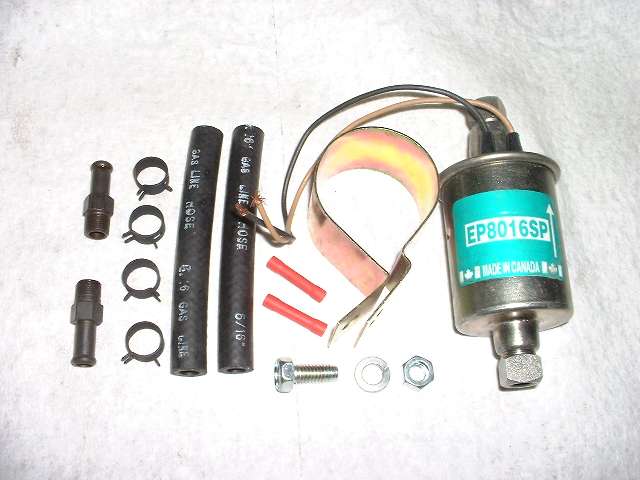
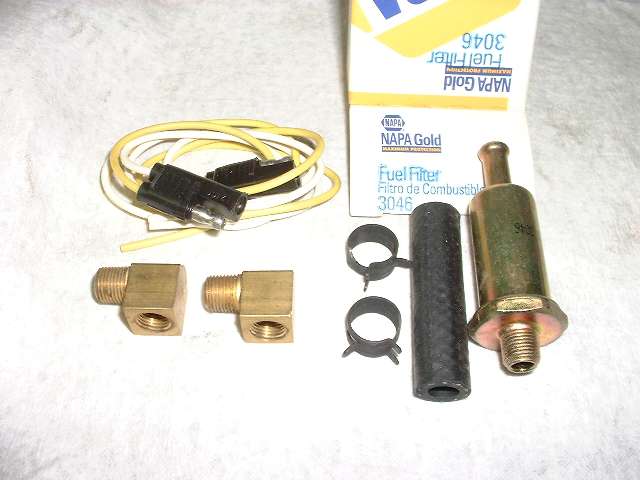
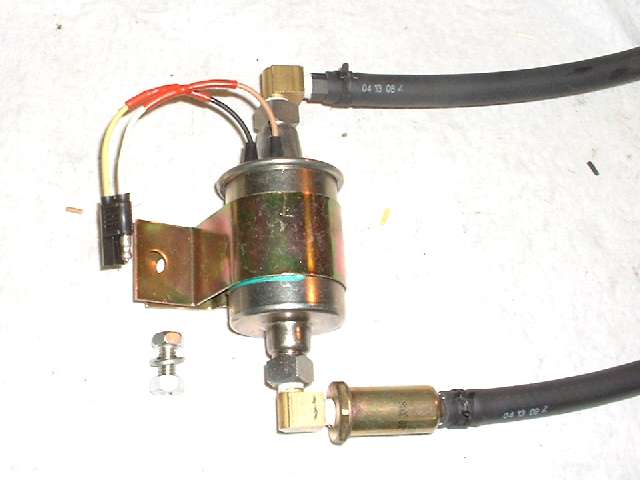
For my own use I have decided to make it a permanent installation. The first one cost $27 in 1989 and ran faithfully for 85,000 miles without incident. When it did give out it had a fairly friendly mode of failure with plenty of warning, just had a gradual loss of pressure over several hundred miles of travel. As such, the first sign of a problem was when pulling a long uphill grade at speed while towing the trailer, and the engine started to sputter, but it settled down okay if held down to 60 mph. As time and mileage progressed it got to the point of nagging me on most any upgrade at 60 mph, and when I continued to ignore it the thing gradually slowed my progress until I had trouble keeping up with traffic, at which point I got ticked off and pulled over at my next convenience to change it. If it has to eventually fail, that's a nice way to go, so it doesn't leave you stranded. The second one ran for 12 years and 100,000 miles. Static fuel pressure was then down to 2-psi, so I installed a new one as preventative maintenance. For my MGA I installed it in the same location as the original fuel pump, right next to the battery carrier near the right rear wheel. If you were a bit of a contortionist you might be able to accomplish this through the battery cover opening without removing the wheel. As the instructions note, the preferred orientation is somewhere between level and with the outlet end up, but not with the outlet down. I think it has free floating gravity assisted check valves, and a friend tells me from experience that it definitely does not work upside down. As a matter of space and convenience for routing the hoses I added the two brass elbows shown in the picture. The first time I had to replace this unit I also installed the rubber harness connector shown. Now the R&R is about a 5 minute job, just pinch two hose clamps to remove the hoses, unplug the connector, loosen the mounting bolt and lift the pump from the mounting clamp. Installation of the new unit is the reverse of removal. You can find fuel pumps like this with identical physical form but with very different pressure ratings. There is a low pressure unit good for our LBCs rated at 2.5-4.5 PSI and 30 GPH free flow. This is commonly touted as being "for imported cars". The next step up is 4-7 PSI and 35 GPH, commonly noted as "for American cars". If you get this unit you will likely need to install a pressure regulator along with it to satisfy the low pressure spec's of our LBC carburetors and avoid flooding and/or overflow of the float bowls. One to really avoid is the unit with 40 PSI output intended for use with fuel injection systems. These are available from a lot of different sources, like almost any auto parts store, but you have to pay attention to the part numbers and pressure ratings. I have so far run across the following sources, spec's and numbers: NAPA P24097, Carter E8016S, 2.5-4.5 psi. This is the one that ran 85,000 miles for me, changed out June 1997 No longer listed in the NAPA system. NAPA P74021, E8016S, 12v, 3.6-5.5 psi Current stock 9/17/01 $61.99 Counter man says he thinks it's made by Bendix. Note: The pressure spec's have changed slightly from time to time, so check the latest pressure specs before buying one. Over 5 psi is a little risky with SU carburetors. NAPA P74029, AC EP42S 6442339, 12v, 3.8-5.7 psi, 16.8 gph @ 2.3 psi actually measuring in the 2-3 psi range on the car. This one is still in service after 105,000 miles. Nov-07 This causes me to think the output pressure declines with age. J.C.Whitney 81--6652U, 4-7 psi, 35 gph free flow. This used to be listed under Marine parts (and more expensive), but I don't see this listing any more. J.C.Whitney 74--9422Y, 4-7 psi, 35 gph free flow Current catalog listing at $49.98 with price increase July 2001. This is in the picture above with tag "E8012S". I accidentally ordered the wrong part number here (a few years ago), so this one will need a pressure regulator. This is also the one that came packaged with the small metal in-line filter you see in the picture (but not the elbows). J.C.Whitney 74--9423W, 2.5-4.5 psi, 30 gph free flow, $49.98 (Jul 2001). This one should be labeled "E8016S" and is good for use without a pressure regulator. This is the one you would prefer to buy for your LBC. AIRTEX model E8016S. 2.5-4.5 psi. - 60 gph. - $30.99 from AutoZone (Aug 2003 report from Chuck Jackson) .... made in Mexico and carries the label MASTER M of Fairfield, Il. The company that actually "sells" these MASTER M products is Airtex. AIRTEX EP1816S or EP8016SP. - My most recent purchase from TRAK Auto Parts (shortly before they closed shop). I would guess the "P" in the part number represents "Pipe" thread ports. Label on the part is "EP8016SP". Printed on the box was "EP8016S". Same spec as the others, 2.5-4.5 psi. Filter was not included with this one. KEM No. EFP19, also labeled E8016S made in Canada, 3.5-5.5 PSI , purchased at Trak Auto (Sep 2001) $36.99 Autozone E2014 - 2.5-4.5 psi, 30gph free flow, $51.99 (Apr 2011) Autozone E2019 - 2.5-4.5 psi, 30gph free flow, $52.99 (Apr 2011) Advance Auto Parts - Airtex E8016S - $49.99 (sale) with filter (normally $61.99), (Apr 2011) Also available from Little British Car Company 2.5-4.5 psi, listed at $47.50 (Sep 2001) AC Delco EP42S. Found this catalog listing, but have not yet verified it to be the same as the others. I also have reports of this type of fuel pump being purchased at Pep Boys and Forest City. As you can see, they come from many retailers under different brand names, but as they all seem to bear the same base model number labels on the part itself, so I suspect they all come from the same manufacturer. The important point is that they can be purchased just about anywhere. Just for reference I have included below a copy of the installation instructions included with the pump. Use common sense in reference to positive or negative earth, tube cutting, fuel injection, fuses, oil pressure cut-off switch, or other notes intended for newer cars. 
|
||||||||
|
ELECTRIC FUEL PUMP INSTALLATION INSTRUCTION SHEET A. SAFETY PRECAUTIONS: Work on a level surface. Use safety stands for support, not a jack. Keep an ABC fire extinguisher close by. Work in a well ventilated area. Do not smoke or allow open flames near vehicle. Disable fuel pump before servicing by removing fuse or battery cables. Relieve fuel system pressure before servicing pump. B. NOTE: PHYS1CAL CONFIGURATION OF REPLACEMENT PUMP MAY NOT BE IDENTICAL TO THE PUMP BEING REMOVED, BUT REPLACEMENT PUMP WILL FUNCTION THE SAME AS THE PUMP BEING REMOVED. In some applications the new pump may not mount in the same location as the pump being removed. This kit may service more than one vehicle, so there may be some parts left over after installation. This pump will not remedy malfunctions of the filter, regulator, injectors or other fuel system components. Diagnose fuel pump using procedures in service manual to confirm pump failure before proceeding with pump replacement. C. CAUTION: NOT INTENDED FOR MARINE OR AIRCRAFT APPLICATIONS. DO NOT RUN PUMP DRY OR DAMAGE COULD RESULT TO PUMP. DO NOT REUSE FUEL STRAINER. D. FUEL PUMP REPLACEMENT: Installation of replacement pump may require that some of the mounting or electrical hardware be reused. Do not destroy any hardware that might need to be reused on replacement pump. Use #14 AWG wire or larger and a 10 amp fuse. An oil pressure switch - QS75 or equivalent should be incorporated into the power circuit to shut off the fuel pump in the event of a collision or an upset. Locate the pump along the fuel line away from heat and splash, the closer to the tank the better. Try to use the vehicle frame for mounting if at all possible. If the pump is to be mounted vertically keep the outlet side pointed up. Do not pump through a defective mechanical fuel pump to do so could pump fuel into the crankcase. It is also strongly recommended that an inline filter be installed between the pump and the fuel tank.  NOTE: If this pump is to be used to replace a defective in tank pump make sure the fuel supply is not hindered or restricted by the defective in tank pump or a plugged in tank filter if they are going to be left in the tank.
|