The MGA With An Attitude
INSTALLING MGA FLOORBOARDS - FR-110
Where you start when replacing floorboards depends on your current state of affairs. For a completely assembled car you need to remove the seats and carpet. For easier working space it also helps to remove the steering column (only 3 bolts). The dash itself is not hard to remove, but that first requires removal of the temperature sender from the engine cylinder head to snake the sensor line back through the firewall, disconnecting tachometer and speedometer cables and all of dash electrical wire connections. At the appropriate stage of restoration it might be nice if the body was off the frame for easiest access to the floor area.
Once the seats and carpet have been removed you get to attack the old floorboards. You may expect many (if not most) of the floorboard attachment screws to be securely rusted in the threads. Original floorboards might be badly rotted, in which case it may be fairly easy to cut them apart in small pieces and pull them out while the screws are still in place. The screws (originally) thread into weld nuts permanently attached (hopefully) to the frame rails and tunnel flanges. Copious amounts of penetrating oil would be the order of the day here. See Universal Tech for information dealing with rusted and/or broken bolts. Keep in mind that it is often easier to remove a bolt without breaking it than it is to repair the results of a broken bolt.
Of course the follow up to the last sentence is that you will need to check, clean, repair or replace (as required) all of the captive nuts (shiver at the thought). If you run into a lot of rust in the frame rails there may be some welding repair to attend to there, as well as re-installing captive nuts. If you are not a stickler for concours perfection, some people may not bother with weld nuts, but may install flat washers, lock washers and hex nuts below the frame. At front and back around the tunnel area there are weld nuts on the back of the tunnel flanges, and along the bottom edge of the front bulkhead panel (above the passengers' toes). That rather implies that the sheet metal parts should not be rusted in these areas (or may need repair), and that the tunnel is installed before the floorboards. Note that the rear flange of the tunnel lies in front of the rear vertical floorboard, so the rear floorboard should be installed first.
 The correct fasteners for floorboard installation are 1/4-28 (fine threaded) flat head screws with Phillips drive cross slots and pointed tips. These originally nest into flat flanged finishing washers, so no need to countersink the boards. The original style fasteners are available from Anglo Parts.
As all of the floorboard screws will be hidden under the carpet, originality may not be an issue here. You might substitute Phillips drive or straight slotted or hex socket screws (Allen heads). If you are thinking ahead to some future disassembly date, maybe think about stainless steel screws, or at least assemble them with anti-seize compound on the threads. When I last put mine together (in 1978) I used socket head screws. I didn't have original type finishing washers handy, so I used 3/8 inch flat washers and hit each one with a countersink tool to make the flat head screws seat flush with the top side of the flat washer.
You may purchase new floorboards as a ready made set. The original ones were 3/8 inch thick, whatever type plywood was cheap at the time (probably Ash), 5-ply for reasonable strength and clean surface both sides (no visible knots). They were not preserved or sealed well and were certainly prone to sagging and rotting when allowed to get wet. Hopefully modern replacements will be better material (but don't count on it). The obvious advantage of a purchased set is quick installation, hopefully drop in and install screws. But some replacement floorboard sets may arrive with no screw holes. If you have to do some frame rail repairs the fasteners may not all be in original locations. In that case lay the boards in place in the frame and poke through the mounting holes from below to mark the locations for drilling the plywood.
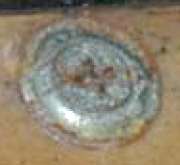
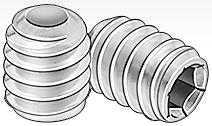 For those holes inaccessible from the bottom, install a socket head set screw (1/4-28-UNF) and leave the top end slightly exposed. Put the floorboard in place and give it a whack with your hand so the set screw will make an impression in the board. Remove the board, and drill in the location of the impression.
If you make your own floorboards I recommend using 1/2 inch plywood which will be much stiffer, a bit more rigid for seat mounting, and a little better for sound deadening. Be sure it is 5-ply. Do not (if at all possible) use 3-ply, especially if it is only 3/8 inch thick. If you do use 3-ply, orient the boards with the outer grain going the short way across the panel for best strength. Decide for yourself if several pounds difference in weight is significant. You could search out and use marine grade plywood (very expensive) which is smooth on both sides and has no internal voids. You could get fancy and use "AA" plywood (furniture grade) which is smooth and has no knots on both sides (also pretty expensive). You can just as well use "AC" or "CC" plywood. The "C" surface will have any knots cut and filled with patch pieces to give a smooth surface. Or if you're not particular about what the bottom side looks like, you could do what I did and use cheap construction grade CDX plywood (roof sheathing). The "D" surface will have exposed/visible open knots (put smooth side on top for carpeting). If using 1/2 inch plywood, the open knots will not be a strength issue. If using 3/8" plywood, you might rather have a closed/smooth surface on both sides for better strength.
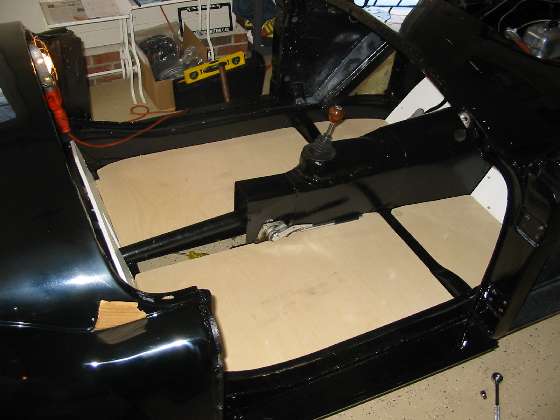
It is not particularly difficult to make your own floorboards (just time consuming). The entire 7 piece set can be made from a single 4 x 8 foot sheet of plywood. Paper patterns are available from Clarke Spares and Restorations, or you can print full scale templates from article FR-112. It is also not difficult to make your own patterns. Just drop a piece of corrugated cardboard into the frame and trim with scissors to fit the openings, then trace the pattern onto the plywood for cutting. Drop the cut plywood panels into place and poke from the underside to mark locations for drilling. Do the rear vertical board first, as that piece goes in before the tunnel. Your only real problem here might be getting the proper shape for the top edge of the rear panel where it mates with the battery cover (if you don't have the original panel to use for a pattern). Then install the tunnel complete, sitting against the rear bulkhead and against the frame closure panel that resides in front just below the frame goal post. Then install the two front standing boards (toe boards). The four horizontal boards go in last.
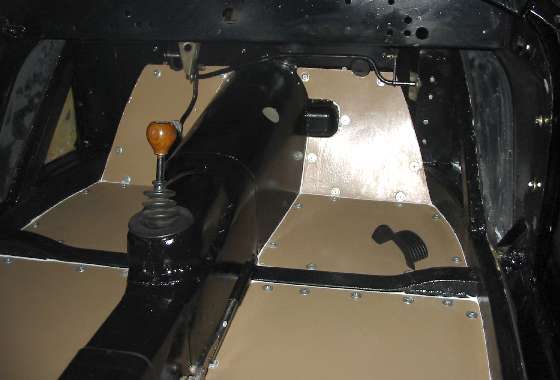
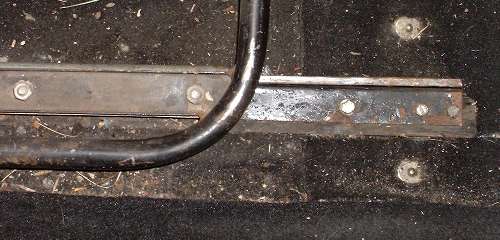
New floorboards installed and caulked all around.
New floorboard sets may not have holes for installation of carpet studs and seat rails. This should not be a problem, and may even be an advantage. If you glue the carpeting down you don't need or want carpet studs. Replacement carpet sets will usually not have Lift-the-dot fasteners installed, so you can install both the studs and the mating fasteners wherever it's convenient. Any pre-existing fasteners may be out of place anyway, especially if they have previously been replaced. For the seat rail installation you can position complete seat assemblies wherever you like for your best personal fit, and install screws in the floor accordingly.
For information on Wood Preservatives for floorboards see article FR-113.
For installation the floorboards originally had felt packing pieces underneath to serve (poorly) as weather seal. On my car these felt strips came out in total tatters when the car was only 19 years old. For a 40+ year old original setup the felt strips may be nearly gone. In my opinion the felt strips are a bad idea anyway, as they tend to hold water and cause rust in the frame rails and rot in the plywood. The felt packing strips originally used around the sheet metal tunnel joints may be equally bad for similar reason, although the rust problem usually only affects the lowest parts of the tunnel.
I recommend installing the tunnel sections and floorboards with caulking to totally exclude water infiltration. The tunnel top cover at the shift lever may be installed with felt or rubber seal for ease of future servicing of the gearbox. Otherwise the floorboards and tunnel sections may never need to be removed at all, except for possible future restoration work. [Do not believe the shop manual when it says you have to remove seats, carpeting, floorboards and tunnel to remove the engine and gearbox. That may only apply to a few very early production cars which had no removable top tunnel cover.]
Caulk underneath the floorboards to seal on the mounting rails. If you want nice appearance for concours judging, wipe off any excess caulk from the bottom where it might be visible underneath. It is also a good idea to caulk around the edges to completely fill the side gaps, especially for the horizontal boards. That keeps water out of the groove to keep it from rusting the frame and tunnel. My replacement floorboards have been in there for 18 years and 190,000 miles (to date), they look like the day they were installed, and believe me they have been plenty wet, plenty often.
Three wood screws at each end of seat floor rail.
Some cars have a single 1/4-inch bolt at each end.
I have some conflicting (or variable) information for fasteners used to attach the seat base rails to the floor. A reproduction copy of the MGA Service Parts List calls for two screws per floor rail. Some current parts catalogs call for two screws for each seat floor rail. I believe this is because replacement floor rails and replacement floor boards are commonly supplied in that pattern (similar to MGB rails). But my original MGA seat floor rails have three smaller holes in each end to accept wood screws, up to 6 per rail, 24 screws used to install two seats (although I believe originally only 4 used per rail, 16 screws per car).
Replacement floor board sets may have had "T" nuts installed (from bottom) in the floorboards as delivered. In this case the screws had coarse machine screw threads, but still 2 in each end of each rail, 8 per car. You may find more on seat and carpet installation under Interior Tech. The pertinent note here is, if you use only a single bolt for each end of the seat floor rails, be sure to install a large flat washer on the bottom side of the plywood to distribute the load so the bolt will not pull out during harsh maneuvering. In my opinion, single "T" nuts may be a bit weak for long term durability. I have seen them work loose. Loose "T" nuts are a pending disaster waiting to fall out or pull out.
 Addendum January 2010:
When I installed my floorboards in 1977 I used Paintable Siliconized Latex Caulk, 35 year warranty for outdoor use. If you caulk underneath and all around to fill the side gaps, it likely takes two 10-oz tubes. Do a good job with wood preservative, so the plywood will last as long as the caulking. Available at Ace Hardware, Home Depot, etc:
I put the car back in service in late 1986, have driven it 250,000 miles since then in all kinds of weather, lots of rain and snow, even salt laden mud in Alaska. From underneath it looks like the day it was installed, never been touched. Inside where the carpet has been wet fairly often (and holds moisture for a long time) the caulk released from edge of the plywood in a few places, but the plywood is well pickled so no rot there. In July 2008 (22 years on) I cleaned it up inside, repainted the frame where accessible, and re-caulked it inside before installing new carpet (3rd time). In short, PSLC is good stuff (and cheap too).
|
