The MGA With An Attitude
OIL PRESSURE RELIEF VALVE -- OF-111
At 02:38 PM 6/21/06, Richard Laplante wrote::
"Have removed cap plug and spring because of very little to no oil pressure and cannot remove the poppet. It seems to be jammed in crooked. Started motor briefly and plenty of oil came out of the relief valve hole. I think the poppet is wedged open. How can I get the wedged poppet out?"
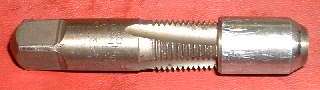
 The valve poppet should be loose and might be lifted out with a screw driver or pulled out with a magnet. If it should happen to be stuck in place, gently screw in a 1/4-18 NPT tapered pipe tap just enough to get a good grip to pull it out. For the later MGB engine with the thick button shim inside the poppet, you may have to grind the tip off of the pipe tap to get it to go in far enough to get a bite on the threads.
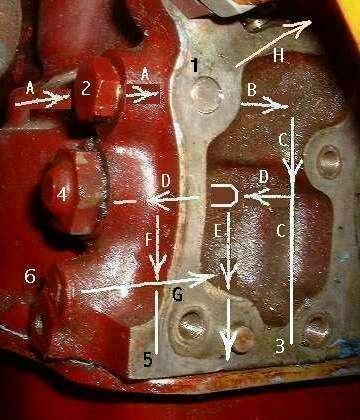 You should recall this picture from a prior article. This is at the left rear corner of the engine block, just above the sump flange. The large dome nut at center left is the cap nut retaining the oil pressure relief valve. Have a good grip on the nut when you remove it, because there is a very strong spring inside.
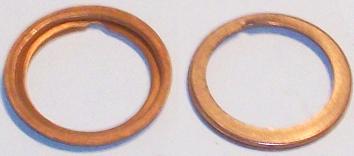
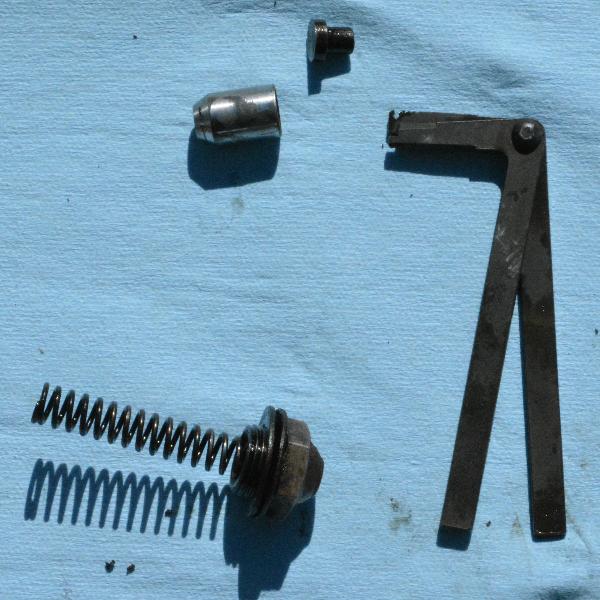
The picture below shows the parts disassembled. The book calls for two fiber washers under the cap nut, but one seems to work as well. The second one may have been intended for fine tuning the relief pressure, but neither the spring nor the gauge are likely to be quite that accurate. The fiber washers are well pinched when the nut is tightened, so you may need to replace these any time the part is removed for servicing. The fiber washers can be replaced with a copper cush washer, BMC part number 6K431B.
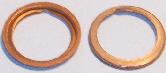 Try to get the one with extended inner flange that will screw onto the thread of the cap nut, as it will be better centered when installed (and will stay on the nut when removed).
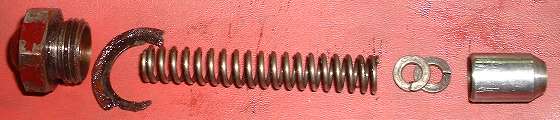
Between the spring and the valve poppet on the right in the picture are extra parts. These are a 1/4 inch helical spring lockwashers which work well for shimming the spring to increase the relief pressure setting. They are .060 to .070 inch thick. Each one installed will increase the relief pressure by about 6 psi.
 Whether or not you wish to do this is covered in another article. Later production MGB engines (5-main bearing engines GB series and later) use a single thick spacer button about 0.102" thick (BMC part no. AEH798) to set relief pressure to 80 psi using the same spring (which should be 3 inches free length).
A valve poppet which sticks in the seated position can cause excessively high oil pressure at high engine speed. If it sticks in the open position it will cause very low oil pressure at idle speed. Either condition is very bad and should be fixed immediately.
A poppet with a groove worn around the nose and/or a worn valve seat in the block can cause a fluttering of oil pressure which might be seen on the pressure gauge. This is not detrimental to the engine, but can be irritating to see. The cure for fluttering pressure is to install a new valve poppet and lap it in place. For a valve lapping tool use a 1/2 inch wooden dowel with a bit of tape around the end if necessary for a snug fit in the poppet. Use a touch of valve lapping compound on the nose only, not on the sides of the poppet. Lap the valve in manner similar to hand lapping cylinder head valves. Continue lapping until you get a continuous buff mark all around the nose of the poppet. Clean out all remaining lapping compound before reassembly.
To install the oil pressure relief valve assembly, use a wrench socket. Put a hex nut inside the socket if necessary to hold the cap nut about flush with end of socket with the threads exposed. A short extension on back of socket makes a nice handle. Place cap nut in socket, followed by seal washer(s), spring, shim (if used) and poppet. Push all into the block, push firmly on the socket to engage threads, and screw it into place. Additionally, it may help to assemble the cap nut first without the internal parts, and mark the orientation on the side of the nut where the threads first start to engage. That way when you get to the point of pressing on the spring, the first 1/4 turn may get the thread started.
On 4/11/2022, Tim Ross <-thr at nbnet.nb.ca-> in Fredericton, New Brunswick, Canada wrote:
"I just removed the oil pressure relief valve from my 1956 MGA and found some oddball things.
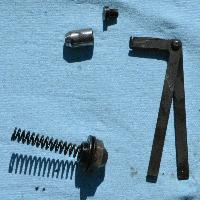 I got the valve out easy using the tool on the right in the photo. The tool is a stuck case extractor to remove brass casing from a rifle when the head separates.
The odd item in the photo is the tee shaped stud that was at the end of the spring. It has a head under 1/2" diameter and 0.14" thick with a shaft of 5/16". I assume it is a spacer.
The original spring measures 2.9". I will be replacing the valve and spring". -- Regards, Tim Ross
|