The MGA With An Attitude
RUBBER REAR SEAL for Three Main Bearing Engine - CS-202B
The rear seal installation is in 5 steps spanning 5 web pages.
Click green arrow at bottom to follow pages in sequence.
A - Modify rear plate
B - Machine slip ring - (this page).
C - Modify Viton seal
D - Modify bearing cap
E - Assembly
F - Can I buy it?
G - Video Installation
H - Follow-up notes
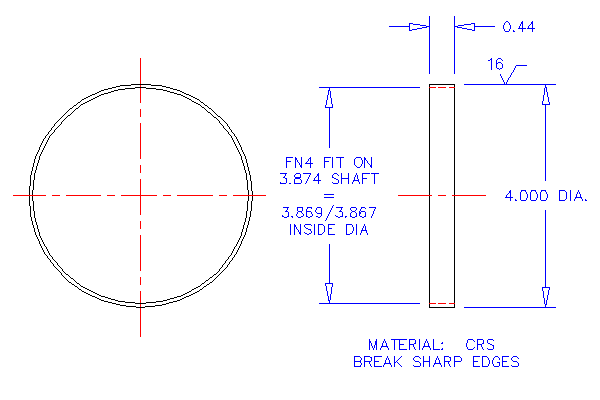
The new seal needs a smooth surface to ride on at the end of the crankshaft. The crankshaft flange is 3-7/8" diameter, and the new seal is 4" diameter. That leaves just enough room for a steel ring 1/16" thick to be mounted on the rear flange. Because of thermal expansion of the ring due to heat in the engine, the ring needs to be a tight press fit on the flange so it doesn't work loose while running. The resulting interference of the parts (0.005-0.007") is such that you may need to heat the ring to 350-400 degrees Fahrenheit to install it (175-205 degrees Celsius). I managed to install it without heating by resting a flat metal plate against the ring and starting it onto the flange with a sizeable hammer. After that I put the flywheel in place and tightened the retaining nuts to force the ring back onto the flange.
|
 |
 |
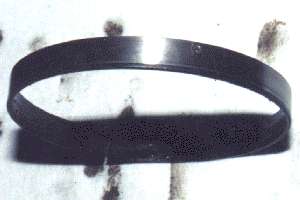
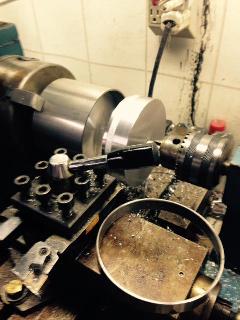
Machined seal slip ring - (dimensions below)
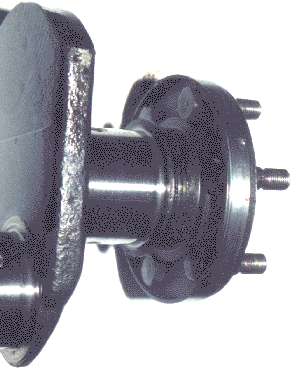
 Slip ring installed on crankshaft
|
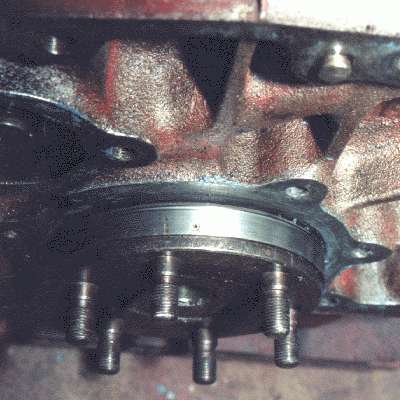
Slip ring on crankshaft installed in engine block
In the picture above you should notice a little circle near the front edge of the ring. That mark is the top of a 1/16" diameter steel roll pin. After the ring is installed to the correct position on the flange, a 1/16" hole is to be drilled through the ring and into the crankshaft flange about 1/10" in from the edge of the ring. With the rear plate and oil pan removed this hole is easy enough to drill from the bottom of the engine. The 1/16" steel roll pin is then tapped into place, and the top of the pin is ground down flush with the surface of the ring with a hand grinder. The purpose of this small roll pin is to prevent any movement of the slip ring on the crankshaft when the engine is hot and running. Been there, done that, and don't want to do that again.
A small buff mark in the ring at this point is not critical, as the rubber lip of the new seal rests on the ring much closer to the engine block. You can just see a small shiny rub mark from the seal near the edge of the ring next to the engine block. Rather than installing this roll pin, you may prefer to use a high temperature bearing set adhesive to secure the ring.
Just to the left of the roll pin in the picture there is a short mark on the ring running from the near edge toward the engine block. This is a very shallow bite mark left by the chucking jaws of a crankshaft grinding machine when the crank was reground once after the ring was installed. This mark also does not affect the seal, as it does not extend into the area of contact for the rubber lip seal.

Notice in the drawing below that the original machining of the ring requires a surface finish of 16 RMS as a smooth running surface for the seal.
|
Slip ring machining
 On Mar 11, 2016, Tom Young in Georgetown, Kentucky, USA wrote:
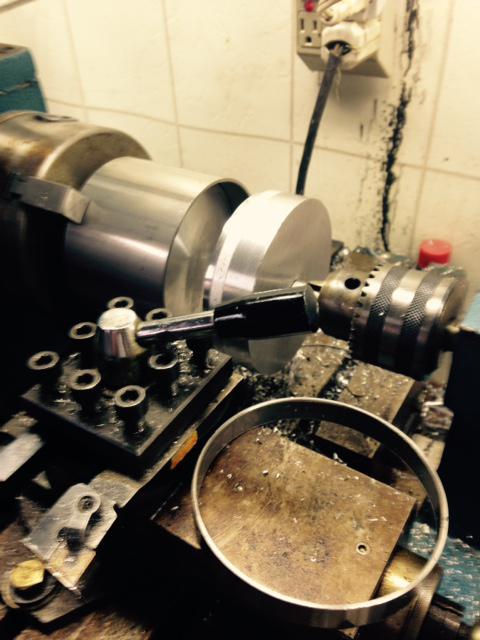
"I was cutting some slip rings for another member. Learned a lot. He sent me the tubing and I cut the rings. What I learned was that you have to make an inner aluminum plug for the lathe jaws to hold the tubing. Then on the tailstock end you have to make a plug with a bearing and a stud to hold that end. That prevents the ring jumping off when cut. The plugs prevent the tubing from shifting when cutting pressure is applied".
|
|