The MGA With An Attitude
REPLACING DASH KNOBS -- DT-103
This is a quick note on replacing dash knobs.
At 04:37 PM 4/1/02 -0500, Wayne Rasmussen wrote:
>"I've been able to replace all of the knobs on my MGA with the exception of the starter and choke. Neither of these knobs have the small hole on the bottom, and I'm reluctant to grind them off. Will I need to replace the cables in order to change the knobs"?
If you have the new knobs, they can be installed. To remove the (two) bonded knobs, crush them in a bench vice to pulverize the plastic for removal. To install the new knobs, just attach them in place with two part structural epoxy (a.k.a. "J B Weld"), available for a few dollars from any discount auto parts shop.
On February 11 2006 Jim Ferguson wrote:
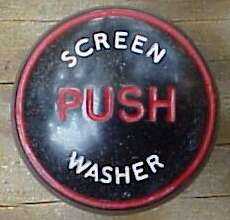
>"I restored my old knob with the original colors. See image.
On February 11, 2006 Cam Cunningham in UK wrote:
>"All my dash knobs have red lettering and are original (except the choke which is a replacement). My car is black with red interior - could be something to do with the colour scheme or special order (mine was a RHD European export)."
Most original issue dash knobs, and maybe all currently available replacement parts, will be black with white lettering. Apparently some original issue dash knobs had red logo, particularly if the car had red interior. Dates of original manufacture are unknown.
Your first encounter with an MGA dash switch will likely be figuring out how to remove the knob. The trick is to press in on the little button on the bottom, and pull. If that doesn't do it, press harder, and pull harder. You could make a special tool to assist in this operation,
 see article TS-213. If that doesn't work, get a ViceGrip and crush the knob into little pieces.
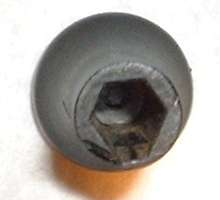
Looking at the back of the knob you will see a hexagonal hole that is slip fit on the switch shaft. At the bottom flat of the hex there is a small ramp that serves as a lead in for the retaining pin. This becomes more significant later.
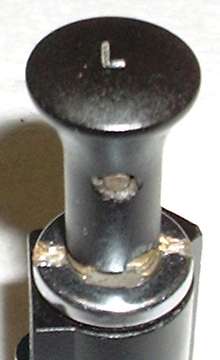
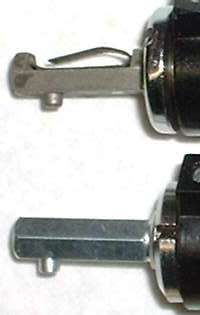
Here we are looking at two types of switch shafts. The one at top is an original equipment type, and the other is a modern replacement type switch. Looking at the side of the shaft you can see the spring loaded pin that secures the knob on the shaft. For the OEM part the pin has a small flat head and extends through half the thickness of the shaft for a long bearing surface and fairly stable pin, and there is a leaf spring to hold it in place.
When you place the knob on the shaft the pin is easily pushed back as it slides up the little ramp inside the knob. Pushing further the knob captures the top side of the leaf spring forcing it down to apply strong pressure on the pin. With the knob pushed fully home the pin snaps out to engage the hole in the bottom side of the knob to hold it securely on the shaft. Additionally the leaf spring maintains pressure on the knob making the knob one with the shaft to serve as an anti-rattle device. These can be disassembled decades later with a push on the pin and pull on the knob.
|
|
For the replacement type switch the pin also has a small flat head. This is placed into a drilled hole in the shaft along with a compression coil spring, and the side of the shaft is swaged to hold the pin in place. The pin has very short engagement with the shaft, so it tends to wobble around easily. The pin also protrudes a little farther than the original part, so you have to depress the pin a bit before the knob will pass over the pin. Then press the knob home, and the pin snaps into the hole in the bottom of the knob to secure the knob on the shaft. The difference here is that the knob is a loose slip fit on the hex shaft, and there is no anti-rattle device, so the knob will wiggle around a bit. I have never heard anyone complain about the knob buzzing with resonant vibration while driving, but it can have an uncomfortable feeling of being loose in your fingers. Another issue with this is that the spring loaded pin in the blind hole may tend to load up with dirt or rust over time making it difficult to depress the pin to remove the knob many years later.
|