The MGA With An Attitude
BRAKE TUNE-UP - BT-110
Sticky wheel cylinder pistons or incorrect master cylinder push rod adjustment will result in a 'dead' feeling pedal. Air in the system is the most common cause of 'spongy' pedal. These are the most common of storage-related brake problems.
When you have hydraulic pressure (firm pedal half way down the stroke), Raise the wheels off the floor, have a helper step on the brake pedal, and see if the wheels are locked. If you can turn a wheel with brakes applied, you may have a stuck slave cylinder. High hydraulic pressure will almost always overcome a clogged hose, but a clogged hose will often prevent a brake from releasing. You must repair any faulty hydraulic cylinders or hoses before final adjustment and/or driving the car.
An obvious and serious brake problem is indicated by the abnormal loss of fluid once the car is put in service. Do not just keep on filling the reservoir; clean and tighten the brake fluid connections. Look for fluid seeping out of the cylinder seals. Pay special attention to the master cylinder. If wheel cylinders leak into the brake assembly, the fluid quickly ruins the shoes.
 Leaky rear oil seals are also a prime source of brake contamination. Often, both leaky wheel cylinders and oil seals rob your stopping safety. Determine the culprit and correct the problem.
Shoes that have been soaked with brake fluid and oil may sometimes be reclaimed with a proprietary brake cleaner, but it is usually necessary to replace them, as rear axle oil will soften the friction material, greatly reducing its efficiency and safety.
As brake fluid is susceptible to water contamination, it is essential to bleed the brake system at least once every 24 months. Worn seals will allow air to enter the system without a sign of fluid leak. The need for repeated bleedings is a sure indicator of this fault.
Absolute cleanliness is essential when servicing brake systems. Be sure that the master cylinder top is clean before it is opened, so no dirt or grit enters the system.
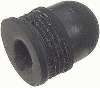 Small rubber caps (Moss 031-300) are available to cover bleed screws, and are an inexpensive and convenient way to keep dirt out of the bleeders. Wash the back plates and any other gritty areas before anything is disassembled for service. Remove the drums and clean the parts with brake cleaner or soap and hot water. Do not use an air blast to clean brake assemblies. The asbestos particles are a proven carcinogen. Do not handle the clean parts with dirty hands.
Carefully inspect the cylinder bores. Units having rust pitting, score marks, and 'rings' left by corrosion must be replaced. Internal parts must also be in good order. Disc brake pistons that are rusted or corroded will not hold a seal, nor will plungers and pistons that are scored or worn on one side.
Examine the rubber hydraulic hoses. The connections to the metal piping are commonly covered in grease. This area should be kept clean so any indication of cracking or swelling can be observed. An uncommon problem with rubber hydraulic hoses occurs when the inside of the hose swells and cuts off the fluid flow. No problem is apparent on the outside. If you are bleeding the system and no air or fluid passes from the cylinder in question, consider removing the rubber hose for close inspection.
It is preferable to visually inspect front drum brake systems where two cylinders are used. Back off the adjusters to permit the removal of the drum. Get a helper to push the pedal gently. Observe the action of the cylinders' pistons - only one cylinder may be working, while the other may be stuck. That will stop the wheel, but not very well. If the cylinder does not retract fully when pressure is released you can see right away that it will have to be rebuilt.
Tip: Stuck pistons can be forced from cylinders by air pressure. Clean the cylinder; remove corrosion in the exposed bore. Use an air nozzle to force air into the cylinder, covering the open end with a rag to prevent damage from flying pistons.
 Turn the adjusters clockwise until the shoes come up tight against the brake drums. Then turn back one notch (or two if necessary) until the brake drum turns freely. Find two adjusters at each wheel for MGA front drum brakes. Find only one adjuster for MGA rear drum brakes.
The hand brake cable must be slack when adjusting the rear shoes. Only after proper adjustment of the rear shoes should you adjust the cable length. Proper adjustment here allows the hand lever to come up three or four notches when all is "snug". The hand lever will come up farther as the rear brake shoes wear. Abnormally high hand lever implies rear shoes needing adjustment or replacement. Repeat, do NOT adjust cable length until the rear shoes are properly adjusted first.
|