The MGA With An Attitude
Installing the MGA GRILLE, 1 - BD-102
At 09:07 PM 6/6/04 -0400, Steve Demko wrote:
>"Any tips on fitting a repo grille assembly to the MGA that I am rebuilding?"
Pray a lot. Keep plenty of ale handy. Don't rush it. Be sure the radiator is out and bumper off before you start. It wouldn't hurt if the front valance panel was also removed, making the three bottom grille bolts easier access. Run the bolts into all of the threads before trying to install it. If any of the threads bind, chase the threads with a tap to run free before going on. Those little nagging problems you DON'T need when you're facing the real problems.
>"The grille just does not want to lay in there nice and flush to the body and the piping around the grille is impossible to keep in place. Everyone I've talked to says that these grilles are a real bear to get to fit properly and that the piping is always a headache to try and keep in place."
Could be right. Last time I bought a new grille was in 1986. I'm not sure it was right then either, but it only took me a day or two to get it to fit (yikes). I think the newer ones might be "less correct". I have never seen a repro grille that fit like the original ones, so any one of them may be a challenge, maybe some just worse than others. Not encouraging enough yet?
When I restored my car I had to deal with a somewhat mangled nose. In particular the grille opening at the top corner passenger side was munched in, step bead flattened, and had a couple of cracks in the sheet metal running away from the opening. I welded the cracks first, then heated the metal and bumped it up from behind as best I could. There was an area about the size of one hand right around the corner of the opening that was located generally over the top of the inside steel body brace channel so I couldn't hammer it up from behind. In that area I filled it with body lead, which is almost a lost art, but easy enough to learn if you need it. The lead fill is about 1/8" thick in the heaviest places near the inside radius, thinner farther from the corner.
In the process I remodeled the stepped recess around that corner of the grille opening, sort of sculpted in lead, using the replacement grille as a template. I may have also moved the grille a smidgen sideways to fit better at the other top corner. Once the body surround matched the grille profile fairly well, I cleaned and painted the body, and it fit well enough to assemble for reasonable appearance. 125,000 miles later in 1998 I had it apart to repaint the car again, nothing much changed, and it went back together okay again. For the record, I have fitted the piping all the way around with the butted ends at bottom center. This is not original, but it has not been particularly difficult, so I figure it is good to buffer the edge of the grille away from the body paint along the lower edge. Some people ultimately give up with less than total success and install piping over top and down sides, stopping at bottom corners, not running across the bottom. Original issue piping was 48 inches long and stopped about 2 inches in from the lower corners. This may look best if the piping ends are tucked up inside to hide behind the grille surround.
Original grilles had brass surround shells, triple chrome plated, with stainless steel slat insert. Most repro units have steel shells, barely chrome plated. Some have cheap chrome right on the base steel and tend to rust and/or flake off in a year or two. Some have thin chrome over copper flash, which is a little more durable, but sometimes bleeds through to the surface with copper color stain. I think some of the newest ones now are triple plate on steel, copper flash for adhesion, nickel plate for thickness and durability (bare minimum I suppose), and thin chrome on top for appearance. Still nothing like original quality, but better than in past years, nothing to write home about.
To add insult to injury, a few years ago there was a batch of repro grilles with molded plastic shells, absolute crap, thin and flimsy, flexible, wouldn't lay flat, and not close to the right perimeter shape either. To the best of my knowledge they were always returned with complaints, and I do not know of even one which was kept and permanently installed (although there could still be one out there somewhere).
First problem with a new grille is that it may not lay flat against the body. As I understand it, they usually touch at top center and lay maybe 1/4" away from the body at the top corners. If you stand in front and press the top corners with the flats of your hands you may be able to bend it to match the contour of the body. This is not a permanent set, but more like a leaf spring which will go back to original state when you let go. So it can help if you sprout a couple extra arms and hands to hold it in place while you fiddle with the screws. To make this contortionist chore tougher, you need to tuck the thin edge of the piping behind the edge of the grille while you are pressing it into position, so maybe 5 or 6 hands would seem more appropriate.
I also seem to recall on mine the tabs that carry the captive nuts, three at top and three at bottom, were not formed in the proper plane. The bottom ones need to be horizontal to lay on top of the air pan ahead of the radiator. The top ones need to be angled back and downward to match the angle of the flange at the top of the grille opening. Life should be easier if you can get these six tabs to line up with the mounting holes in the body, taken one at a time first. When each can be made to reach the mounting hole, then you can get down to pressing on the corners of the grille to see if they might all line up at the same time.
If you are attempting to fit the grille first without the piping, do not be too surprised if you chip the paint. If that happens, maybe you get lucky and the piping will ultimately cover the marks. Otherwise you may have a little paint touch up to do after the fact.
Some comments I recall from a few years ago said the outside corners of the grille surround had too large a radius. This makes it leave a small lateral space between the piping and the step in the body shell at the top corners. With piping in place this may not look too bad (but not concours). The key to success here seems to be to press the shell firmly against the body when the bolts are tightened, so it stays there with no gap and holds the piping nicely in place (without falling out).
For the bottom corners the overly generous radius leaves a slightly obnoxious flat surface showing just inboard of the step in the body shell, which terminates going straight down, effectively making a square corner for the bottom of the grille opening on the body. The larger the radius on the shell the "less original" it looks. Here too it will have better finished appearance an be less noticeable if the piping runs around the corner and at least part way across the bottom. Originally the piping ran just a few inches inboard after making the bottom turn, no piping across the rest of the bottom edge. It is not terribly difficult to run the piping all acroos to meet in the middle, and I think it lools better, but not concours. Either way, running piping around the bottom corner is much neater than stopping short and square near the bottom at the sides.
This may a two 6-pack job, but it is one of the prime appearance items on the MGA, so have patience and do try to get it right. Keep the faith. Keep the faith. Keep the faith.
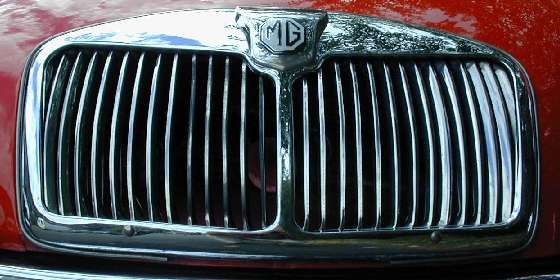
Aftermarket grille with large corner radius top and bottom (and incomplete piping).
Thanks to Walter Tange for the picture.
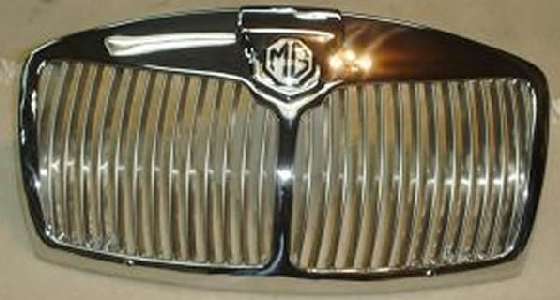
Better reproduction grille from Jorge Cervera.
Note the more square outer corners, and slats with correct curvature and angle.
|